Cititi toate instructiunile cu atentie inainte de a folosi ...
46
Cititi toate instructiunile cu atentie inainte de a folosi acest produs. Pastrati acest manual de utilizare pentru referinta viitoare. !
Transcript of Cititi toate instructiunile cu atentie inainte de a folosi ...
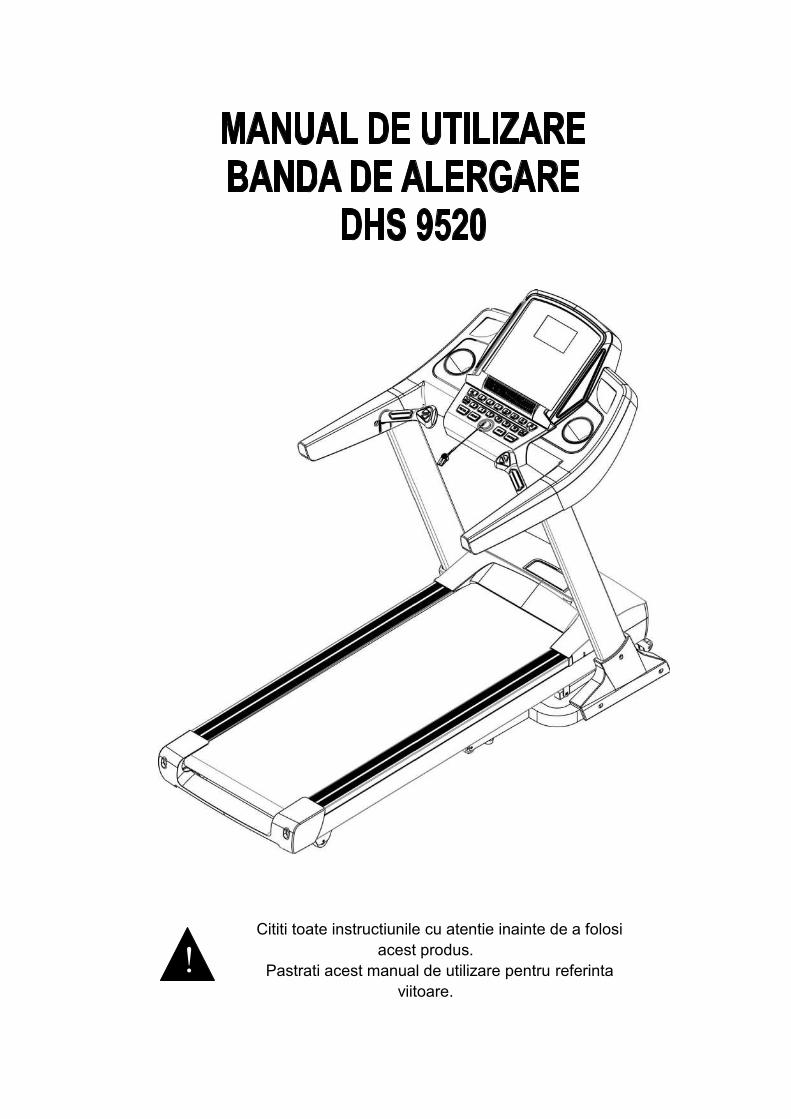
Cititi toate instructiunile cu atentie inainte de a folosiacest produs.
Pastrati acest manual de utilizare pentru referintaviitoare.
!
1
Avertisment:Inainte de a incepe antrenamentul periodic si intensiv, consultati doctorul. Acest consult este necesarpentru persoanele cu varsta mai mare de 35 ani sau cu probleme de sanatate. Trebuie sa respectatiintotdeauna instructiunile de siguranta, in caz contrar nu ne asumam responsabilitatea eventualeloraccidentari. Conectarea la curent a benzii de alergare se va face doar dupa ce banda a fost asamblatacu atentie, iar carcasa motorului a fost montata.
ATENTIE:1. Inainte de a incepe antrenamentul, asigurati-va ca clemele de siguranta au fost atasate la hainele saucureaua dvs.2. Va rugam sa nu introduceti nici un obiect in nici o parte a aparatului,care ar putea deteriora aparatul.3. Asezati intotdeauna aparatul pe o suprafata plana, curata. Nu asezati banda pe covor des deoarecepoate impiedica ventilatia corespunzatoare a benzii. Nu folositi banda niciodata langa apa sau in spatiideschise.4. Nu porniti niciodata banda de alergare daca sunteti asezat pe covorul de alergare. Dupa pornireabenzii si reglarea vitezei poate exista o pauza inainte de punerea in miscare a covorului de alergare,stati intotdeauna pe sinele laterale ale cadrului pana cand covorul de alergare se pune in miscare.5. Folositi intotdeauna imbracaminte adecvata pentru antrenament. Nu va imbracati cu haine lungi saucare s-ar putea agata in banda de alergare. Folositi intotdeauna incaltaminte de alergare sau aerobic cutalpa de cauciuc.6. Nu lasati copiii sau animalele in preajma aparatului in timpul antrenamentului.7. Dupa ce ati mancat, asteptati 40 minute inainte de a incepe antrenamentul.8. Acest produs a fost creat pentru a fi folosit doar de catre adulti. Tinerii trebuie sa fie insoti de catreadulti in timpul antrenamentului.9. Inaintea inceperii antrenamentului, tineti-va de manere pana cand va obisnuiti si pana va simtitifamiliar cu banda de alergare.10. Banda de alergare este un produs destinat utilizarii in spatii interioare, nu o folositi in spatii exterioarepentru a evita deteriorarea acesteia. Depozitati-o intr-un mediu curat, uscat si neted. A nu se folosi inalte scopuri, doar pentru antrenament.11. Cablul de alimentare cu curent trebuie achizitionat de la distribuitor, deoarece se poate folosi doarcablul de utilizare compatibil cu banda de alergare.12.Daca banda de alergare creste viteza datorita unei nereguli eletronice sau daca viteza benzii cresteneasteptat, banda se va opri dintr-o data cand magnetul de siguranta nu este atasat la consola.13. Nu conectati la mijlocul cablului un alt fir; nu prelungiti cablul, nu schimbati stecherul; nu asezatiobiecte grele pe cablu sau asezati cablul langa sursa de caldura; este interzisa utilizarea prelungitoruluicu mai multe locuri deoarece aceasta poate determina aprinderea focului sau ranirea persoanelor prinelectrocutare.14. Decuplati alimentarea cu curent cand nu utilizati aparatul. Cand aparatul este decuplat de la curent,nu trageti cablul de alimentare pentru ca firele sa nu se defecteze. Introduceti stecherul in priza cuimpamantare sigura, deoarece cablul de alimentare cu current este un echipament profesional. Trebuiesa contactati personae specializate in cazul in care cablul de alimentare este deteriorat.15. Aceasta banda de alergare a fost conceputa doar utilizare acasa..16. Zona de siguranta ce trebuie lasata in spatele benzii de alergat este de: 1000*2000MM
INSTRUCTIUNI IMPORTANTE DE SIGURANTA
2
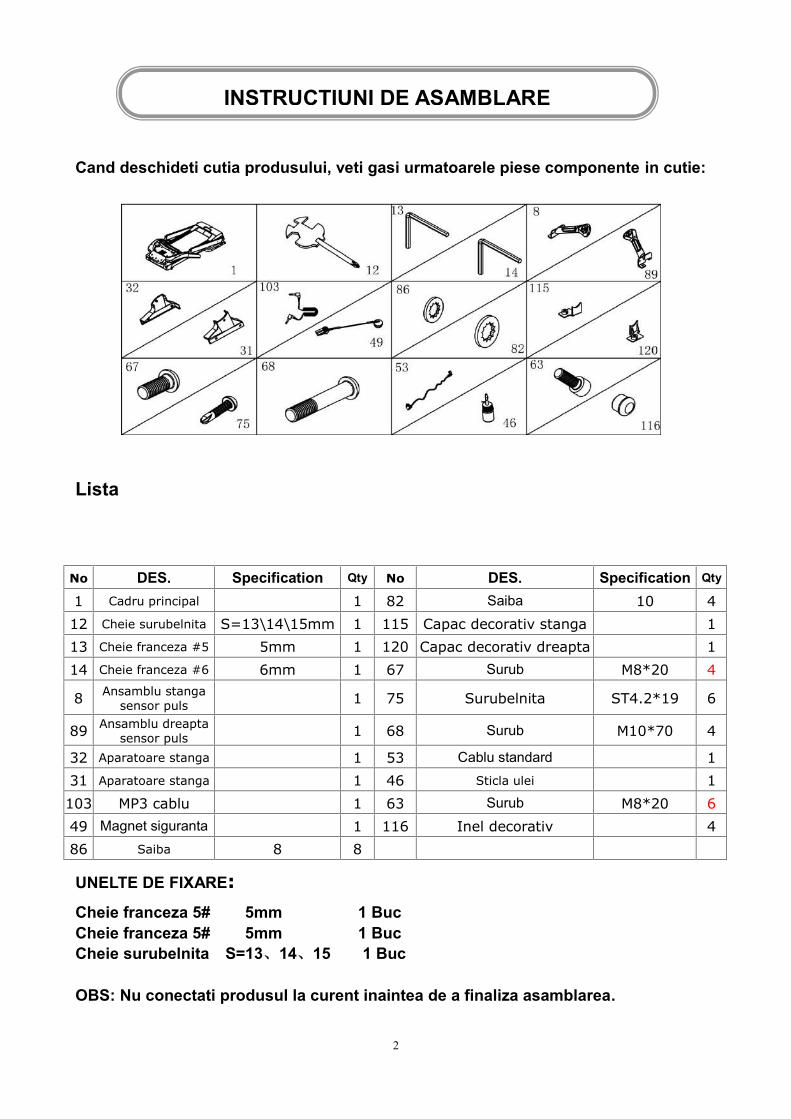
Cand deschideti cutia produsului, veti gasi urmatoarele piese componente in cutie:
Lista
UNELTE DE FIXARE:Cheie franceza 5# 5mm 1 BucCheie franceza 5# 5mm 1 BucCheie surubelnita S=13、14、15 1 Buc
OBS: Nu conectati produsul la curent inaintea de a finaliza asamblarea.
No DES. Specification Qty No DES. Specification Qty
1 Cadru principal 1 82 Saiba 10 412 Cheie surubelnita S=13\14\15mm 1 115 Capac decorativ stanga 113 Cheie franceza #5 5mm 1 120 Capac decorativ dreapta 114 Cheie franceza #6 6mm 1 67 Surub M8*20 4
8 Ansamblu stangasensor puls 1 75 Surubelnita ST4.2*19 6
89 Ansamblu dreaptasensor puls 1 68 Surub M10*70 4
32 Aparatoare stanga 1 53 Cablu standard 131 Aparatoare stanga 1 46 Sticla ulei 1103 MP3 cablu 1 63 Surub M8*20 649 Magnet siguranta 1 116 Inel decorativ 486 Saiba 8 8
INSTRUCTIUNI DE ASAMBLARE
3
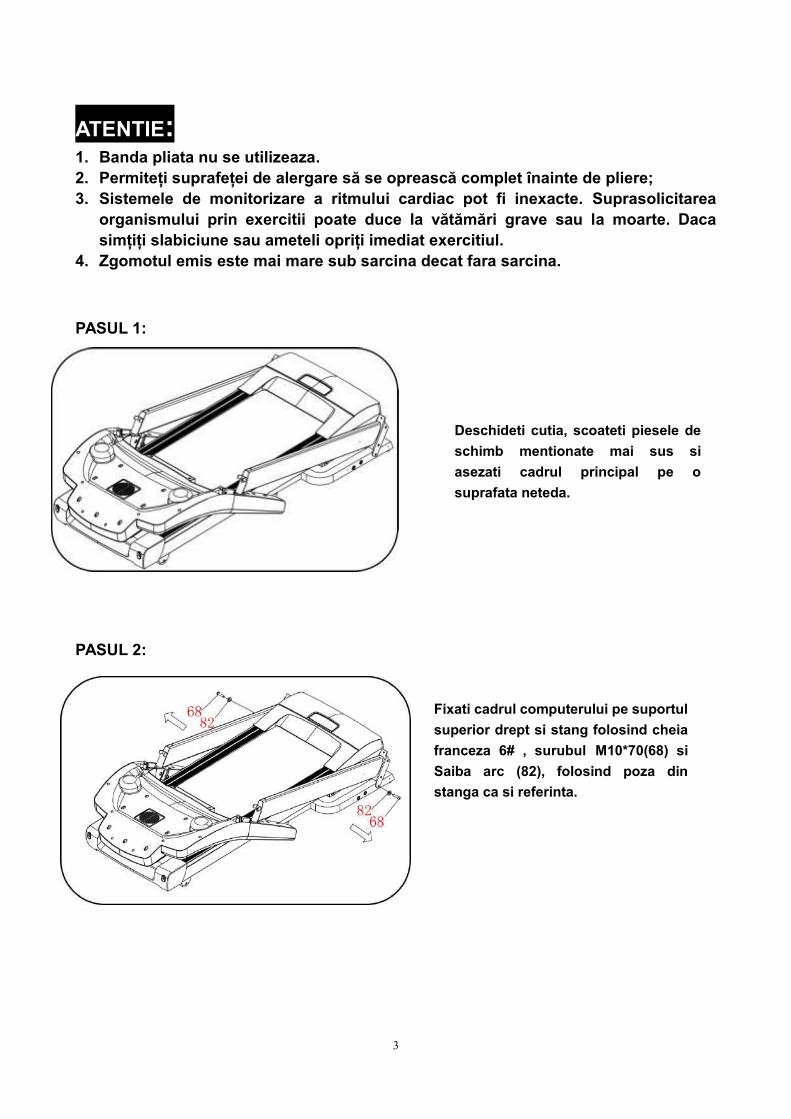
ATENTIE:1. Banda pliata nu se utilizeaza.2. Permiteți suprafeței de alergare să se oprească complet înainte de pliere;3. Sistemele de monitorizare a ritmului cardiac pot fi inexacte. Suprasolicitarea
organismului prin exercitii poate duce la vătămări grave sau la moarte. Dacasimțiți slabiciune sau ameteli opriți imediat exercitiul.
4. Zgomotul emis este mai mare sub sarcina decat fara sarcina.
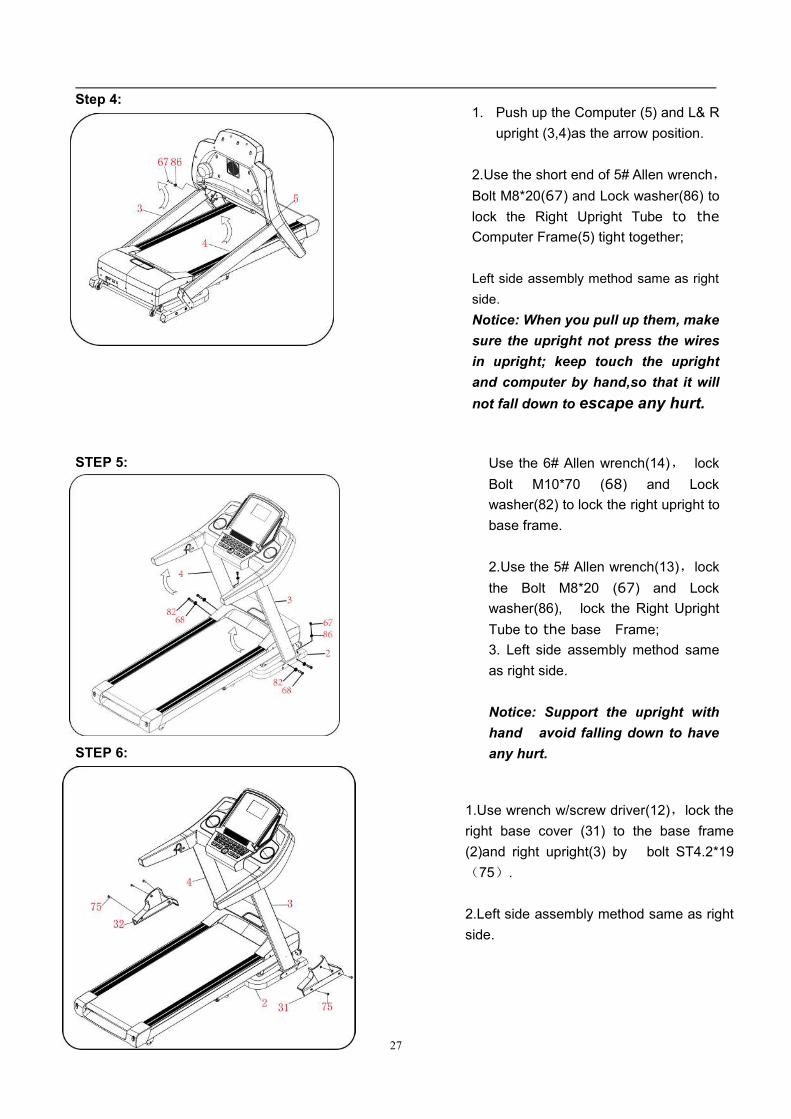
PASUL 1:
PASUL 2:
Deschideti cutia, scoateti piesele deschimb mentionate mai sus siasezati cadrul principal pe osuprafata neteda.
Fixati cadrul computerului pe suportulsuperior drept si stang folosind cheiafranceza 6# , surubul M10*70(68) siSaiba arc (82), folosind poza dinstanga ca si referinta.
4
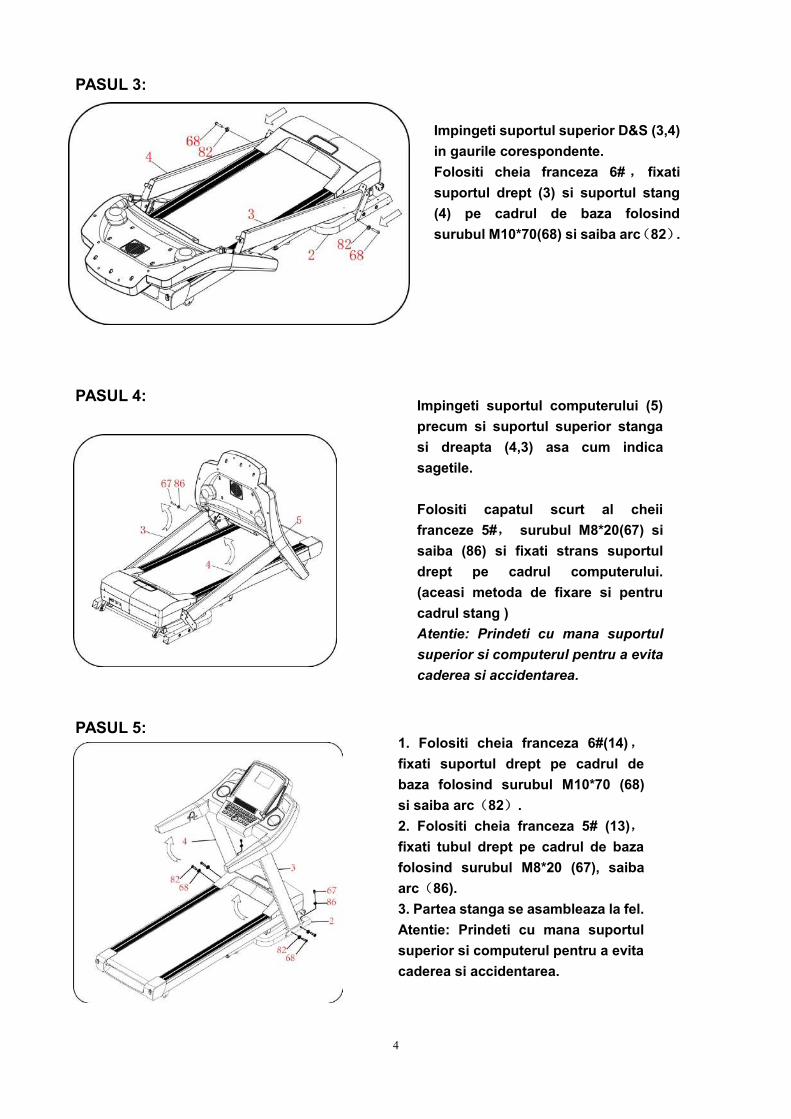
PASUL 3:
PASUL 4:
PASUL 5:
Impingeti suportul superior D&S (3,4)in gaurile corespondente.Folositi cheia franceza 6# , fixatisuportul drept (3) si suportul stang(4) pe cadrul de baza folosindsurubul M10*70(68) si saiba arc(82).
Impingeti suportul computerului (5)precum si suportul superior stangasi dreapta (4,3) asa cum indicasagetile.
Folositi capatul scurt al cheiifranceze 5#, surubul M8*20(67) sisaiba (86) si fixati strans suportuldrept pe cadrul computerului.(aceasi metoda de fixare si pentrucadrul stang )Atentie: Prindeti cu mana suportulsuperior si computerul pentru a evitacaderea si accidentarea.
Atentie: Prindeti cu mana suportulsuperior si computerul pentru a evitacaderea si accidentarea.
1. Folositi cheia franceza 6#(14),fixati suportul drept pe cadrul debaza folosind surubul M10*70 (68)si saiba arc(82).2. Folositi cheia franceza 5# (13),fixati tubul drept pe cadrul de bazafolosind surubul M8*20 (67), saibaarc(86).3. Partea stanga se asambleaza la fel.Atentie: Prindeti cu mana suportulsuperior si computerul pentru a evitacaderea si accidentarea.
5
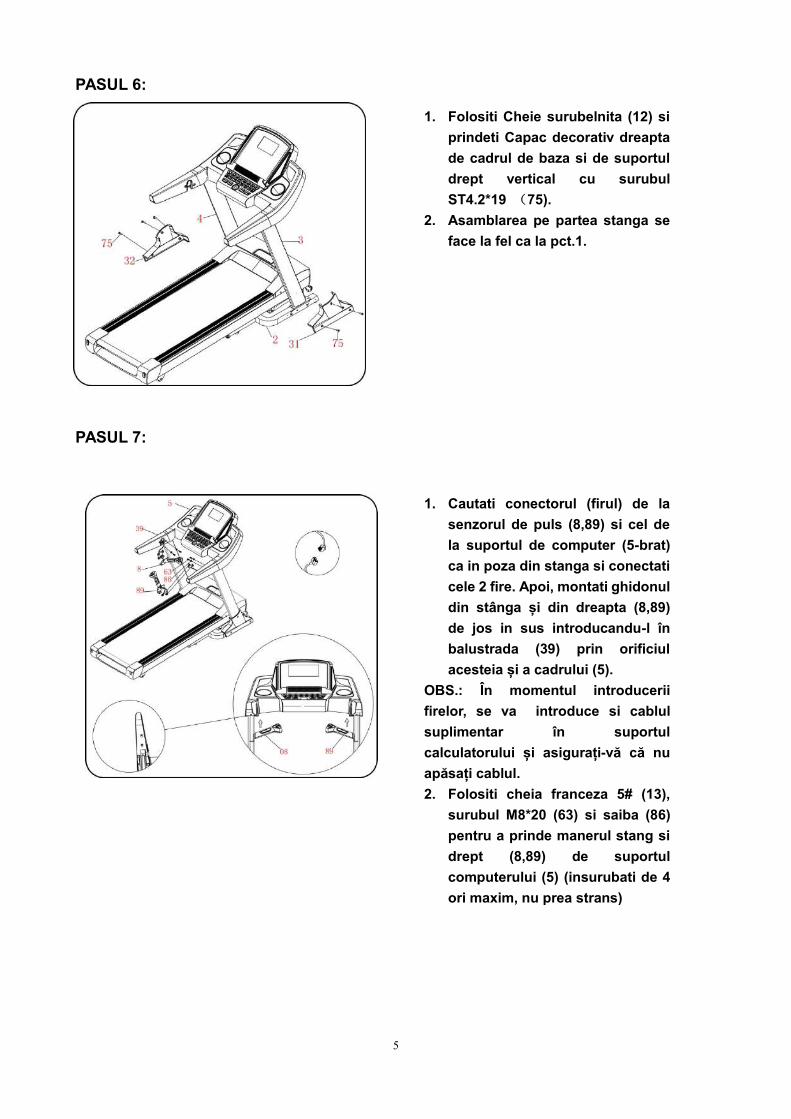
PASUL 6:
PASUL 7:
1. Folositi Cheie surubelnita (12) siprindeti Capac decorativ dreaptade cadrul de baza si de suportuldrept vertical cu surubulST4.2*19 (75).
2. Asamblarea pe partea stanga seface la fel ca la pct.1.
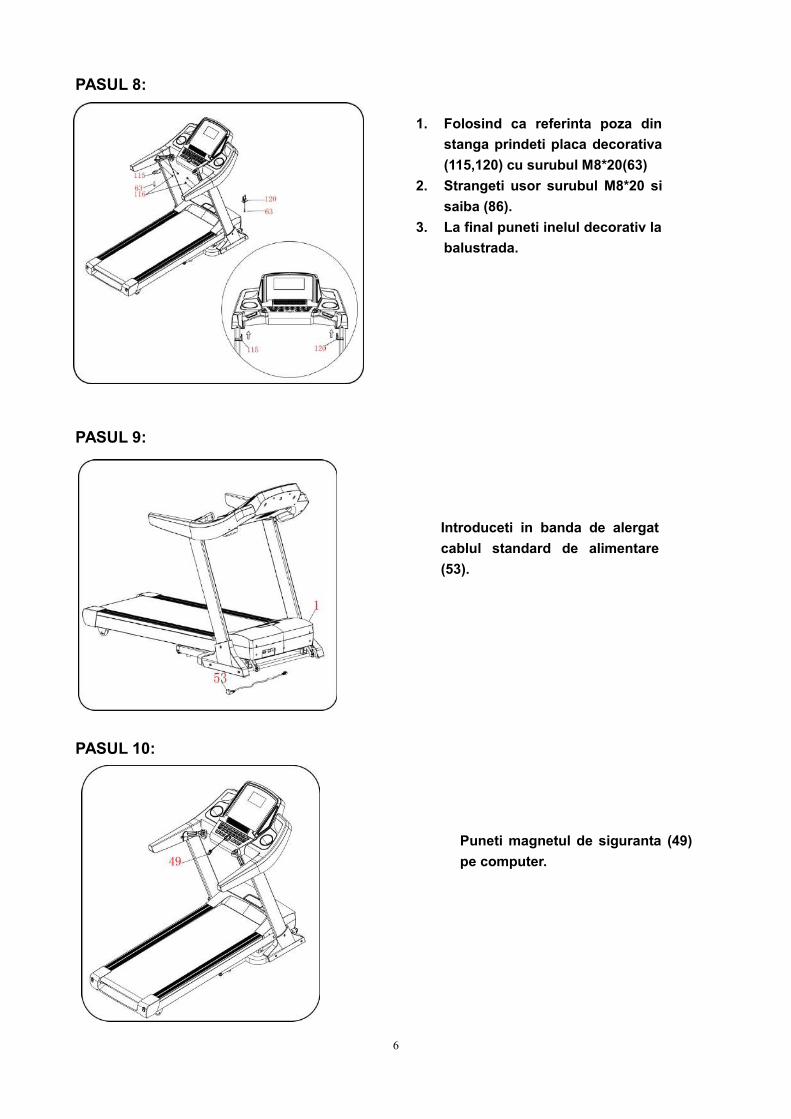
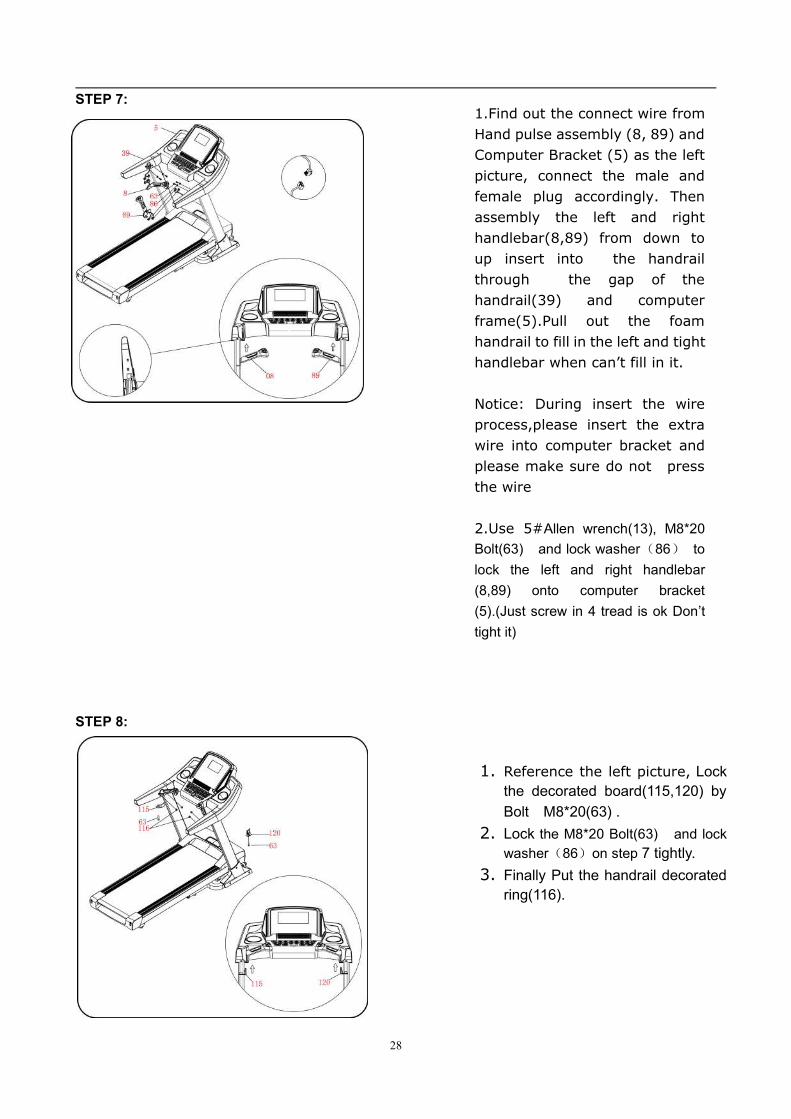
1. Cautati conectorul (firul) de lasenzorul de puls (8,89) si cel dela suportul de computer (5-brat)ca in poza din stanga si conectaticele 2 fire. Apoi, montati ghidonuldin stânga și din dreapta (8,89)de jos in sus introducandu-l înbalustrada (39) prin orificiulacesteia și a cadrului (5).
OBS.: În momentul introduceriifirelor, se va introduce si cablulsuplimentar în suportulcalculatorului și asigurați-vă că nuapăsați cablul.2. Folositi cheia franceza 5# (13),
surubul M8*20 (63) si saiba (86)pentru a prinde manerul stang sidrept (8,89) de suportulcomputerului (5) (insurubati de 4ori maxim, nu prea strans)
6
PASUL 8:
PASUL 9:
PASUL 10:
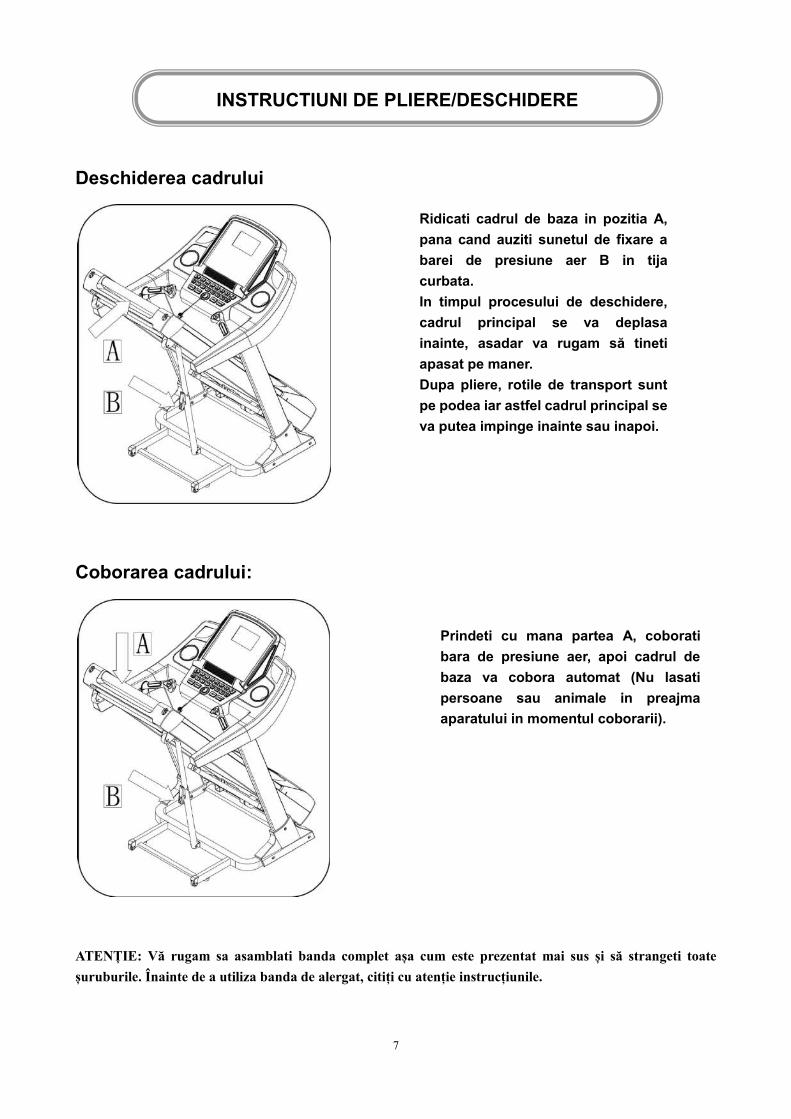
1. Folosind ca referinta poza dinstanga prindeti placa decorativa(115,120) cu surubul M8*20(63)
2. Strangeti usor surubul M8*20 sisaiba (86).
3. La final puneti inelul decorativ labalustrada.
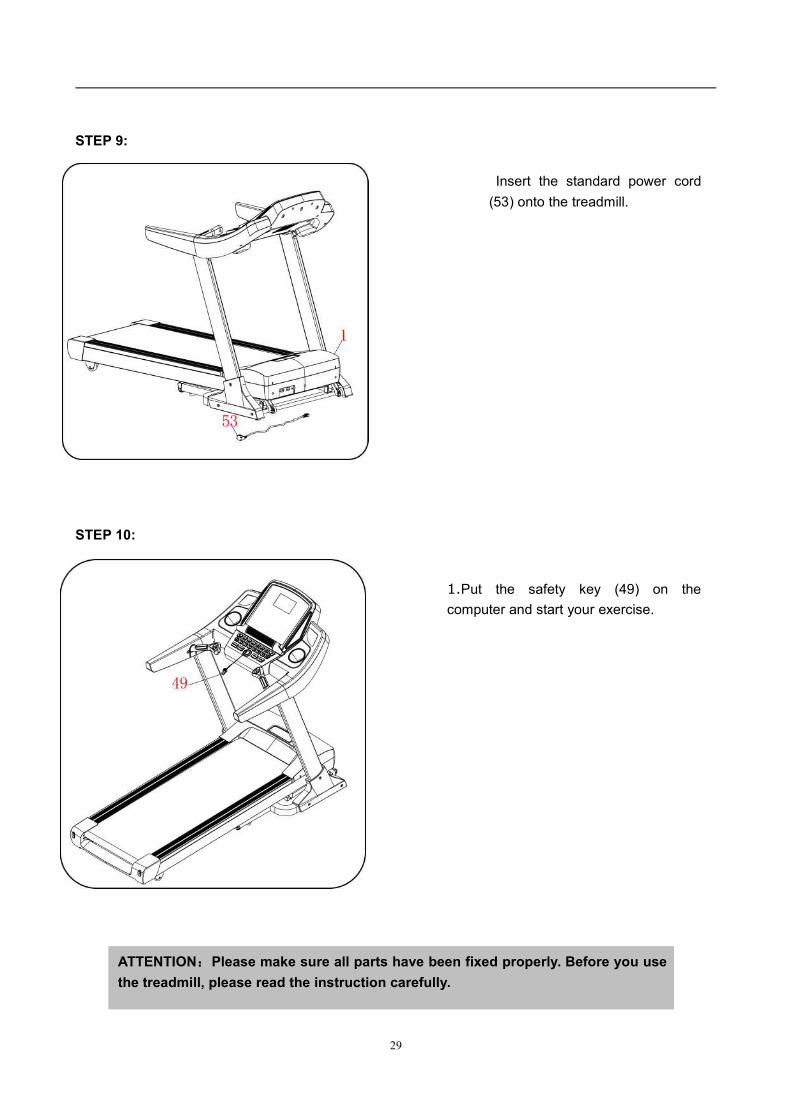
Introduceti in banda de alergatcablul standard de alimentare(53).
Puneti magnetul de siguranta (49)pe computer.
7
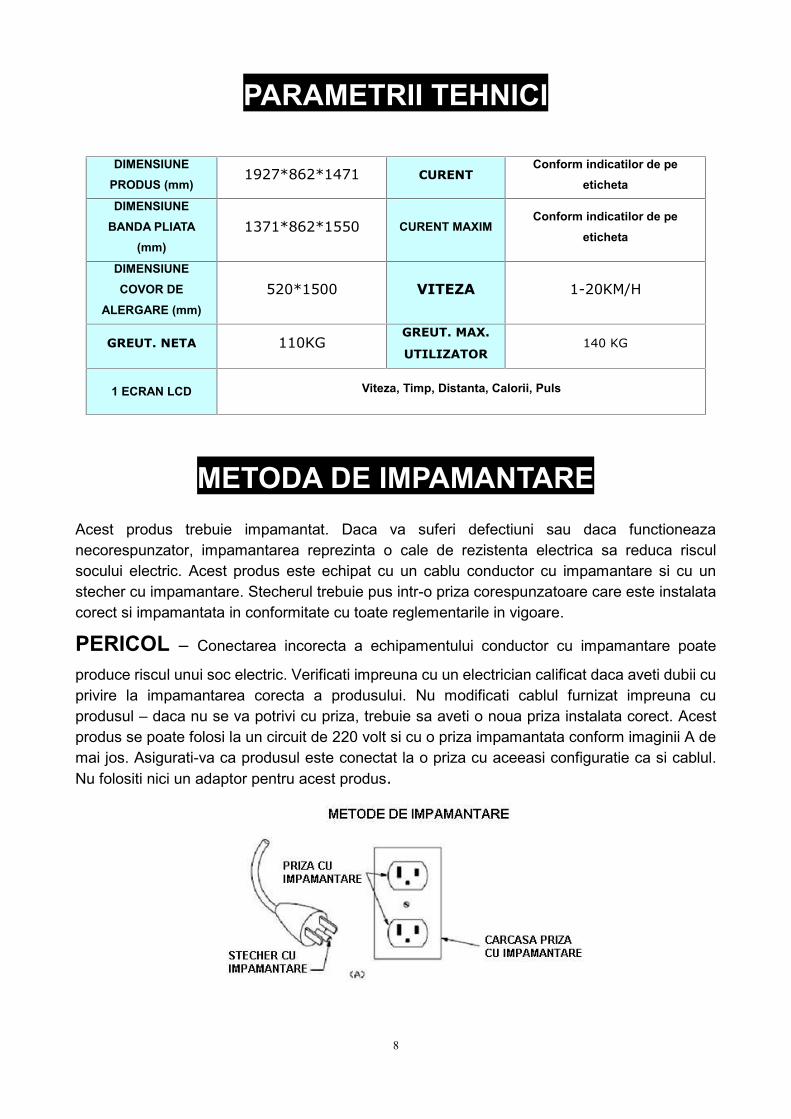
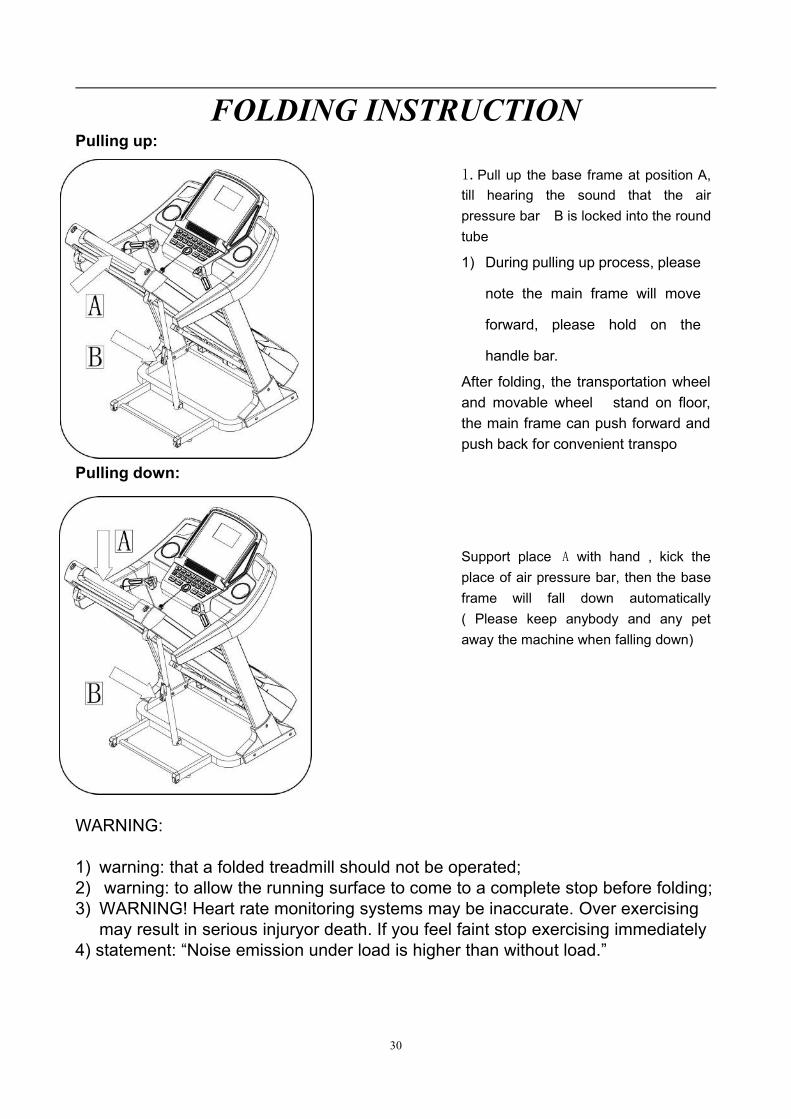
Deschiderea cadrului
Coborarea cadrului:
ATENȚIE: Vă rugam sa asamblati banda complet așa cum este prezentat mai sus și să strangeti toateșuruburile. Înainte de a utiliza banda de alergat, citiți cu atenție instrucțiunile.
Ridicati cadrul de baza in pozitia A,pana cand auziti sunetul de fixare abarei de presiune aer B in tijacurbata.In timpul procesului de deschidere,cadrul principal se va deplasainainte, asadar va rugam să tinetiapasat pe maner.Dupa pliere, rotile de transport suntpe podea iar astfel cadrul principal seva putea impinge inainte sau inapoi.
Prindeti cu mana partea A, coboratibara de presiune aer, apoi cadrul debaza va cobora automat (Nu lasatipersoane sau animale in preajmaaparatului in momentul coborarii).
INSTRUCTIUNI DE PLIERE/DESCHIDERE
8
PARAMETRII TEHNICI
DIMENSIUNEPRODUS (mm)
1927*862*1471 CURENTConform indicatilor de pe
eticheta
DIMENSIUNEBANDA PLIATA
(mm)1371*862*1550 CURENT MAXIM
Conform indicatilor de peeticheta
DIMENSIUNECOVOR DE
ALERGARE (mm)520*1500 VITEZA 1-20KM/H
GREUT. NETA 110KGGREUT. MAX.
UTILIZATOR140 KG
1 ECRAN LCD Viteza, Timp, Distanta, Calorii, Puls
METODA DE IMPAMANTAREAcest produs trebuie impamantat. Daca va suferi defectiuni sau daca functioneazanecorespunzator, impamantarea reprezinta o cale de rezistenta electrica sa reduca risculsocului electric. Acest produs este echipat cu un cablu conductor cu impamantare si cu unstecher cu impamantare. Stecherul trebuie pus intr-o priza corespunzatoare care este instalatacorect si impamantata in conformitate cu toate reglementarile in vigoare.
PERICOL – Conectarea incorecta a echipamentului conductor cu impamantare poate
produce riscul unui soc electric. Verificati impreuna cu un electrician calificat daca aveti dubii cuprivire la impamantarea corecta a produsului. Nu modificati cablul furnizat impreuna cuprodusul – daca nu se va potrivi cu priza, trebuie sa aveti o noua priza instalata corect. Acestprodus se poate folosi la un circuit de 220 volt si cu o priza impamantata conform imaginii A demai jos. Asigurati-va ca produsul este conectat la o priza cu aceeasi configuratie ca si cablul.Nu folositi nici un adaptor pentru acest produs.
9
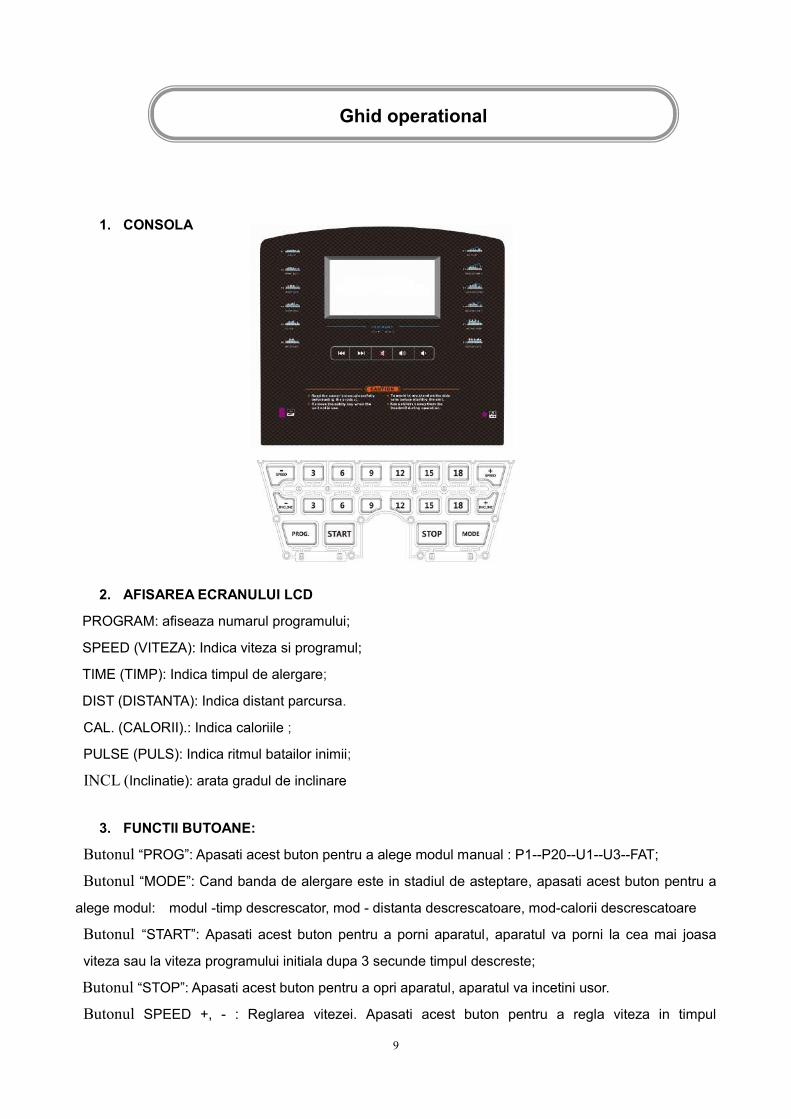
1. CONSOLA
2. AFISAREA ECRANULUI LCD
PROGRAM: afiseaza numarul programului;
SPEED (VITEZA): Indica viteza si programul;
TIME (TIMP): Indica timpul de alergare;
DIST (DISTANTA): Indica distant parcursa.
CAL. (CALORII).: Indica caloriile ;
PULSE (PULS): Indica ritmul batailor inimii;
INCL (Inclinatie): arata gradul de inclinare
3. FUNCTII BUTOANE:
Butonul “PROG”: Apasati acest buton pentru a alege modul manual : P1--P20--U1--U3--FAT;
Butonul “MODE”: Cand banda de alergare este in stadiul de asteptare, apasati acest buton pentru a
alege modul: modul -timp descrescator, mod - distanta descrescatoare, mod-calorii descrescatoare
Butonul “START”: Apasati acest buton pentru a porni aparatul, aparatul va porni la cea mai joasa
viteza sau la viteza programului initiala dupa 3 secunde timpul descreste;
Butonul “STOP”: Apasati acest buton pentru a opri aparatul, aparatul va incetini usor.
Butonul SPEED +, - : Reglarea vitezei. Apasati acest buton pentru a regla viteza in timpul
Ghid operational

10
antrenamentului, reglati valoarea cand va opriti;
Butonul SPEED(3 6 9 12 15 18):Reglarea rapida a vitezei;
Butonul “ INCLINE+”,“INCLINE-”: Reglarea gradului de inclinare. Apasati acest buton pentru a regla
inclinarea in timpul antrenamentului, reglati valoarea cand va opriti;
Butonul INCLINE(3 6 9 12 15 18):Reglarea rapida a gradului de inclinare;
Buton volum +
Buton volum -
Buton mut
Buton derulat inapoi
Buton derulat inainte
Butonul stang de puls: ajusteaza inclinarea
Butonul drept de puls: ajusteaza viteza
4. FUNCTII PRINCIPALE
Apasati butonul de pornire, ecranul se va lumina, banda va intra in stadiul de pornire.
4.1.PORNIRE RAPIDA (MANUAL):
Asezati magnetul de siguranta, apasati butonul “PROGRAM” pentru a alege program dorit: Program
P1->P2->P3->P4>P5->P6->P7->P8->P9->P10->P11->P12->P13->P14->P15->P16->P17->P18->P19->
P20>U1>U2>U3>FAT. Apasati butonul “START”, banda va porni la cea mai joasa viteza in 3 secunde,
apasati “SPEED +,-” / INCLINE “+/-” pentru reglarea vitezei/inclinarii. Apasati butonul “STOP” sau
scoateti direct magnetul de siguranta pentru a opri banda de alergare.
4.2.MODUL DESCRESCATOR:
Apasati butonul “MODE” pentru a alege modul timp descrescator, modul distanta descrescatoare, modul
calorii descrescatoare, si ecranul va indica valorile initiale si va licari. In acelasi timp, apasati “SPEED +/-”pentru a fixa valorile. Apasati butonul “START”, banda va functiona la cea mai joasa viteza, apoi
apasati “SPEED +/-” / INCLINE “+/-” pentru a schimba viteza/inclinarea. Cand valoarea coboara la 0,
banda se va opri usor. Prin apasarea butonului “STOP” sau prin scoaterea magnetului de siguranta din
computer puteti opri banda de alergare.
4.3.PROGRAMUL INTEGRAT:
Apasati butonul “PROG” pentru a alege programul interior de instalare intre P1----P15. Cand alegeti
programul, fereastra timp va indica valorile initiale si va licari, apasati butonul “SPEED” sau “INCLINE”
pentru a fixa timpul de alergare. Fiecare program a fost impartit in 20 de sectiuni, timpul fiecarui exercitiu
= timpul fixat/20. Apasati butonul “START”’, banda va functiona cu primul nivel al vitezei. Cand sectiunea
s-a terminat, va intra in urmatoarea sectiune automat, viteza va creste la urmatorul nivel. Cand terminati
un program, banda se va opri usor. In timpul antrenamentului, puteti schimba viteza prin apasarea
11
oricand a butonului “SPEED+”,“SPEED-” .Cand programul intra in noua sectiune, va reveni la viteza
actuala. Pentru a opri banda oricand, apasati butonul “STOP’ sau scoateti magnetul de siguranta.
4.4.PROGRAME PREDEFINITE
Exista 3 programe predefinite: U1, U2, U3
Apăsați tasta program pentru a selecta orice program U1-U3. Apoi apăsați tasta MODE pentru a seta
viteza și inclinata (Buton SPEED/INCLINE +/-). Apăsați butonul MODE pentru a confirma si seta
perioada următoare.După finalizarea celor 20 de sectiuni puteți stoca toate datele până la o nouă setare.
Aceste date nu vor fi pierdute prin întrerupere. Cu ajutorul butoanelor de pe maner se poate regla viteza
si inclinatia.
4.5.TESTUL BATAILOR INIMII
Cand aveti ambele maini pe senzorul puls, ecranul puls va indica ritmul batailor inimii dupa 5 secunde.
Pentru a obtine corect ritmul batailor inimii, va rugam sa testati cand banda se opreste si tineti mainile pe
senzor mai mult de 30 secunde. Ritmul batailor inimii este doar informativ, nu se poate considera valoare
medicala.5. TESTUL GRASIMILOR CORPORALE
In modul READY, apasati butonul “PROGRAM” pana cand in fereastra vitezei este indicat “FAT”’. “FAT”
este modul de testare al grasimilor corporale. Apasati butonul “MODE” pentru a alege parametrii
‘”F1-SEX -GENDER/ F2- AGE (VARSTA) / F3-HEIGHT (INALTIME)/ F4- WEIGHT (GREUTATE)”,
ecranul TIME/DIST (TIMP/DIST) va indica “F1”,“F2”、“F3”“F4". Cand setati fiecare parametru, apasati
“SPEED +/-” pentru reglarea valorii (folositi tabelul de mai jos ca referinta),
Apăsați butonul "mod" după ce ați setat datele. In interfața de testare a corpului F-5, puneti mâinile pe
detectorul de puls două-trei secunde, si astfel vi se va indica indexul de sănătate și vizualiza greutatea și
înălțimea pentru a fi verificate dacă sunt sau nu corecte. . Indicele de constituție (grăsime) evaluează o
persoană în înălțime și greutate și nu este proporțională cu grăsimea aplicabilă oricărui bărbat și femeie
și împreună cu alți indicatori de sănătate pentru ajustarea greutății grăsimii. Grăsimea ideală ar trebui să
fie cuprinsă între 20 și 25, dacă mai puțin de 19 înseamnă subponderal, dacă greutatea este cuprinsa
între 25 și 29 înseamnă supraponderală și dacă mai mult de 30 inseamna obez. (Datele sunt date ca
referință și nu pot fi tratate ca date medicale.)
5.1.Afisarea valorilor si intervalul de fixare:
Parameter
CategoryMod implicit Arie Tip
Sex(-1-) 0(barbat) 0—1 0=barbat 1=femeie
Varsta(-2-) 25 ani 10—99 ani
Inaltime(-3-) 170 CM 100—220 CM
Greutate(-4-) 70KG 20—150KG
12
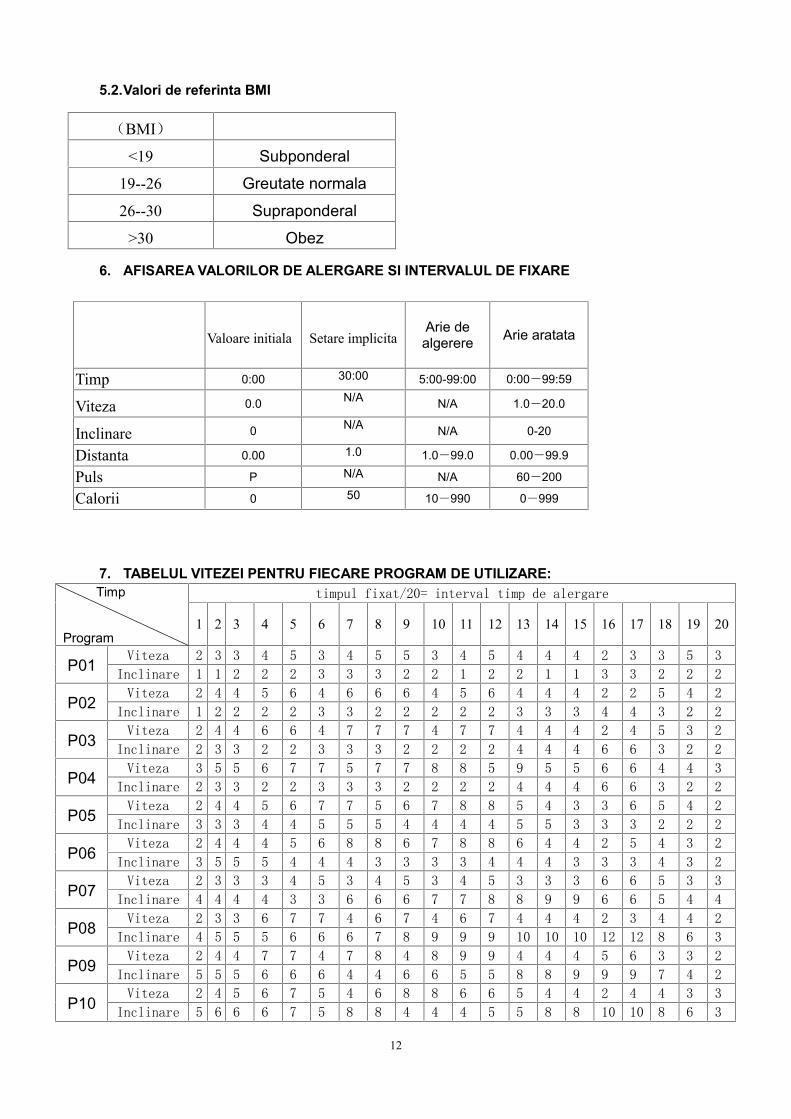
5.2.Valori de referinta BMI
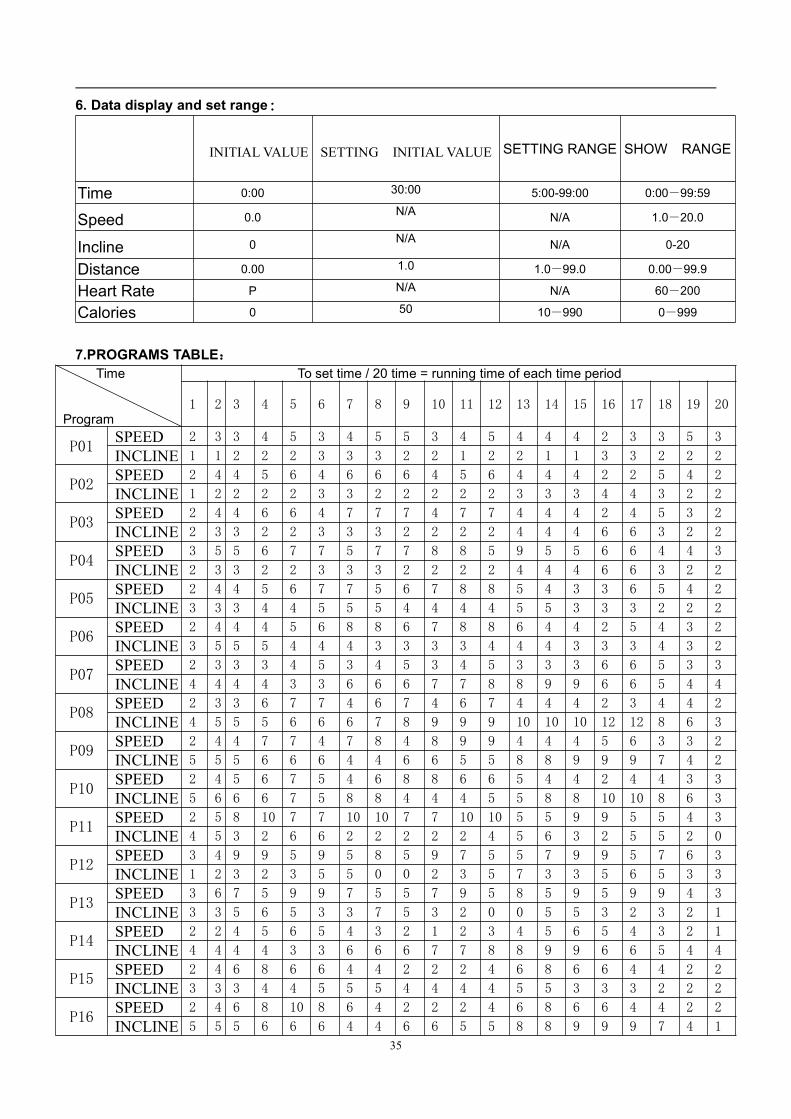
6. AFISAREA VALORILOR DE ALERGARE SI INTERVALUL DE FIXARE
Valoare initiala Setare implicitaArie dealgerere Arie aratata
Timp 0:00 30:00 5:00-99:00 0:00-99:59
Viteza 0.0 N/A N/A 1.0-20.0
Inclinare 0 N/A N/A 0-20
Distanta 0.00 1.0 1.0-99.0 0.00-99.9
Puls P N/A N/A 60-200
Calorii 0 50 10-990 0-999
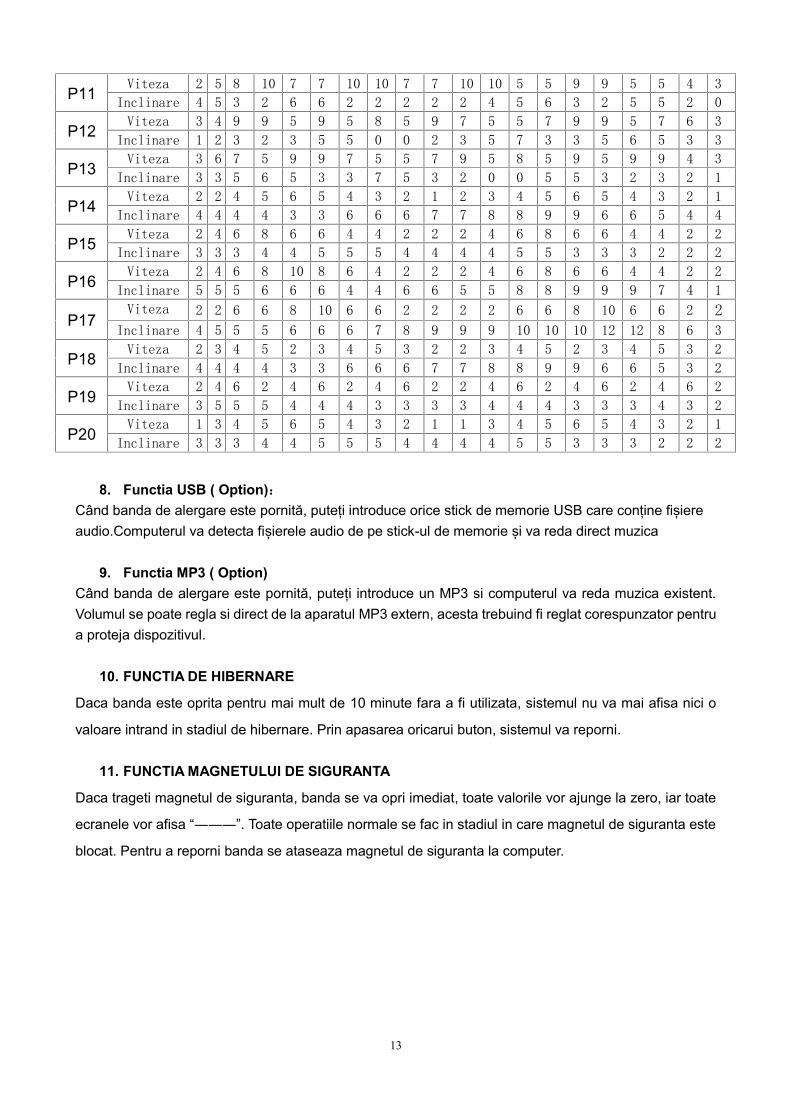
7. TABELUL VITEZEI PENTRU FIECARE PROGRAM DE UTILIZARE:Timp
Program
timpul fixat/20= interval timp de alergare
1 2 3 4 5 6 7 8 9 10 11 12 13 14 15 16 17 18 19 20
P01 Viteza 2 3 3 4 5 3 4 5 5 3 4 5 4 4 4 2 3 3 5 3
Inclinare 1 1 2 2 2 3 3 3 2 2 1 2 2 1 1 3 3 2 2 2
P02 Viteza 2 4 4 5 6 4 6 6 6 4 5 6 4 4 4 2 2 5 4 2
Inclinare 1 2 2 2 2 3 3 2 2 2 2 2 3 3 3 4 4 3 2 2
P03 Viteza 2 4 4 6 6 4 7 7 7 4 7 7 4 4 4 2 4 5 3 2
Inclinare 2 3 3 2 2 3 3 3 2 2 2 2 4 4 4 6 6 3 2 2
P04 Viteza 3 5 5 6 7 7 5 7 7 8 8 5 9 5 5 6 6 4 4 3
Inclinare 2 3 3 2 2 3 3 3 2 2 2 2 4 4 4 6 6 3 2 2
P05 Viteza 2 4 4 5 6 7 7 5 6 7 8 8 5 4 3 3 6 5 4 2
Inclinare 3 3 3 4 4 5 5 5 4 4 4 4 5 5 3 3 3 2 2 2
P06 Viteza 2 4 4 4 5 6 8 8 6 7 8 8 6 4 4 2 5 4 3 2
Inclinare 3 5 5 5 4 4 4 3 3 3 3 4 4 4 3 3 3 4 3 2
P07 Viteza 2 3 3 3 4 5 3 4 5 3 4 5 3 3 3 6 6 5 3 3
Inclinare 4 4 4 4 3 3 6 6 6 7 7 8 8 9 9 6 6 5 4 4
P08 Viteza 2 3 3 6 7 7 4 6 7 4 6 7 4 4 4 2 3 4 4 2
Inclinare 4 5 5 5 6 6 6 7 8 9 9 9 10 10 10 12 12 8 6 3
P09 Viteza 2 4 4 7 7 4 7 8 4 8 9 9 4 4 4 5 6 3 3 2
Inclinare 5 5 5 6 6 6 4 4 6 6 5 5 8 8 9 9 9 7 4 2
P10 Viteza 2 4 5 6 7 5 4 6 8 8 6 6 5 4 4 2 4 4 3 3
Inclinare 5 6 6 6 7 5 8 8 4 4 4 5 5 8 8 10 10 8 6 3
(BMI)
<19 Subponderal
19--26 Greutate normala
26--30 Supraponderal
>30 Obez
13
P11 Viteza 2 5 8 10 7 7 10 10 7 7 10 10 5 5 9 9 5 5 4 3
Inclinare 4 5 3 2 6 6 2 2 2 2 2 4 5 6 3 2 5 5 2 0
P12 Viteza 3 4 9 9 5 9 5 8 5 9 7 5 5 7 9 9 5 7 6 3
Inclinare 1 2 3 2 3 5 5 0 0 2 3 5 7 3 3 5 6 5 3 3
P13 Viteza 3 6 7 5 9 9 7 5 5 7 9 5 8 5 9 5 9 9 4 3
Inclinare 3 3 5 6 5 3 3 7 5 3 2 0 0 5 5 3 2 3 2 1
P14 Viteza 2 2 4 5 6 5 4 3 2 1 2 3 4 5 6 5 4 3 2 1
Inclinare 4 4 4 4 3 3 6 6 6 7 7 8 8 9 9 6 6 5 4 4
P15 Viteza 2 4 6 8 6 6 4 4 2 2 2 4 6 8 6 6 4 4 2 2
Inclinare 3 3 3 4 4 5 5 5 4 4 4 4 5 5 3 3 3 2 2 2
P16 Viteza 2 4 6 8 10 8 6 4 2 2 2 4 6 8 6 6 4 4 2 2
Inclinare 5 5 5 6 6 6 4 4 6 6 5 5 8 8 9 9 9 7 4 1
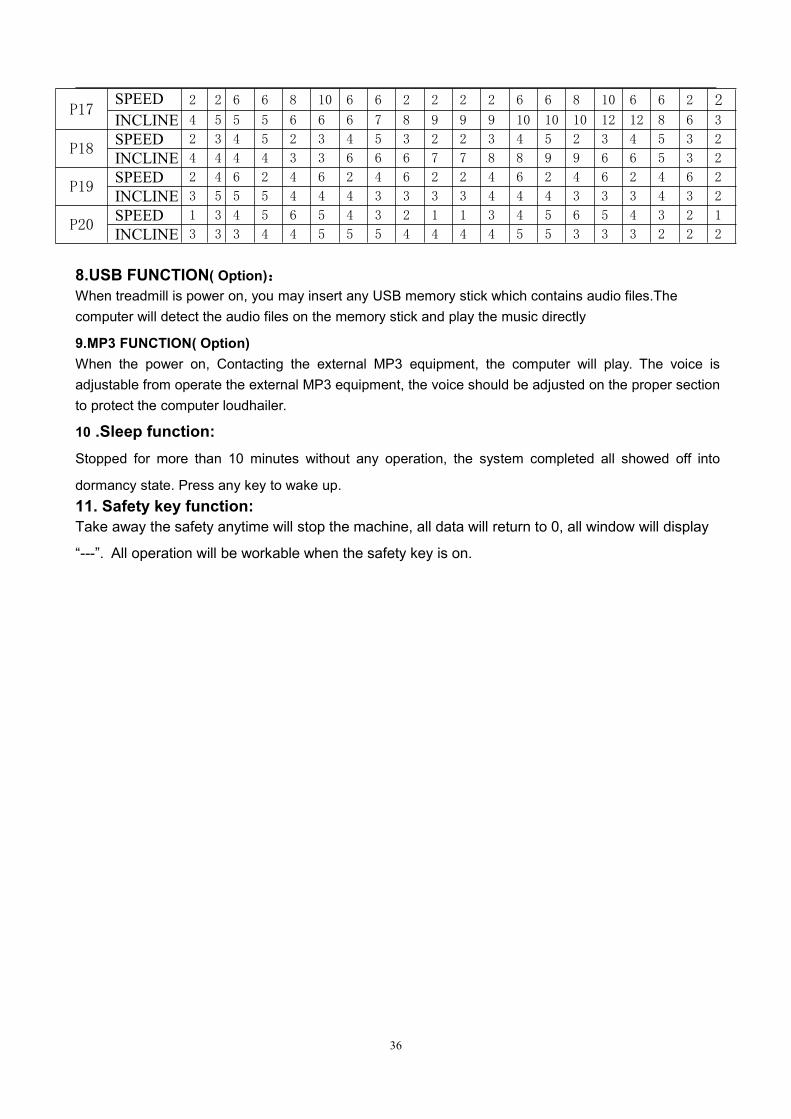
P17Viteza 2 2 6 6 8 10 6 6 2 2 2 2 6 6 8 10 6 6 2 2
Inclinare 4 5 5 5 6 6 6 7 8 9 9 9 10 10 10 12 12 8 6 3
P18 Viteza 2 3 4 5 2 3 4 5 3 2 2 3 4 5 2 3 4 5 3 2
Inclinare 4 4 4 4 3 3 6 6 6 7 7 8 8 9 9 6 6 5 3 2
P19 Viteza 2 4 6 2 4 6 2 4 6 2 2 4 6 2 4 6 2 4 6 2
Inclinare 3 5 5 5 4 4 4 3 3 3 3 4 4 4 3 3 3 4 3 2
P20 Viteza 1 3 4 5 6 5 4 3 2 1 1 3 4 5 6 5 4 3 2 1
Inclinare 3 3 3 4 4 5 5 5 4 4 4 4 5 5 3 3 3 2 2 2
8. Functia USB ( Option):Când banda de alergare este pornită, puteți introduce orice stick de memorie USB care conține fișiereaudio.Computerul va detecta fișierele audio de pe stick-ul de memorie și va reda direct muzica
9. Functia MP3 ( Option)Când banda de alergare este pornită, puteți introduce un MP3 si computerul va reda muzica existent.Volumul se poate regla si direct de la aparatul MP3 extern, acesta trebuind fi reglat corespunzator pentrua proteja dispozitivul.
10. FUNCTIA DE HIBERNARE
Daca banda este oprita pentru mai mult de 10 minute fara a fi utilizata, sistemul nu va mai afisa nici o
valoare intrand in stadiul de hibernare. Prin apasarea oricarui buton, sistemul va reporni.
11. FUNCTIA MAGNETULUI DE SIGURANTA
Daca trageti magnetul de siguranta, banda se va opri imediat, toate valorile vor ajunge la zero, iar toate
ecranele vor afisa “―――”. Toate operatiile normale se fac in stadiul in care magnetul de siguranta este
blocat. Pentru a reporni banda se ataseaza magnetul de siguranta la computer.
14
INSTRUCTIUNI ANTRENAMENT
INCALZIREDaca aveti varsta peste 35 de ani sau aveti probleme de sanatate si este prima oara cand folositi
bada de alergare pentru antrenament, va rugam sa consultati medicul inainte de incepereaantrenamentului.
Inainte sa folositi banda de alergare va rugam cititi cu atentie instructiunile de utilizare pentru a stifoarte bine cum se porneste si se opreste, cum se regleaza viteza,etc.iar in acest timp nu stati asezat pecovorul de alergare in timp ce reglati banda. Nu folositi aparatul pana nu cunoasteti bine aceste lucruri.Asezati-va pe sinele laterale pentru a evita alunecarea si tineti-va cu ambele maini de manere. Mentinetiaparatul la viteza redusa de cel putin 1.6-3.2 km/h, apoi testati banda de alergare cu un picior pana vaobisnuiti cu viteza banzii, puteti mariti viteza incepand cu 3 – 5 km/h. Mentineti viteza timp de 10 minuteapoi opriti aparatul.
EXERCITIIInainte de utilizare invatati cum se regleaza viteza si cum se inclina aparatul. Pasiti aprox. 1 km cu
viteza constanta si notati-va timpul, va va lua aproximativ 15-25 de minute. Daca pasiti la o viteza de 4.8km/h, va dura aproximativ 12 minute sa parcurgeti 1 km. Daca va simtiti in siguranta la viteza constanta,puteti mari viteza si sa inclinati aparatul dupa 30 de minute pentru a avea un exercitiu corect. In acestmoment, nu puteti mari viteza sau sa inclinati prea mult aparatul dintr-o data pentru a va simti insiguranta.
NTENSITATEA EXERCITIULUIIncepeti antrenamentul cu o incalzire la o viteza de 4.8 km/h timp de 2 minute, apoi mariti viteza la
5.3 km/h si, continuati antrenamentul timp de 2 minute, mariti din nou viteza la 5.8 km/h si continuatiantrenamentul timp de 2 minute. Dupa aceasta cresteti viteza cu cate 0.3km/h la fiecare 2 minute,pana vi se accelereaza respiratia dar fara a va crea o stare de disconfort.
Metoda cea mai eficienta de ardere a caloriilorIncalziti-va timp de 5 minute la viteza de 4-4.8km/h, apoi mariti treptat viteza cu 0.3km/h/2 min pana
ajungeti la o viteza constanta care nu va creaza disconfort timp de 45 de minute. Pentru imbunatatireaintensitatii miscarii puteti mentine viteza timp de 1 ora cat are un program TV, apoi mariti viteza cu0.3km/h la fiecare moment de publicitate TV, apoi reveniti la viteza initiala. Cea mai eficienta metoda inarderea caloriilor este in timpul intervalului de publicitate TV prin cresterea frecventei batailor inimii. Lasfarsitul antrenemantului trebuie sa incetiniti viteza gradual timp de 4 minute.
FRECVENTA EXERCITIULUI:Program ciclic de antrenamnet: 3-5 ori/saptamana, 15-60 minute/exercitiu. Creati-va programul de
exercitiu profesional nu doar pentru hobby. Puteti controla intensitatea exercitiului prin reglarea vitezei sia inclinarii benzii de alergat.
Va recomandam sa nu reglati inaltimea benzii la inceputul antrenamentului; reglarea inclinarii estemetoda cea mai eficienta de crestere a intensitatii exercitiului.
Consultati-va medical inaintea inceperii antrenamentului. Persoanele specializate va pot ajuta saconstruiti un program de antrenament in functie de varsta si conditia fizica a dvs., determinarea vitezei
15
miscarii si a intensitatii antrenamentului. Va rugam sa va oprita imediata daca simtiti ca nu puteti respira,durere in piept, batai neregulate ale inimii, dificultati de respiratie, ameteala sau orice alta senzatie dedisconfort in timpul antrenamentului. In aceste cazuri, trebuie sa va consultati imediat medicul inainte sacontinuati antrenamentul.
Puteti fixa viteza normala de mers sau viteza de alergare daca va antrenati mereu pe banda de
alergare.
Daca nu aveti suficienta experienta in testarea vitezei, puteti urma instructiunile de mai jos:
Viteza 1-3.0 KM/H Conditie fizica cu probleme
Viteza 3.0-4.5 KM/H Sedentarism
Viteza 4.5-6.0 KM/H Plimbare normala
Viteza 6.0-7.5 KM/H Pas alergator
Viteza 7.5-9.0 KM/H Alergare usoara
Viteza 9.0-12.0KM/H Alergator cu viteza intermediara
Viteza 12.0-14.5M/H Alergator experimentat
Viteza 14.5-16.0KM/H Alergator excelent
Atentie: Viteza miscarii pentru mersul normal este ≤ 6KM/H;
Viteza miscarii pentru alergare este ≥ 8.0KM/H.
16
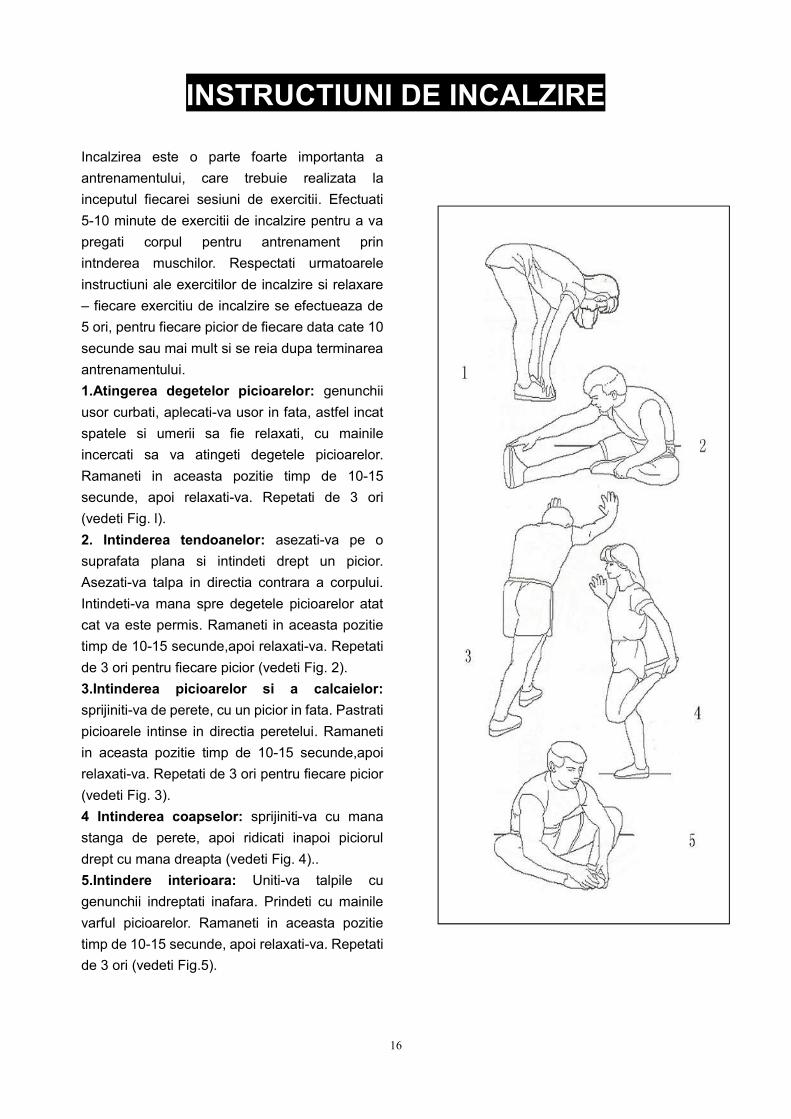
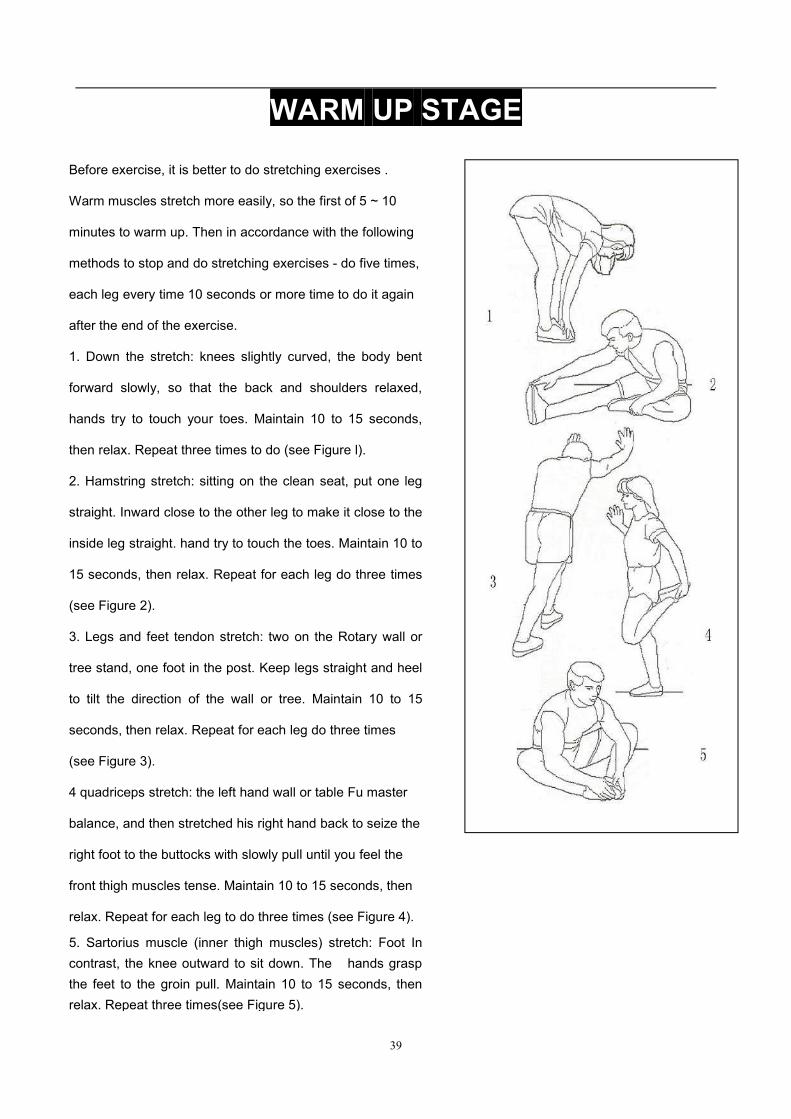
INSTRUCTIUNI DE INCALZIRE
Incalzirea este o parte foarte importanta aantrenamentului, care trebuie realizata lainceputul fiecarei sesiuni de exercitii. Efectuati5-10 minute de exercitii de incalzire pentru a vapregati corpul pentru antrenament prinintnderea muschilor. Respectati urmatoareleinstructiuni ale exercitilor de incalzire si relaxare– fiecare exercitiu de incalzire se efectueaza de5 ori, pentru fiecare picior de fiecare data cate 10secunde sau mai mult si se reia dupa terminareaantrenamentului.1.Atingerea degetelor picioarelor: genunchiiusor curbati, aplecati-va usor in fata, astfel incatspatele si umerii sa fie relaxati, cu mainileincercati sa va atingeti degetele picioarelor.Ramaneti in aceasta pozitie timp de 10-15secunde, apoi relaxati-va. Repetati de 3 ori(vedeti Fig. l).2. Intinderea tendoanelor: asezati-va pe osuprafata plana si intindeti drept un picior.Asezati-va talpa in directia contrara a corpului.Intindeti-va mana spre degetele picioarelor atatcat va este permis. Ramaneti in aceasta pozitietimp de 10-15 secunde,apoi relaxati-va. Repetatide 3 ori pentru fiecare picior (vedeti Fig. 2).3.Intinderea picioarelor si a calcaielor:sprijiniti-va de perete, cu un picior in fata. Pastratipicioarele intinse in directia peretelui. Ramanetiin aceasta pozitie timp de 10-15 secunde,apoirelaxati-va. Repetati de 3 ori pentru fiecare picior(vedeti Fig. 3).4 Intinderea coapselor: sprijiniti-va cu manastanga de perete, apoi ridicati inapoi picioruldrept cu mana dreapta (vedeti Fig. 4)..5.Intindere interioara: Uniti-va talpile cugenunchii indreptati inafara. Prindeti cu mainilevarful picioarelor. Ramaneti in aceasta pozitietimp de 10-15 secunde, apoi relaxati-va. Repetatide 3 ori (vedeti Fig.5).
17
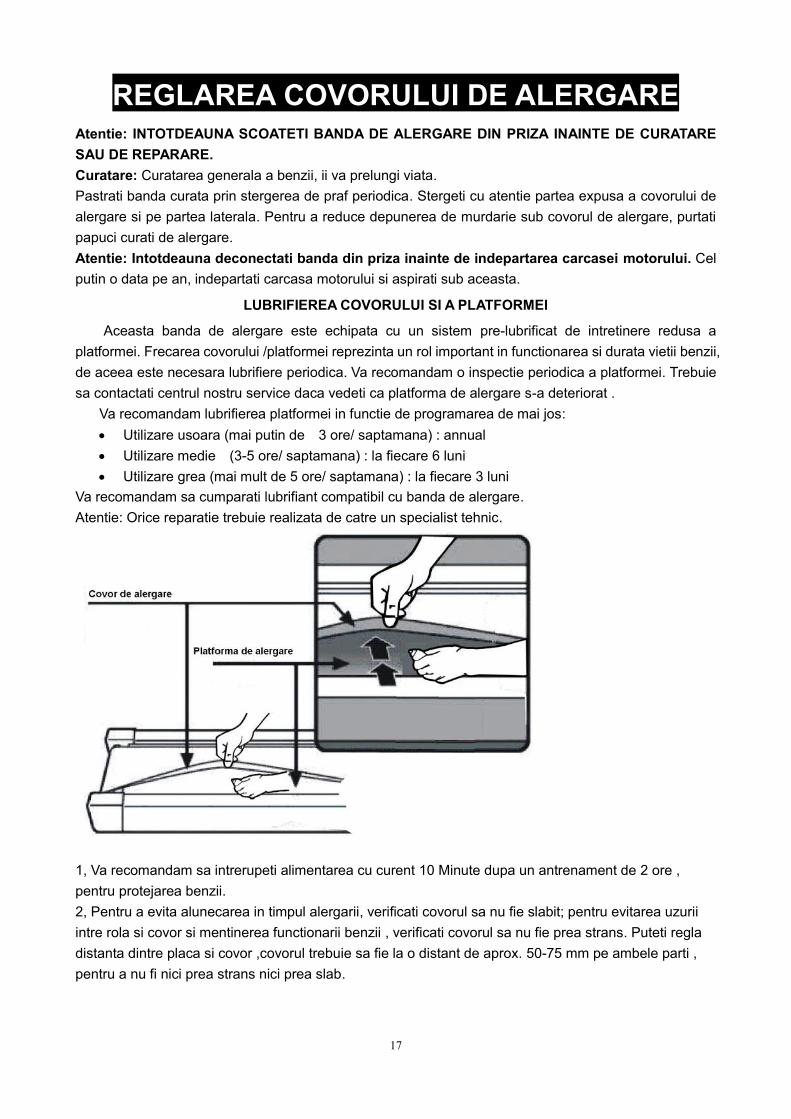
REGLAREA COVORULUI DE ALERGAREAtentie: INTOTDEAUNA SCOATETI BANDA DE ALERGARE DIN PRIZA INAINTE DE CURATARESAU DE REPARARE.Curatare: Curatarea generala a benzii, ii va prelungi viata.Pastrati banda curata prin stergerea de praf periodica. Stergeti cu atentie partea expusa a covorului dealergare si pe partea laterala. Pentru a reduce depunerea de murdarie sub covorul de alergare, purtatipapuci curati de alergare.Atentie: Intotdeauna deconectati banda din priza inainte de indepartarea carcasei motorului. Celputin o data pe an, indepartati carcasa motorului si aspirati sub aceasta.
LUBRIFIEREA COVORULUI SI A PLATFORMEI
Aceasta banda de alergare este echipata cu un sistem pre-lubrificat de intretinere redusa aplatformei. Frecarea covorului /platformei reprezinta un rol important in functionarea si durata vietii benzii,de aceea este necesara lubrifiere periodica. Va recomandam o inspectie periodica a platformei. Trebuiesa contactati centrul nostru service daca vedeti ca platforma de alergare s-a deteriorat .
Va recomandam lubrifierea platformei in functie de programarea de mai jos: Utilizare usoara (mai putin de 3 ore/ saptamana) : annual Utilizare medie (3-5 ore/ saptamana) : la fiecare 6 luni Utilizare grea (mai mult de 5 ore/ saptamana) : la fiecare 3 luni
Va recomandam sa cumparati lubrifiant compatibil cu banda de alergare.Atentie: Orice reparatie trebuie realizata de catre un specialist tehnic.
1, Va recomandam sa intrerupeti alimentarea cu curent 10 Minute dupa un antrenament de 2 ore ,pentru protejarea benzii.2, Pentru a evita alunecarea in timpul alergarii, verificati covorul sa nu fie slabit; pentru evitarea uzuriiintre rola si covor si mentinerea functionarii benzii , verificati covorul sa nu fie prea strans. Puteti regladistanta dintre placa si covor ,covorul trebuie sa fie la o distant de aprox. 50-75 mm pe ambele parti ,pentru a nu fi nici prea strans nici prea slab.
18
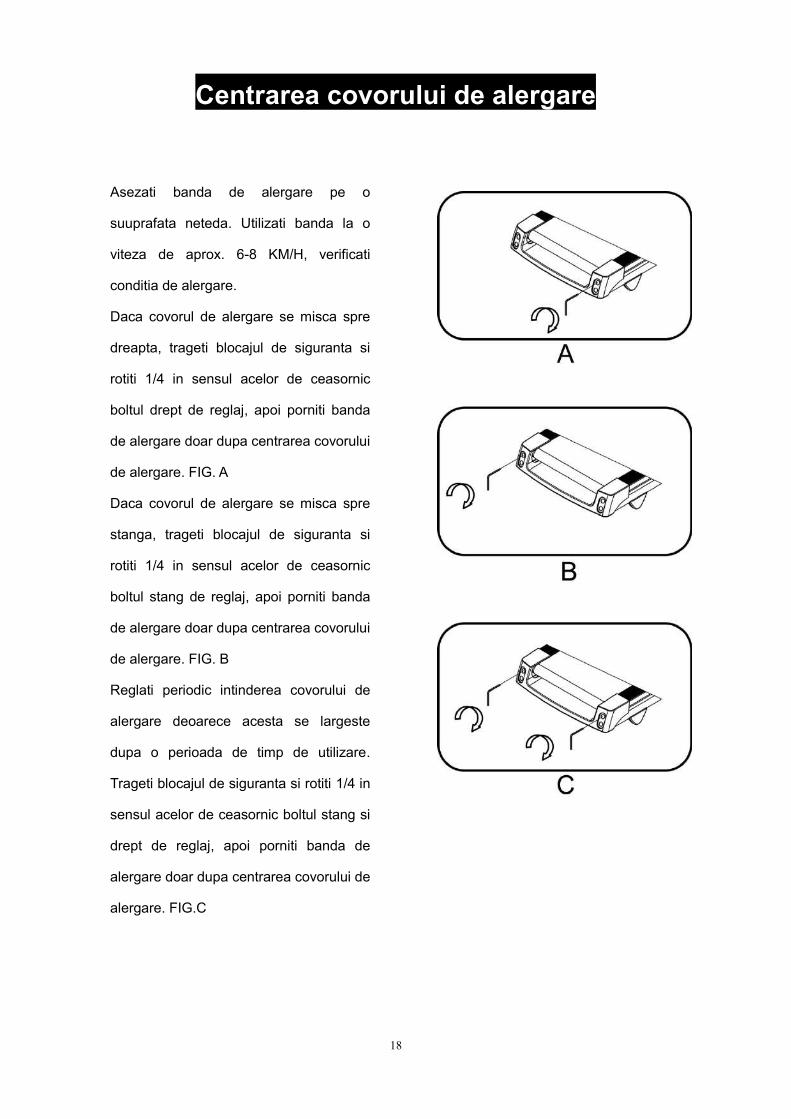
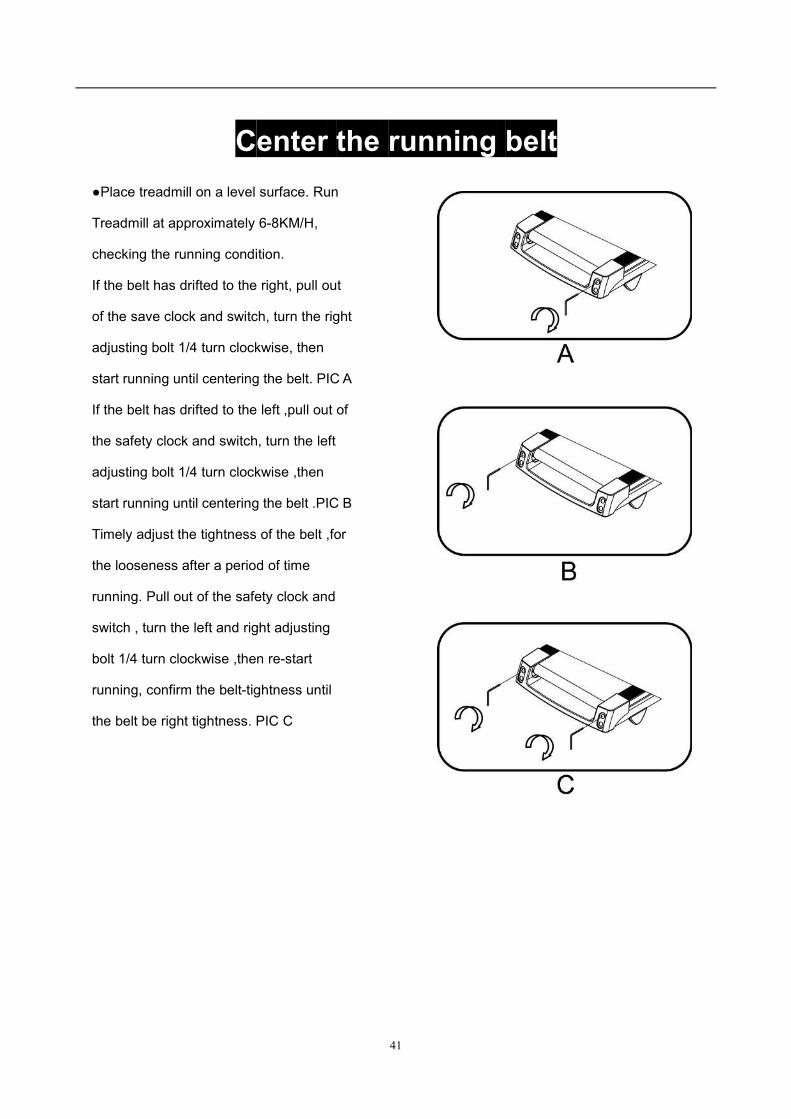
Centrarea covorului de alergare
Asezati banda de alergare pe o
suuprafata neteda. Utilizati banda la o
viteza de aprox. 6-8 KM/H, verificati
conditia de alergare.
Daca covorul de alergare se misca spre
dreapta, trageti blocajul de siguranta si
rotiti 1/4 in sensul acelor de ceasornic
boltul drept de reglaj, apoi porniti banda
de alergare doar dupa centrarea covorului
de alergare. FIG. A
Daca covorul de alergare se misca spre
stanga, trageti blocajul de siguranta si
rotiti 1/4 in sensul acelor de ceasornic
boltul stang de reglaj, apoi porniti banda
de alergare doar dupa centrarea covorului
de alergare. FIG. B
Reglati periodic intinderea covorului de
alergare deoarece acesta se largeste
dupa o perioada de timp de utilizare.
Trageti blocajul de siguranta si rotiti 1/4 in
sensul acelor de ceasornic boltul stang si
drept de reglaj, apoi porniti banda de
alergare doar dupa centrarea covorului de
alergare. FIG.C
19
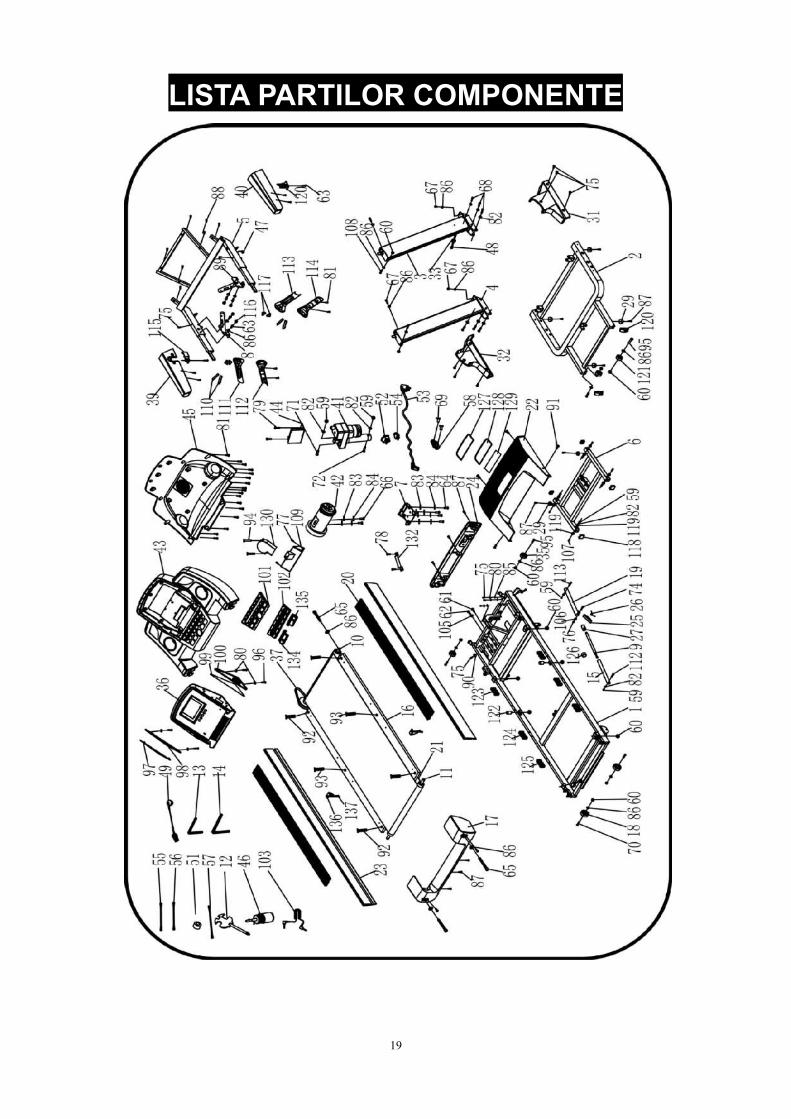
LISTA PARTILOR COMPONENTE
20
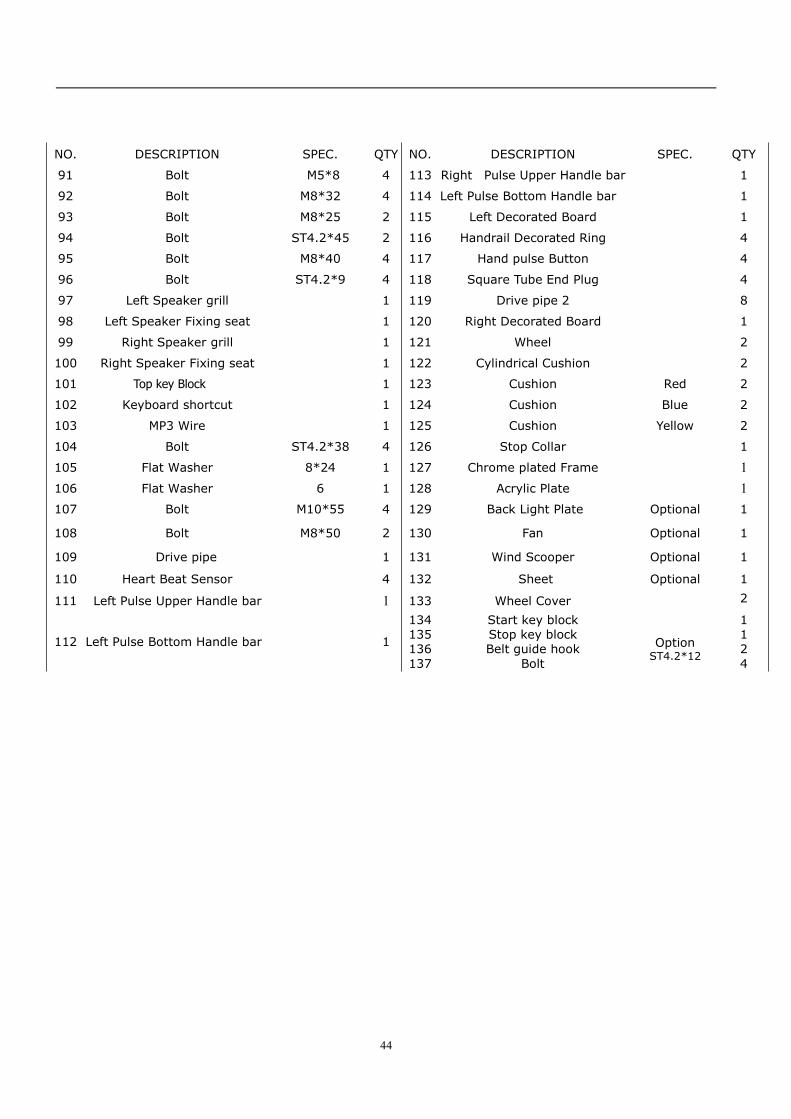
LISTA PARTILOR COMPONENTE
NO. DESCRIPTION SPEC. QTY NO. DESCRIPTION SPEC. QTY1 Cadrul principal 1 46 Sticluta cu ulei pentru ungere 1
2 Cadrul de sustinere aldisplay-ului (partea de jos)
1 47 Fire alimentare display 1
3Partea dreapta a cadruluide sustinere al display-ului 1 48 Fire alimentare display 1
4Partea stanga a cadrului
de sustinere al display-ului 1 49 Siguranta 1
5 Senzor/led lumina 1 50 Platic protectie dreapta 16 Inclinarea motorului 1 51 Inel magnetic 17 Suport motor 1 52 Intrerupator pornit/oprit 1
8 Senzor puls 1 53 Cablul de alimentare pentrupriza 1
9 Cilindru 1 54 Protectie suprasarcina 110 Rola ghidaj fata 1 55 Cablu/fir 111 Rola ghidaj spate 1 56 Fir albastru 112 Cheie cu surubelnita S=13、14、15 1 57 Fir marou 213 Imbus #5 5mm 1 58 Sursa de alimentare electrica 114 Imbus #6 6mm 1 59 Piulita autoblocare M10 8
15 Reglarea tijei 1 60 Piulita autoblocare M8 12
16Capac laterala stangape unde se schimba
covorul
1 61 Bolt M8*30 1
17 Capac spate 1 62 Bolt M8*35 218 Rola plastic 2 63 Bolt M8*20 619 Suport plastic 1 64 Bolt M8*32 420 Lateralele benzii 2 65 Bolt M8*65 321 Curea 1 66 Bolt M8*12 222 Cap superior motor 1 67 Bolt M8*20 4
23 Lateralele benzii de alergare 2 68 Bolt M10*70 6
24 Capac fata protectie motor 1 69 Bolt M4*20 225 Arc presiune 8 70 Bolt M8*50 226 Arc torsiune 1 71 Bolt M10*45 127 Carcasa plastic 1 72 Bolt M10*60 128 Reglarea rotilor 2 73 Bolt M8*40 229 Tampon cauciuc 6 74 Bolt M6*40 130 Carcasa plastic 2 75 Bolt ST4.2*19 1531 Capac plastic dreapta 1 76 Piulita autoblocare M6 132 Capac plastic stanga 1 77 Bolt ST4.2*12 233 Inel metallic protectie 2 78 Bolt ST2.9*6.5 234 Senzor puls 2 79 Bolt ST4.2*12 235 Roti pt transport banda 2 80 Capac protectie display 5 736 Computer 1 81 Bolt ST4.2*13 2537 Cureaua motorului 1 82 Saiba grover 10 1438 Capac stanga display 1 83 Capac protectie display 8 6
39 Maner stanga display 1 84 Saiba plata 8 6
40 Maner dreapta display 1 85 Saiba grover 5 3
21
41 Piston pentru inclinatiebanda 1 86 Saiba grover 8 18
42 Motor 1 87 Bolt ST4.2*19 12
43 Capac superior display 1 88 Bolt ST4.2*30 6
44 Panoul de control/display 1 89 Senzor puls maner dreapta 1
45 Capac spate display 1 90Protectie plastic/stanga
dreapta 2
NO. DESCRIPTION SPEC. QTY NO. DESCRIPTION SPEC. QTY
91 Bolt M5*8 4 113 Senzor puls manerul drept 1
92 Bolt M8*32 4 114 Senzor puls manerul stang 1
93 Bolt M8*25 2 115 Protectie plastic stanga 1
94 Bolt ST4.2*45 2 116 Protectie plastic 4
95 Bolt M8*40 4 117 Capac plastic maner 4
96 Bolt ST4.2*9 4 118 Loc pentru cheie tubulara reglajcovor 4
97 Protectie plastic boxa stanga 1 119 Tub/conducta 8
98 Consola fixare boxa stanga 1 120 Protectie plastic dreapta 1
99 Protectie plastic boxa dreapta 1 121 Roata de transport banda 2
100 Consola fixare boxa dreapta 1 122 Tampon amortizare din cauciuc 2
101 Parte superioara display 1 123 Amortizor cauciuc Red 2
102 Parte inferioara display 1 124 Amortizor cauciuc Blue 2
103 MP3 1 125 Amortizor cauciuc Yellow 2
104 Bolt ST4.2*38 4 126 Delimitator covor 1
105 Protectie plastic 8*24 1 127 Portiune cadru placat cu crom 1106 Protectie plastic 6 1 128 Placa senzori 1107 Bolt M10*55 4 129 Placa control lumini Optional 1
108 Bolt M8*50 2 130 Ventilator Optional 1
109 Tub/conducta 1 131 Protectie ventilatie Optional 1
110 Senzor pulsul inimii 4 132 Protectie Optional 1
111 Senzor puls manerul stang 1 133 Capac roata 2
112 Senzor puls manerul drept 1
134135136137
Buton startButon stop
Ghidaj cureaBolt
OptionST4.2*12
1124
22
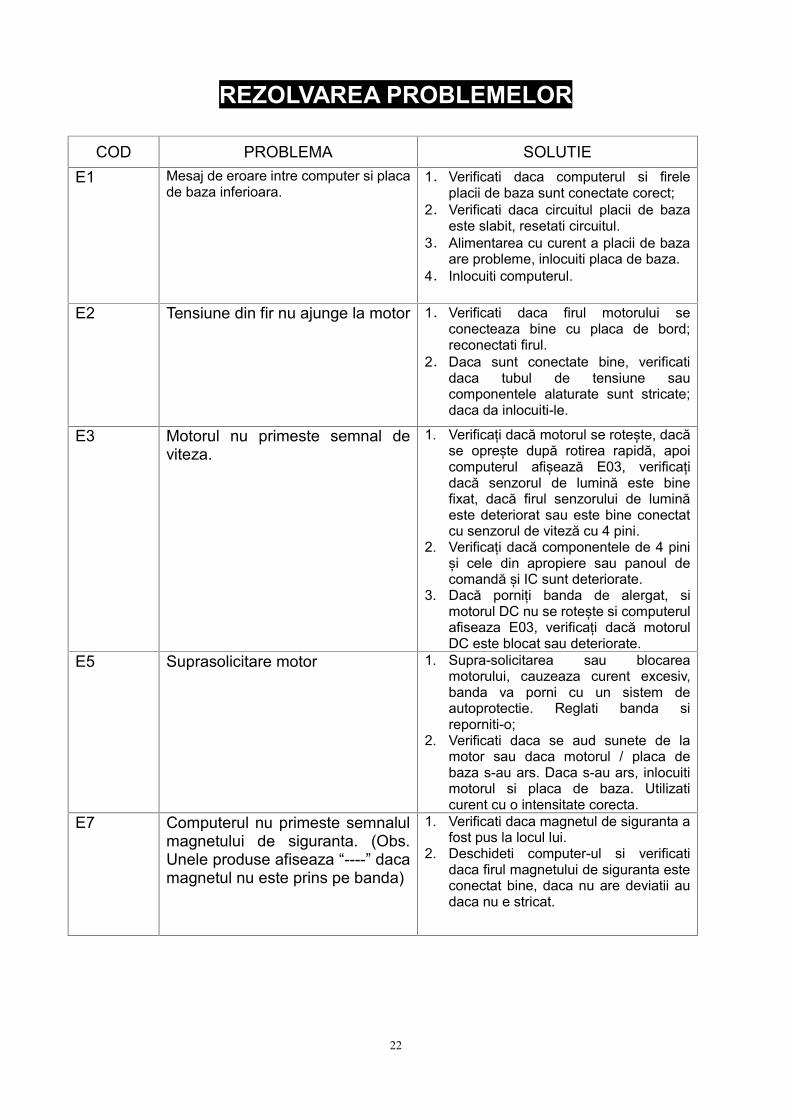
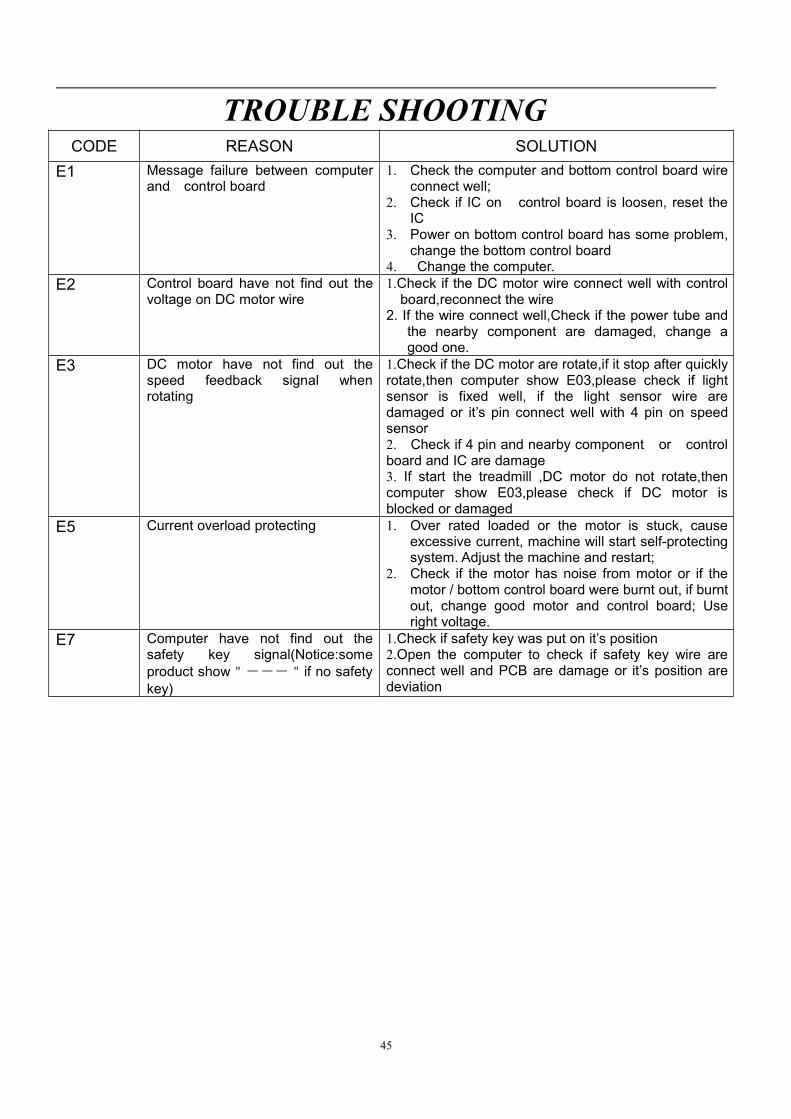
REZOLVAREA PROBLEMELOR
COD PROBLEMA SOLUTIEE1 Mesaj de eroare intre computer si placa
de baza inferioara.1.Verificati daca computerul si firele
placii de baza sunt conectate corect;2.Verificati daca circuitul placii de baza
este slabit, resetati circuitul.3.Alimentarea cu curent a placii de baza
are probleme, inlocuiti placa de baza.4. Inlocuiti computerul.
E2 Tensiune din fir nu ajunge la motor 1.Verificati daca firul motorului seconecteaza bine cu placa de bord;reconectati firul.
2.Daca sunt conectate bine, verificatidaca tubul de tensiune saucomponentele alaturate sunt stricate;daca da inlocuiti-le.
E3 Motorul nu primeste semnal deviteza.
1. Verificați dacă motorul se rotește, dacăse oprește după rotirea rapidă, apoicomputerul afișează E03, verificațidacă senzorul de lumină este binefixat, dacă firul senzorului de luminăeste deteriorat sau este bine conectatcu senzorul de viteză cu 4 pini.
2. Verificați dacă componentele de 4 piniși cele din apropiere sau panoul decomandă și IC sunt deteriorate.
3. Dacă porniți banda de alergat, simotorul DC nu se rotește si computerulafiseaza E03, verificați dacă motorulDC este blocat sau deteriorate.
E5 Suprasolicitare motor 1. Supra-solicitarea sau blocareamotorului, cauzeaza curent excesiv,banda va porni cu un sistem deautoprotectie. Reglati banda sireporniti-o;
2. Verificati daca se aud sunete de lamotor sau daca motorul / placa debaza s-au ars. Daca s-au ars, inlocuitimotorul si placa de baza. Utilizaticurent cu o intensitate corecta.
E7 Computerul nu primeste semnalulmagnetului de siguranta. (Obs.Unele produse afiseaza “----” dacamagnetul nu este prins pe banda)
1. Verificati daca magnetul de siguranta afost pus la locul lui.
2. Deschideti computer-ul si verificatidaca firul magnetului de siguranta esteconectat bine, daca nu are deviatii audaca nu e stricat.

23
Read all instruction carefully before use thisproduct. Retain this owner’s manual for the future’sreference.
。
!
DHS 9520
MOTORIZED TREADMILLUSER’S MANUAL
24
Safety Instructions:Warning: Now here we suggest that you should consult with your physician or health professional before
starting your workout, especially for the age up to 35 old or once-health problem people. We take no
responsible for any troubles or hurts if you don’t following our specification. Treadmill will be carefully
assembled and covered the motor shield, then connect to the power.
Before the assembly, be sure to check if delivery is complete by using the includedparts-list.
1, Ensuring the safety clamps were attached to the clothing or belts before using the treadmill.
2, Please do not insert any items to any part of the equipment, which would damage the equipment.
3, Position the treadmill on a clear, level surface. Do not place the treadmill on thick carpet as it may
interfere with proper ventilation. Do not place the treadmill near water or outdoors.
4, Never start the treadmill while you are standing on the walking belt. After turning the power on and
adjusting the speed control, there may be a pause before the walking belt begins to move, always
stand on the foot rails on the sides of the frame until the belt is moving.
5, Wear appropriate clothing when exercising on the treadmill. Do not wear long, loose fitting clothing
that may be caught in the treadmill. Always wear running or aerobic shoes with rubber soles.
6, Keep the children and pets away from the treadmill while starting workout.
7, Don’t exercise in 40-Minutes after dinner.
8, The equipment is suitable for adults, Juveniles need be accompanied with adults while workout.
9, You must hold on to the handrails until you become comfortable and familiar with the treadmill at your
first start the workout.
10, Treadmill is indoor-using equipment, not outdoor-using for avoiding damage. Keep the store-place
clean and flat, drying. Prohibiting the other purpose using, only for workout.
11, Please purchase the power-line to the distributor or contact with our company directly, for the
power-line only equip to the treadmill.
12,If the treadmill should suddenly increase in speed due to an electronics failure or the speed being
inadvertently increased, the treadmill will come to a sudden stop when the pull pin is disengaged from
the console.
13, Do not connect line to the middle of cable; do not lengthen cable or change the cable plug; do not put
any heavy thing on cable or put the cable near the heat source; forbid using socket with several
holes, these may cause fire or people may be hurt by the power.
25
14, Cut off the power when the equipment is not used. When the power is cut off , do not pull the power
line to keep the wire unbroken. Insert the plug to the socket with the safety ground circuit, for the
power-line is professional equipment .You must contact with the professional people directly while
the line is damaged.
15,This Treadmill only for home-using.
16.It need obligate 1000*2000mm safety area on the rear of treadmill ,when use treadmill pleasedo not place anything in the safety area.
The owner’s manual is only for customers’ reference.
The supplier can not guarantee for mistakes occurring due to translation or change in technicalspecification of the product.
All data displayed are approximate guidance and cannot be used in any medicalapplication
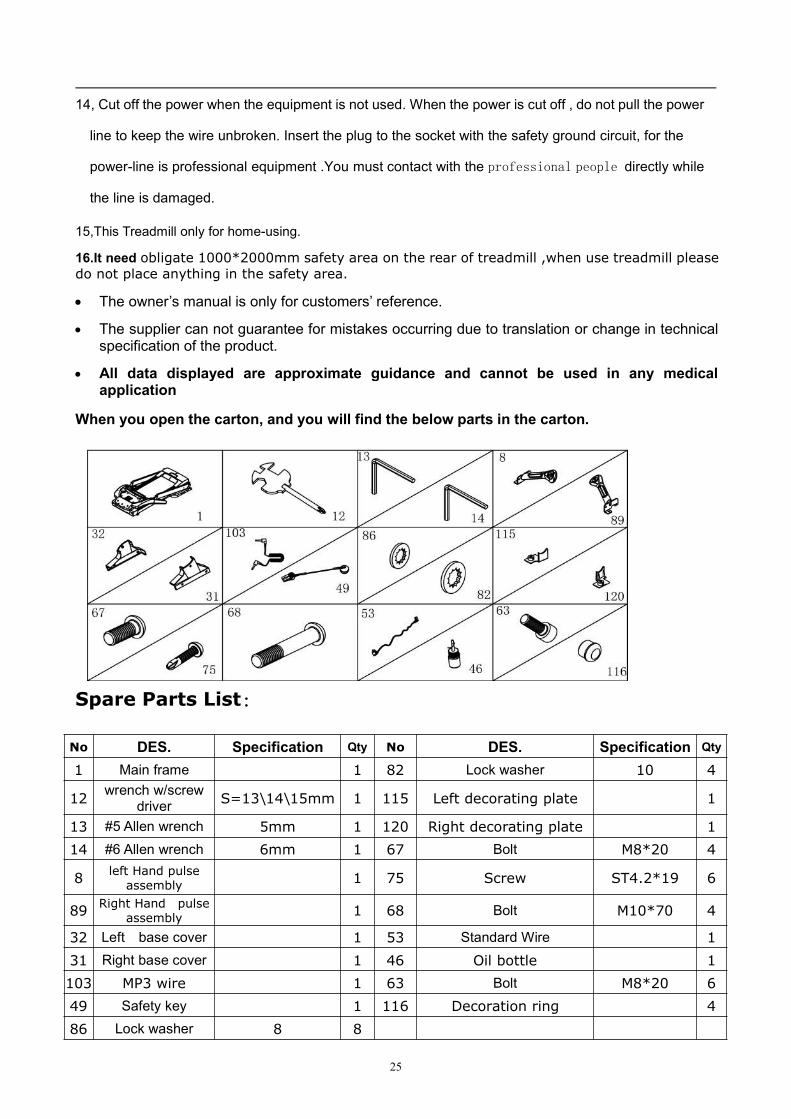
When you open the carton, and you will find the below parts in the carton.
Spare Parts List:
No DES. Specification Qty No DES. Specification Qty
1 Main frame 1 82 Lock washer 10 4
12wrench w/screw
driver S=13\14\15mm 1 115 Left decorating plate 1
13 #5 Allen wrench 5mm 1 120 Right decorating plate 1
14 #6 Allen wrench 6mm 1 67 Bolt M8*20 4
8 left Hand pulseassembly 1 75 Screw ST4.2*19 6
89 Right Hand pulseassembly 1 68 Bolt M10*70 4
32 Left base cover 1 53 Standard Wire 1
31 Right base cover 1 46 Oil bottle 1
103 MP3 wire 1 63 Bolt M8*20 6
49 Safety key 1 116 Decoration ring 4
86 Lock washer 8 8
26
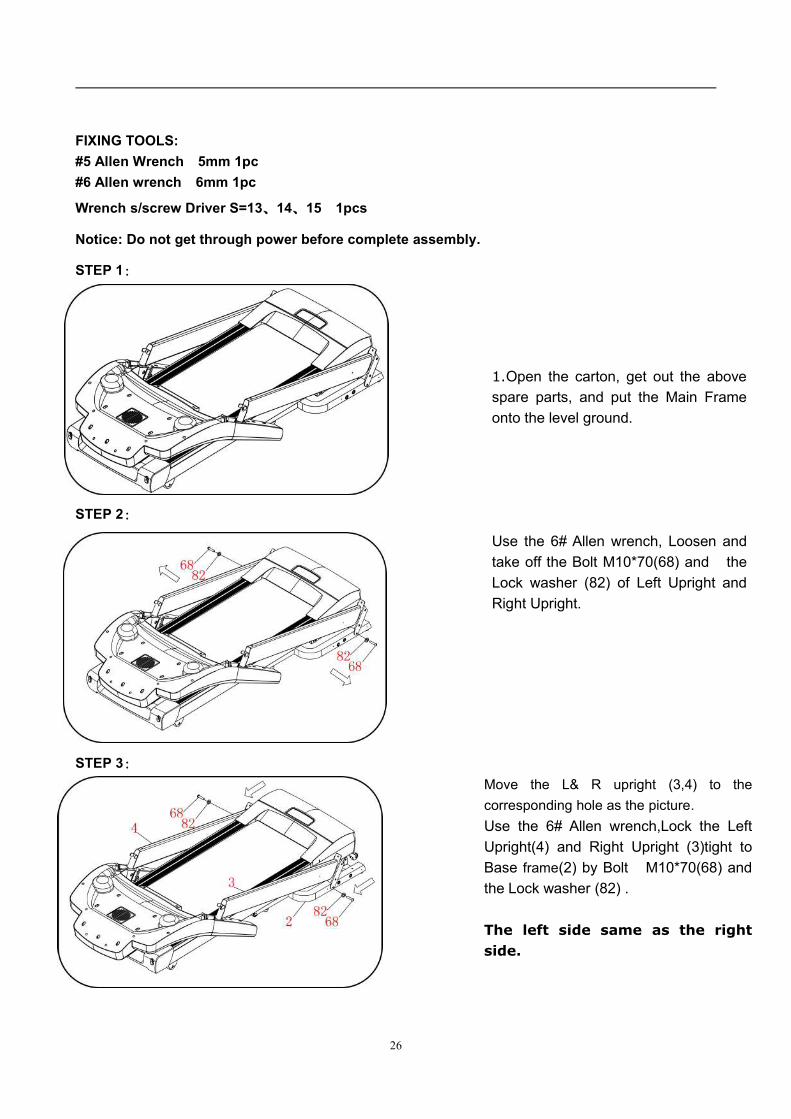
FIXING TOOLS:#5 Allen Wrench 5mm 1pc#6 Allen wrench 6mm 1pc
Wrench s/screw Driver S=13、14、15 1pcs
Notice: Do not get through power before complete assembly.
STEP 1:
STEP 2:
STEP 3:
1.Open the carton, get out the abovespare parts, and put the Main Frameonto the level ground.
Move the L& R upright (3,4) to thecorresponding hole as the picture.Use the 6# Allen wrench,Lock the LeftUpright(4) and Right Upright (3)tight toBase frame(2) by Bolt M10*70(68) andthe Lock washer (82) .
The left side same as the rightside.
Use the 6# Allen wrench, Loosen andtake off the Bolt M10*70(68) and theLock washer (82) of Left Upright andRight Upright.
27
Step 4:
STEP 5:
STEP 6:
1. Push up the Computer (5) and L& Rupright (3,4)as the arrow position.
2.Use the short end of 5# Allen wrench,Bolt M8*20(67) and Lock washer(86) tolock the Right Upright Tube to theComputer Frame(5) tight together;
Left side assembly method same as rightside.Notice: When you pull up them, makesure the upright not press the wiresin upright; keep touch the uprightand computer by hand,so that it willnot fall down to escape any hurt.
1.Use wrench w/screw driver(12),lock theright base cover (31) to the base frame(2)and right upright(3) by bolt ST4.2*19(75).
2.Left side assembly method same as rightside.
Use the 6# Allen wrench(14), lockBolt M10*70 (68) and Lockwasher(82) to lock the right upright tobase frame.
2.Use the 5# Allen wrench(13),lockthe Bolt M8*20 (67) and Lockwasher(86), lock the Right UprightTube to the base Frame;3. Left side assembly method sameas right side.
Notice: Support the upright withhand avoid falling down to haveany hurt.
28
STEP 7:
STEP 8:
1.Find out the connect wire fromHand pulse assembly (8, 89) andComputer Bracket (5) as the leftpicture, connect the male andfemale plug accordingly. Thenassembly the left and righthandlebar(8,89) from down toup insert into the handrailthrough the gap of thehandrail(39) and computerframe(5).Pull out the foamhandrail to fill in the left and tighthandlebar when can’t fill in it.
Notice: During insert the wireprocess,please insert the extrawire into computer bracket andplease make sure do not pressthe wire
2.Use 5#Allen wrench(13), M8*20Bolt(63) and lock washer(86) tolock the left and right handlebar(8,89) onto computer bracket(5).(Just screw in 4 tread is ok Don’ttight it)
1. Reference the left picture, Lockthe decorated board(115,120) byBolt M8*20(63) .
2. Lock the M8*20 Bolt(63) and lockwasher(86)on step 7 tightly.
3. Finally Put the handrail decoratedring(116).
29
STEP 9:
STEP 10:
1.Put the safety key (49) on thecomputer and start your exercise.
Insert the standard power cord(53) onto the treadmill.
ATTENTION:Please make sure all parts have been fixed properly. Before you usethe treadmill, please read the instruction carefully.
30
FOLDING INSTRUCTIONPulling up:
Pulling down:
WARNING:
1) warning: that a folded treadmill should not be operated;2) warning: to allow the running surface to come to a complete stop before folding;3) WARNING! Heart rate monitoring systems may be inaccurate. Over exercising
may result in serious injuryor death. If you feel faint stop exercising immediately4) statement: “Noise emission under load is higher than without load.”
1.Pull up the base frame at position A,till hearing the sound that the airpressure bar B is locked into the roundtube
1) During pulling up process, please
note the main frame will move
forward, please hold on the
handle bar.
After folding, the transportation wheeland movable wheel stand on floor,the main frame can push forward andpush back for convenient transpo
Support place A with hand , kick theplace of air pressure bar, then the baseframe will fall down automatically( Please keep anybody and any petaway the machine when falling down)
31
Technical Parameter
GROUNDING METHODSThis product must be grounded. If it should malfunction or breakdown, grounding providesa path of least resistance for electric current to reduce the risk of electric shock. Thisproduct is equipped with a cord having an equipment-grounding conductor and agrounding plug. The plug must be plugged into an appropriate outlet that is properlyinstalled and grounded in accordance with all local codes and ordinances.
DANGER – Improper connection of the equipment-grounding conductor can result in
a risk of electric shock. Check with a qualified electrician or serviceman if you are in doubtas to whether the product is properly grounded. Do not modify the plug provided with theproduct – if it will not fit the outlet, have a proper outlet installed by a qualified electrician.This product is for use on a nominal 220-240/100-120 volt circuit and has a grounding plug thatlooks like the plug illustrated in sketch A in following figure. Make that the product isconnected to an outlet having the same configuration as the plug. No adapter should beused with this product.( The below picture is just for reference,the actual plug andjack is depends on import country).
BUILT UP
SIZE(mm)1927*862*1471 POWER As the rating label showing
FOLDED
SIZE(mm)1371*862*1550
MAXIMUM
OUTPUT POWERAs the rating label showing
RUNNING
AREA(mm)520*1500 SPEED RANGE 1-20KM/H
NET WEIGHT 110KGMAX USER
WEIGHT140KG
1 LCD WINDOWDISPLAY
SPEED, TIME, DISTANCE, PULSE, CALORIES
32
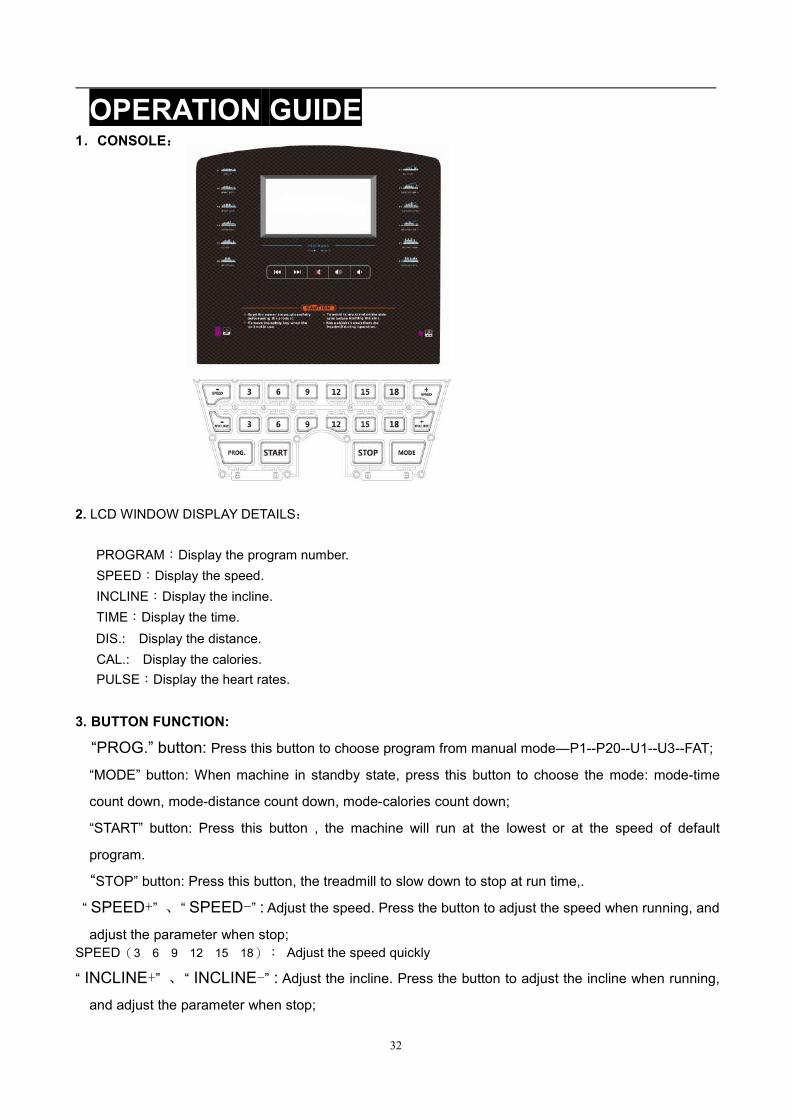
OPERATION GUIDE1.CONSOLE:
2. LCD WINDOW DISPLAY DETAILS:
PROGRAM:Display the program number.SPEED:Display the speed.INCLINE:Display the incline.TIME:Display the time.DIS.: Display the distance.CAL.: Display the calories.PULSE:Display the heart rates.
3. BUTTON FUNCTION:
“PROG.” button: Press this button to choose program from manual mode—P1--P20--U1--U3--FAT;
“MODE” button: When machine in standby state, press this button to choose the mode: mode-time
count down, mode-distance count down, mode-calories count down;
“START” button: Press this button , the machine will run at the lowest or at the speed of default
program.
“STOP” button: Press this button, the treadmill to slow down to stop at run time,.
“ SPEED+” 、“ SPEED-” : Adjust the speed. Press the button to adjust the speed when running, and
adjust the parameter when stop;SPEED(3 6 9 12 15 18): Adjust the speed quickly
“ INCLINE+” 、“ INCLINE-” : Adjust the incline. Press the button to adjust the incline when running,
and adjust the parameter when stop;
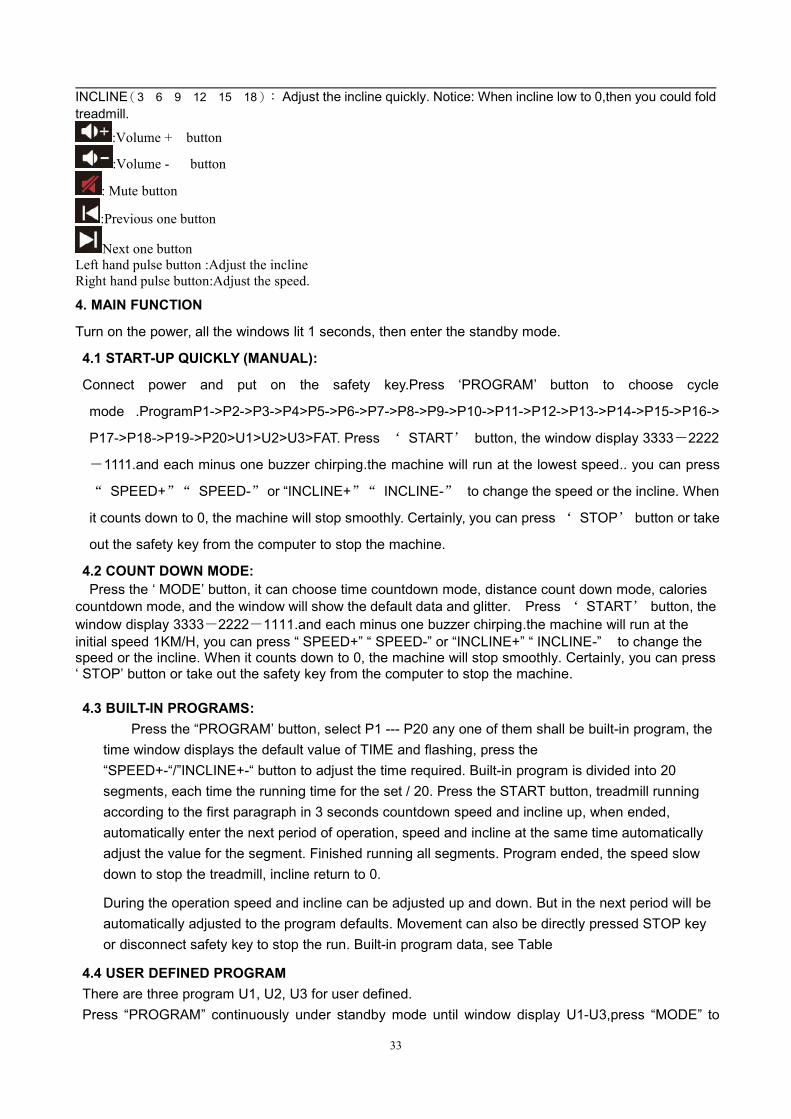
33
INCLINE(3 6 9 12 15 18): Adjust the incline quickly. Notice: When incline low to 0,then you could foldtreadmill.
:Volume + button
:Volume - button
: Mute button
:Previous one button
Next one buttonLeft hand pulse button :Adjust the inclineRight hand pulse button:Adjust the speed.
4. MAIN FUNCTION
Turn on the power, all the windows lit 1 seconds, then enter the standby mode.
4.1 START-UP QUICKLY (MANUAL):
Connect power and put on the safety key.Press ‘PROGRAM’ button to choose cycle
mode .ProgramP1->P2->P3->P4>P5->P6->P7->P8->P9->P10->P11->P12->P13->P14->P15->P16->
P17->P18->P19->P20>U1>U2>U3>FAT. Press ‘ START’ button, the window display 3333-2222
-1111.and each minus one buzzer chirping.the machine will run at the lowest speed.. you can press
“ SPEED+”“ SPEED-” or “INCLINE+”“ INCLINE-” to change the speed or the incline. When
it counts down to 0, the machine will stop smoothly. Certainly, you can press‘ STOP’ button or take
out the safety key from the computer to stop the machine.
4.2 COUNT DOWN MODE:Press the ‘ MODE’ button, it can choose time countdown mode, distance count down mode, calories
countdown mode, and the window will show the default data and glitter. Press ‘ START’ button, thewindow display 3333-2222-1111.and each minus one buzzer chirping.the machine will run at theinitial speed 1KM/H, you can press “ SPEED+” “ SPEED-” or “INCLINE+” “ INCLINE-” to change thespeed or the incline. When it counts down to 0, the machine will stop smoothly. Certainly, you can press‘ STOP’ button or take out the safety key from the computer to stop the machine.
4.3 BUILT-IN PROGRAMS:Press the “PROGRAM’ button, select P1 --- P20 any one of them shall be built-in program, the
time window displays the default value of TIME and flashing, press the“SPEED+-“/”INCLINE+-“ button to adjust the time required. Built-in program is divided into 20segments, each time the running time for the set / 20. Press the START button, treadmill runningaccording to the first paragraph in 3 seconds countdown speed and incline up, when ended,automatically enter the next period of operation, speed and incline at the same time automaticallyadjust the value for the segment. Finished running all segments. Program ended, the speed slowdown to stop the treadmill, incline return to 0.
During the operation speed and incline can be adjusted up and down. But in the next period will beautomatically adjusted to the program defaults. Movement can also be directly pressed STOP keyor disconnect safety key to stop the run. Built-in program data, see Table
4.4 USER DEFINED PROGRAMThere are three program U1, U2, U3 for user defined.Press “PROGRAM” continuously under standby mode until window display U1-U3,press “MODE” to
34
start setting first segment, setup speed and incline by pressing ‘SPEED + -’、’ SPEED(3 6 9 12 15
18)’、’’INCLINE + -’’、’’NCLINE(3 6 9 12 15 18)’’, The left handrail buttons and right handrail buttonscan adjust the speed and incline .press “MODE” finish first segment setting and enter second one, untilfinish all 20 segments. The data will be permanently saved until user reset next time.4.5 HEART REAT:
Both hands holding the sensors, about 5 seconds after the window displays your heartbeat values, inorder to get more correct heartbeat value, measured the treadmill stopped and the time to both handsholding the sensors,about 30seconds at least. Heart rate data only for reference, not as medical data.
5. BODY FAT TESTIn ready state, continued to press “PROGRAM” the button to enter the program's index (FAT) detectioncapabilities, Press “mode” button into F1、F2、F3、F4 interface (F 1 sex, F2 age , F3,height, F 4 weight, todetect), press "SPEED+", “SPEED-”could adjust the 01-04 parameters setting,When all parameters areadjusted, press the "MODE" button again. Corresponding window will display respectively "F5" and "---",hands clasped hand pulse five seconds will show you the health index and view your weight and height iswhether or not. Constitution index (fat) is evaluating a person in height and weight and is not in proportion, fatapplicable to any male and female, and together with other health indicators for the adjustment of the weight offat.
5.1 Data display and setting range
Parameter
Categorydefault range mark
SEX(-1-) 0(MALE) 0—1 0=Male 1=Female
AGE(-2-) 25years old 10—99 years old
HEIGHT(-3-) 170 CM 100—220 CM
WEIGHT(-4-) 70KG 20—150KG
5.2 BMI reference
(BMI) FAT LEVEL
<19 THIN19--26 NORMAL26--30 OVER WEIGHT>30 FAT
35
6. Data display and set range:
INITIALVALUE SETTING INITIAL VALUE SETTING RANGE SHOW RANGE
Time 0:00 30:00 5:00-99:00 0:00-99:59
Speed 0.0 N/A N/A 1.0-20.0
Incline 0 N/A N/A 0-20
Distance 0.00 1.0 1.0-99.0 0.00-99.9
Heart Rate P N/A N/A 60-200
Calories 0 50 10-990 0-999
7.PROGRAMS TABLE:Time
Program
To set time / 20 time = running time of each time period
1 2 3 4 5 6 7 8 9 10 11 12 13 14 15 16 17 18 19 20
P01SPEED 2 3 3 4 5 3 4 5 5 3 4 5 4 4 4 2 3 3 5 3
INCLINE 1 1 2 2 2 3 3 3 2 2 1 2 2 1 1 3 3 2 2 2
P02SPEED 2 4 4 5 6 4 6 6 6 4 5 6 4 4 4 2 2 5 4 2
INCLINE 1 2 2 2 2 3 3 2 2 2 2 2 3 3 3 4 4 3 2 2
P03SPEED 2 4 4 6 6 4 7 7 7 4 7 7 4 4 4 2 4 5 3 2
INCLINE 2 3 3 2 2 3 3 3 2 2 2 2 4 4 4 6 6 3 2 2
P04SPEED 3 5 5 6 7 7 5 7 7 8 8 5 9 5 5 6 6 4 4 3
INCLINE 2 3 3 2 2 3 3 3 2 2 2 2 4 4 4 6 6 3 2 2
P05SPEED 2 4 4 5 6 7 7 5 6 7 8 8 5 4 3 3 6 5 4 2
INCLINE 3 3 3 4 4 5 5 5 4 4 4 4 5 5 3 3 3 2 2 2
P06SPEED 2 4 4 4 5 6 8 8 6 7 8 8 6 4 4 2 5 4 3 2
INCLINE 3 5 5 5 4 4 4 3 3 3 3 4 4 4 3 3 3 4 3 2
P07SPEED 2 3 3 3 4 5 3 4 5 3 4 5 3 3 3 6 6 5 3 3
INCLINE 4 4 4 4 3 3 6 6 6 7 7 8 8 9 9 6 6 5 4 4
P08SPEED 2 3 3 6 7 7 4 6 7 4 6 7 4 4 4 2 3 4 4 2
INCLINE 4 5 5 5 6 6 6 7 8 9 9 9 10 10 10 12 12 8 6 3
P09SPEED 2 4 4 7 7 4 7 8 4 8 9 9 4 4 4 5 6 3 3 2
INCLINE 5 5 5 6 6 6 4 4 6 6 5 5 8 8 9 9 9 7 4 2
P10SPEED 2 4 5 6 7 5 4 6 8 8 6 6 5 4 4 2 4 4 3 3
INCLINE 5 6 6 6 7 5 8 8 4 4 4 5 5 8 8 10 10 8 6 3
P11SPEED 2 5 8 10 7 7 10 10 7 7 10 10 5 5 9 9 5 5 4 3
INCLINE 4 5 3 2 6 6 2 2 2 2 2 4 5 6 3 2 5 5 2 0
P12SPEED 3 4 9 9 5 9 5 8 5 9 7 5 5 7 9 9 5 7 6 3
INCLINE 1 2 3 2 3 5 5 0 0 2 3 5 7 3 3 5 6 5 3 3
P13SPEED 3 6 7 5 9 9 7 5 5 7 9 5 8 5 9 5 9 9 4 3
INCLINE 3 3 5 6 5 3 3 7 5 3 2 0 0 5 5 3 2 3 2 1
P14SPEED 2 2 4 5 6 5 4 3 2 1 2 3 4 5 6 5 4 3 2 1
INCLINE 4 4 4 4 3 3 6 6 6 7 7 8 8 9 9 6 6 5 4 4
P15SPEED 2 4 6 8 6 6 4 4 2 2 2 4 6 8 6 6 4 4 2 2
INCLINE 3 3 3 4 4 5 5 5 4 4 4 4 5 5 3 3 3 2 2 2
P16SPEED 2 4 6 8 10 8 6 4 2 2 2 4 6 8 6 6 4 4 2 2
INCLINE 5 5 5 6 6 6 4 4 6 6 5 5 8 8 9 9 9 7 4 1
36
P17SPEED 2 2 6 6 8 10 6 6 2 2 2 2 6 6 8 10 6 6 2 2
INCLINE 4 5 5 5 6 6 6 7 8 9 9 9 10 10 10 12 12 8 6 3
P18SPEED 2 3 4 5 2 3 4 5 3 2 2 3 4 5 2 3 4 5 3 2
INCLINE 4 4 4 4 3 3 6 6 6 7 7 8 8 9 9 6 6 5 3 2
P19SPEED 2 4 6 2 4 6 2 4 6 2 2 4 6 2 4 6 2 4 6 2
INCLINE 3 5 5 5 4 4 4 3 3 3 3 4 4 4 3 3 3 4 3 2
P20SPEED 1 3 4 5 6 5 4 3 2 1 1 3 4 5 6 5 4 3 2 1
INCLINE 3 3 3 4 4 5 5 5 4 4 4 4 5 5 3 3 3 2 2 2
8.USB FUNCTION( Option):When treadmill is power on, you may insert any USB memory stick which contains audio files.Thecomputer will detect the audio files on the memory stick and play the music directly
9.MP3 FUNCTION( Option)When the power on, Contacting the external MP3 equipment, the computer will play. The voice isadjustable from operate the external MP3 equipment, the voice should be adjusted on the proper sectionto protect the computer loudhailer.
10 .Sleep function:Stopped for more than 10 minutes without any operation, the system completed all showed off into
dormancy state. Press any key to wake up.11. Safety key function:Take away the safety anytime will stop the machine, all data will return to 0, all window will display
“---”. All operation will be workable when the safety key is on.
37
EXERCISE INSTRUCTIONSWARM UP STAGE::If you are over 35 years old, or not very healthy, also it’s your first time exercise, please consult with yourdoctor or professional person.
Before you use the motorized treadmill, please learn how to control the machine, know well how to start,
stop, adjust the speed and so on, don’t stand on the machine at this time. After that, you can use the
machine. Stand on anti-slip pad both sides and handle the handle bar with your both hands. Keep the
machine at the low speed about 1.6~3.2 km/h, then test the running machine by one foot, after get used
to the speed, then you can run on the machine and you can add the speed between 3 and 5 km/h. Keep
the speed about 10 minutes, then stop the machine.
EXERCISE STAGE:Learn how to adjust the speed and incline before using. Walk about 1 km at stable velocity and write
down the time, it will take you about 15-25 minutes. If walk at 4.8 km/h, it will take you about 12 minutes
in 1 km. If you feel comfortable at the stable velocity, you can add the speed and incline, after 30 minutes,
you can have good exercise. At this stage, you can not add the speed or incline too much at one time, it
can keep you feel comfortable.
EXERCISE INTENSITY:Warm up at the speed 4.8 km/h in 2 minutes, then add the speed to 5.3 km/h and keep walking in 2
minutes, then add to 5.8km/h and walk in 2 minutes. After that, add up 0.3 km/h in each 2 minutes, until
rapid breath but not feel comfortable
Calorie burning---the best effective way
Warm-up for 5mints by the velocity:4-4.8KM/H, then slowly increase the speed by 0.3KM/H/2Mints ,until
up to the stable speed which you feel is comfortable for 45Mints.For improving the intensity of movement,
you can maintain the speed during 1H of TV program, then increase the speed by 0.3KM/H each
Advertisement interval time, after that return to the original speed . You can acquaint the best efficiency
of workout for calorie burning during the advertisement time and subsequent heart frequency increasing
time. Finally , you should slow down the speed step by step for 4Mints.
EXERCISE FREQUENCY::The cycle time: 3-5times/Week, 15-60mints/Times.Make up the schedule of workout scientific, not only
for your hobby.You can control the running intensity through adjusting the velocity and incline of treadmill. We suggestthat you don’t set the incline at first; improve the incline is the effective way to strengthen the exercise’sintensity.
Consult with your physician or health professional before starting your workout. The professional people
can help you make up the suitable exercise time-chart according to your age and health condition,
38
determine the velocity of movement, the intensity of exercise. Please stop at once, If you feel chest
tightness, chest pain, irregular heart beat, breath difficulty, dizziness or other discomfort during exercise.
You should consult with your physician or health professional as keep going.
You can choose the normal walking speed or the jogging speed ,if you always take workout with
treadmill.
If you don’t have enough experiences or confirm the testing velocity ,you can follow the instruction :
Speed 1-3.0KM/H not well physical
Speed 3.0-4.5KM/H less movement and workout
Speed 4.5-6.0KM/H normal walking
Speed 6.0-7.5KM/H Fast walking
Speed 7.5-9.0KM/H Jogging
Speed 9.0-12.0KM/H intermediate speed walking
Speed 12.0-14.5M/H well experiences of running
Speed 14.5-16.0KM/H excellent runner
Attention: The velocity of movement ≤6KM/H , the normal walking; The velocity of movement
≥8.0KM/H ,the runner
39
WARM UP STAGE
Before exercise, it is better to do stretching exercises .
Warm muscles stretch more easily, so the first of 5 ~ 10
minutes to warm up. Then in accordance with the following
methods to stop and do stretching exercises - do five times,
each leg every time 10 seconds or more time to do it again
after the end of the exercise.
1. Down the stretch: knees slightly curved, the body bent
forward slowly, so that the back and shoulders relaxed,
hands try to touch your toes. Maintain 10 to 15 seconds,
then relax. Repeat three times to do (see Figure l).
2. Hamstring stretch: sitting on the clean seat, put one leg
straight. Inward close to the other leg to make it close to the
inside leg straight. hand try to touch the toes. Maintain 10 to
15 seconds, then relax. Repeat for each leg do three times
(see Figure 2).
3. Legs and feet tendon stretch: two on the Rotary wall or
tree stand, one foot in the post. Keep legs straight and heel
to tilt the direction of the wall or tree. Maintain 10 to 15
seconds, then relax. Repeat for each leg do three times
(see Figure 3).
4 quadriceps stretch: the left hand wall or table Fu master
balance, and then stretched his right hand back to seize the
right foot to the buttocks with slowly pull until you feel the
front thigh muscles tense. Maintain 10 to 15 seconds, then
relax. Repeat for each leg to do three times (see Figure 4).
5. Sartorius muscle (inner thigh muscles) stretch: Foot Incontrast, the knee outward to sit down. The hands graspthe feet to the groin pull. Maintain 10 to 15 seconds, thenrelax. Repeat three times(see Figure 5).

40
RUNNING BELT ADJUSTMENTWarning: ALWAYS UNPLUG THE TREADMILL FROM THE ELECTRICAL OUTLET BEFORE CLEANING
OR SERVICING THE UNIT.
Clean: General cleaning or the unit will greatly prolong the treadmill.
Keep treadmill clean by dusting regularly. Be sure to clean the exposed part of the deck on either side of
the walking belt and also the side rails. This reduces the build up of foreign material underneath the
walking belt by wearing the clean running shoes.
Warning: Always unplug the treadmill from the electrical outlet before removing the motor cover.
At least once a year remove the motor cover and vacuum under the motor cover.
RUNNING BELT AND DECK LUBRICATION
This treadmill is equipped with a pre-lubricated, low maintenance deck system. The belt/ deck
friction may play a major role in the function and life of your treadmill, thus requiring periodic lubrication.
We recommend a periodic inspection of the deck. You need contact with our service center if you find the
damage of the deck.
We recommend lubrication of the deck according to the following timetable:
Light user (less than 3 hours/ week) annually
Medium user (3-5 hours/ week) every six months
Heavy user (more than 5 hours/ week) every three months
We recommend that you buy the lubrication from our distributor or directly to our company.Attention: Any repair need the professional technician.
1, We suggest that you should cut off the power for 10Mints after keep running 2HS ,so that it’s good for
maintain the treadmill.
2,For avoiding the slipping during running , the belt not too loose; for avoiding the more abrasion
between the roller and belt and maintain the machine’s good running ,the belt not too tight. You can
adjust the distance between plates and belt , the belt be away from the plates about 50-75mm on both
sides ,if the best not too tight and loose.
41
Center the running belt●Place treadmill on a level surface. Run
Treadmill at approximately 6-8KM/H,
checking the running condition.
If the belt has drifted to the right, pull out
of the save clock and switch, turn the right
adjusting bolt 1/4 turn clockwise, then
start running until centering the belt. PIC A
If the belt has drifted to the left ,pull out of
the safety clock and switch, turn the left
adjusting bolt 1/4 turn clockwise ,then
start running until centering the belt .PIC B
Timely adjust the tightness of the belt ,for
the looseness after a period of time
running. Pull out of the safety clock and
switch , turn the left and right adjusting
bolt 1/4 turn clockwise ,then re-start
running, confirm the belt-tightness until
the belt be right tightness. PIC C
42
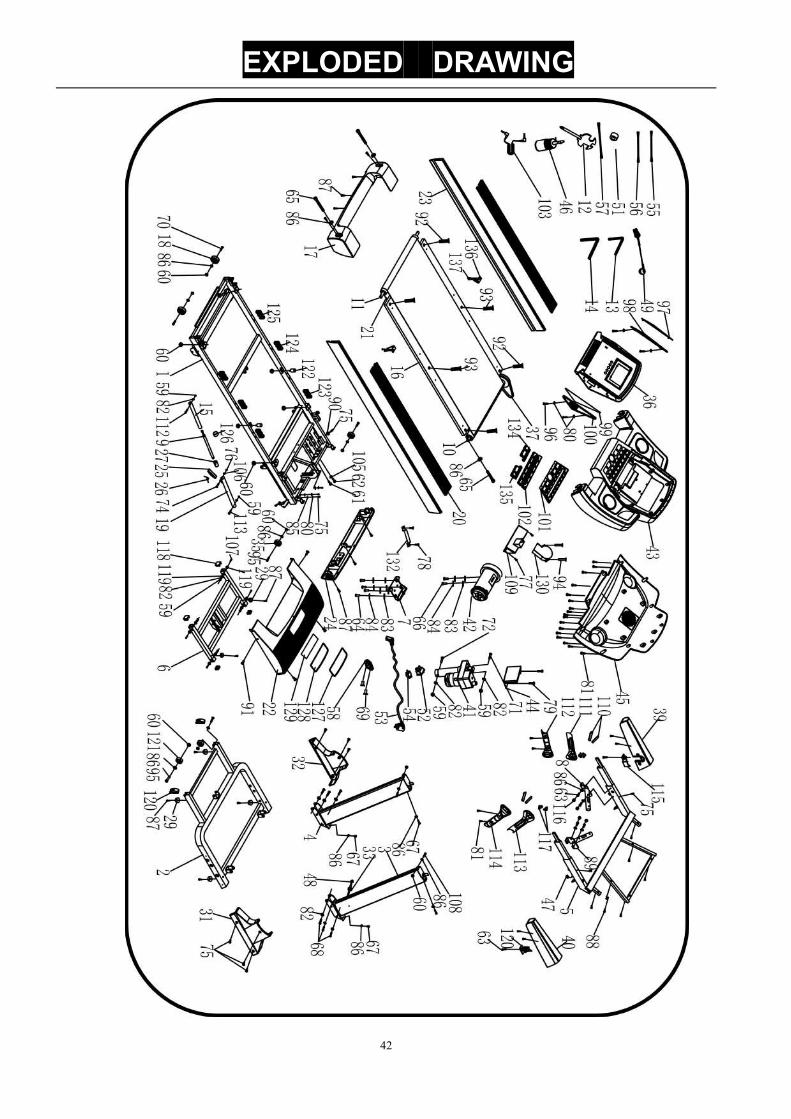
EXPLODED DRAWING
43
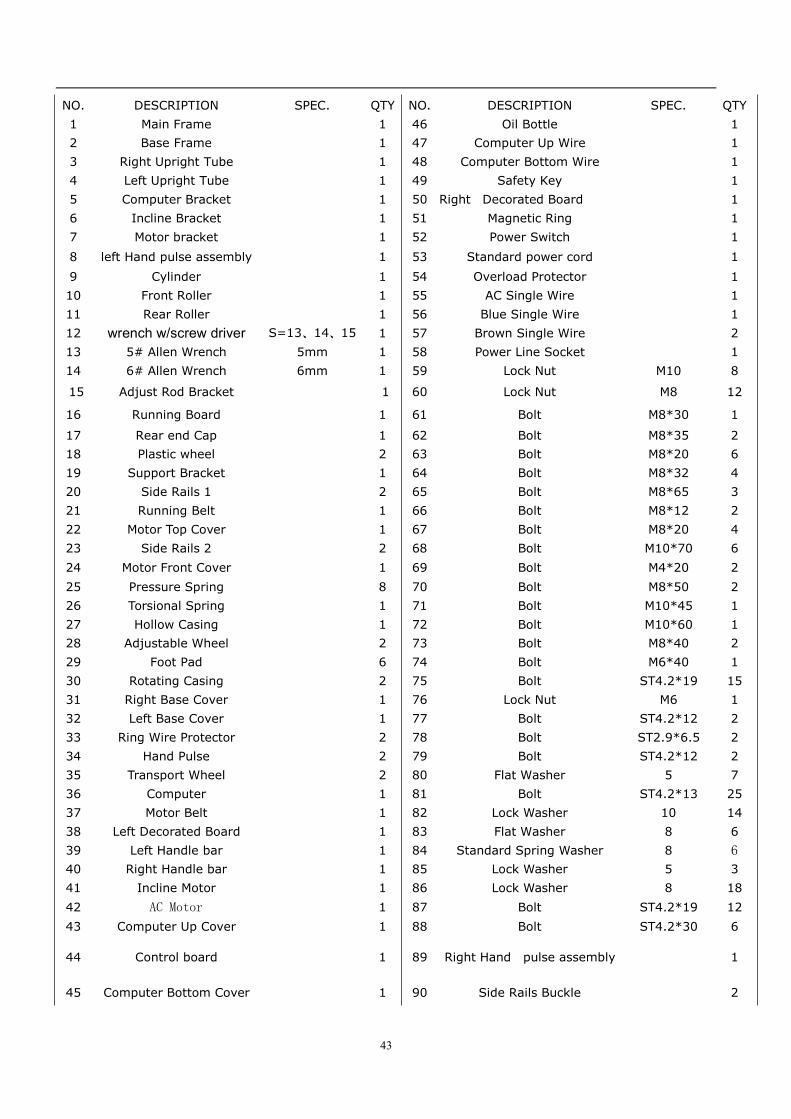
NO. DESCRIPTION SPEC. QTY NO. DESCRIPTION SPEC. QTY
1 Main Frame 1 46 Oil Bottle 1
2 Base Frame 1 47 Computer Up Wire 1
3 Right Upright Tube 1 48 Computer Bottom Wire 1
4 Left Upright Tube 1 49 Safety Key 1
5 Computer Bracket 1 50 Right Decorated Board 1
6 Incline Bracket 1 51 Magnetic Ring 1
7 Motor bracket 1 52 Power Switch 1
8 left Hand pulse assembly 1 53 Standard power cord 1
9 Cylinder 1 54 Overload Protector 1
10 Front Roller 1 55 AC Single Wire 1
11 Rear Roller 1 56 Blue Single Wire 1
12 wrench w/screw driver S=13、14、15 1 57 Brown Single Wire 2
13 5# Allen Wrench 5mm 1 58 Power Line Socket 1
14 6# Allen Wrench 6mm 1 59 Lock Nut M10 8
15 Adjust Rod Bracket 1 60 Lock Nut M8 12
16 Running Board 1 61 Bolt M8*30 1
17 Rear end Cap 1 62 Bolt M8*35 2
18 Plastic wheel 2 63 Bolt M8*20 6
19 Support Bracket 1 64 Bolt M8*32 4
20 Side Rails 1 2 65 Bolt M8*65 3
21 Running Belt 1 66 Bolt M8*12 2
22 Motor Top Cover 1 67 Bolt M8*20 4
23 Side Rails 2 2 68 Bolt M10*70 6
24 Motor Front Cover 1 69 Bolt M4*20 2
25 Pressure Spring 8 70 Bolt M8*50 2
26 Torsional Spring 1 71 Bolt M10*45 1
27 Hollow Casing 1 72 Bolt M10*60 1
28 Adjustable Wheel 2 73 Bolt M8*40 2
29 Foot Pad 6 74 Bolt M6*40 1
30 Rotating Casing 2 75 Bolt ST4.2*19 15
31 Right Base Cover 1 76 Lock Nut M6 1
32 Left Base Cover 1 77 Bolt ST4.2*12 2
33 Ring Wire Protector 2 78 Bolt ST2.9*6.5 2
34 Hand Pulse 2 79 Bolt ST4.2*12 2
35 Transport Wheel 2 80 Flat Washer 5 7
36 Computer 1 81 Bolt ST4.2*13 25
37 Motor Belt 1 82 Lock Washer 10 14
38 Left Decorated Board 1 83 Flat Washer 8 6
39 Left Handle bar 1 84 Standard Spring Washer 8 6
40 Right Handle bar 1 85 Lock Washer 5 3
41 Incline Motor 1 86 Lock Washer 8 18
42 AC Motor 1 87 Bolt ST4.2*19 12
43 Computer Up Cover 1 88 Bolt ST4.2*30 6
44 Control board 1 89 Right Hand pulse assembly 1
45 Computer Bottom Cover 1 90 Side Rails Buckle 2
44
NO. DESCRIPTION SPEC. QTY NO. DESCRIPTION SPEC. QTY
91 Bolt M5*8 4 113 Right Pulse Upper Handle bar 1
92 Bolt M8*32 4 114 Left Pulse Bottom Handle bar 1
93 Bolt M8*25 2 115 Left Decorated Board 1
94 Bolt ST4.2*45 2 116 Handrail Decorated Ring 4
95 Bolt M8*40 4 117 Hand pulse Button 4
96 Bolt ST4.2*9 4 118 Square Tube End Plug 4
97 Left Speaker grill 1 119 Drive pipe 2 8
98 Left Speaker Fixing seat 1 120 Right Decorated Board 1
99 Right Speaker grill 1 121 Wheel 2
100 Right Speaker Fixing seat 1 122 Cylindrical Cushion 2
101 Top key Block 1 123 Cushion Red 2
102 Keyboard shortcut 1 124 Cushion Blue 2
103 MP3 Wire 1 125 Cushion Yellow 2
104 Bolt ST4.2*38 4 126 Stop Collar 1
105 Flat Washer 8*24 1 127 Chrome plated Frame 1106 Flat Washer 6 1 128 Acrylic Plate 1107 Bolt M10*55 4 129 Back Light Plate Optional 1
108 Bolt M8*50 2 130 Fan Optional 1
109 Drive pipe 1 131 Wind Scooper Optional 1
110 Heart Beat Sensor 4 132 Sheet Optional 1
111 Left Pulse Upper Handle bar 1 133 Wheel Cover 2
112 Left Pulse Bottom Handle bar 1
134135136137
Start key blockStop key blockBelt guide hook
Bolt
OptionST4.2*12
1124
45
TROUBLE SHOOTINGCODE REASON SOLUTION
E1 Message failure between computerand control board
1. Check the computer and bottom control board wireconnect well;
2. Check if IC on control board is loosen, reset theIC
3. Power on bottom control board has some problem,change the bottom control board
4. Change the computer.E2 Control board have not find out the
voltage on DC motor wire1.Check if the DC motor wire connect well with controlboard,reconnect the wire
2. If the wire connect well,Check if the power tube andthe nearby component are damaged, change agood one.
E3 DC motor have not find out thespeed feedback signal whenrotating
1.Check if the DC motor are rotate,if it stop after quicklyrotate,then computer show E03,please check if lightsensor is fixed well, if the light sensor wire aredamaged or it’s pin connect well with 4 pin on speedsensor2. Check if 4 pin and nearby component or controlboard and IC are damage3. If start the treadmill ,DC motor do not rotate,thencomputer show E03,please check if DC motor isblocked or damaged
E5 Current overload protecting 1. Over rated loaded or the motor is stuck, causeexcessive current, machine will start self-protectingsystem. Adjust the machine and restart;
2. Check if the motor has noise from motor or if themotor / bottom control board were burnt out, if burntout, change good motor and control board; Useright voltage.
E7 Computer have not find out thesafety key signal(Notice:someproduct show"---"if no safetykey)
1.Check if safety key was put on it’s position2.Open the computer to check if safety key wire areconnect well and PCB are damage or it’s position aredeviation