ROBOT DE BUCATARIE - heinner.ro · Pentru textura mai groasa folositi controlul de pulsatii....
30
1 ROBOT DE BUCATARIE KITCHENKING 7070 Alimentare: 220-240, 50/60 Hz Putere: 800W Cititi cu atentie aceste instructiuni si pastrati-le pentru o consultare ulterioara
Transcript of ROBOT DE BUCATARIE - heinner.ro · Pentru textura mai groasa folositi controlul de pulsatii....

1
ROBOT DE BUCATARIE
KITCHENKING 7070
Alimentare: 220-240, 50/60 Hz
Putere: 800W
Cititi cu atentie aceste instructiuni si pastrati-le pentru o consultare ulterioara
2

3
Inainte de a utiliza aparatul
Cititi cu atentie aceste instructiuni si pastrati-le pentru o consultare ulterioara.
Scoateti toate ambalajele si etichetele.
Siguranta
Lamele si discurile sunt foarte ascutite, manuiti-le cu grija.
Intotdeauna tineti cutitul de maner.
Nu ridicati sau carati aparatul de maner – manerul se poate rupe si poate produce accidente.
Intotdeauna scoateti lamele din bol, inainte de a goli bolul de continut.
Nu introduceti mainile sau ustensile in bolul procesorului in timp ce acesta este conectat la priza.
Opriti aparatul si scoateti din priza:
Inainte de a adauga sau dezasambla accesorii.
Dupa fiecare utilizare.
Inainte de curatare.
Niciodata nu impingeti cu degetele alimentele in tubul de introducere. Folositi dispozitivul de
impingere.
Inainte de a scoate capacul de pe bol sau cana:
Opriti aparatul.
Asteptati pana ce lamele se opresc din miscare.
Aveti grija sa nu desurubati bolul sau cana din unitate.
Lasati toate lichidele sa se raceasca la temperatura camerei, inainte de a le introduce in procesor.
Nu folositi capacul pentru operarea procesorului, folositi butoanele on/off.
Acest aparat va fi deteriorat si poate cauza ranirea persoanelor daca mecanismul de inchidere este
fortat.
Nu folositi niciodata un accesoriu neautorizat.
Nu lasati aparatul pornit nesupravegheat.
In cazul in care aparatul se deterioreaza, pentru a evita orice pericol, nu il utilizati si duceti-l la un
service autorizat
Este interzisa udarea cablului, a stecherului si a aparatului.
Nu lasati cablul sa atarne peste margini ascutite sau sa atinga suprafete fierbinti.
Nu depasiti cantitatile de alimente indicate.
Acest aparat nu este destinat folosirii de catre persoane (inclusiv copii) cu capacitati fizice, senzoriale
sau mentale reduse, decat daca sunt instruite si supervizate de o persoana responsabila de siguranta
lor. Copiii trebuie supravegheati cu atentie, astfel incat sa nu se joace cu aparatul.
Numai pentru uz casnic
Inainte de conectare:
Asigurati-va ca tensiunea inscriptionata pe aparat corespunde cu cea a prizelor.
4
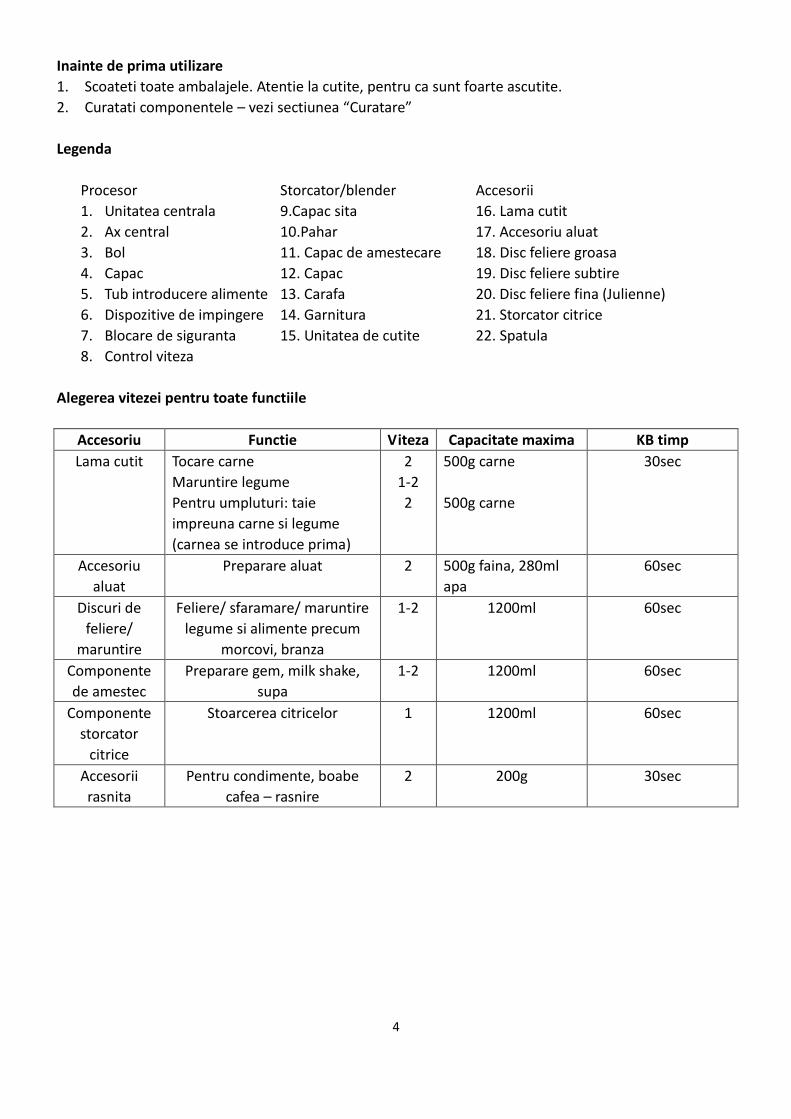
Inainte de prima utilizare
1. Scoateti toate ambalajele. Atentie la cutite, pentru ca sunt foarte ascutite.
2. Curatati componentele – vezi sectiunea “Curatare”
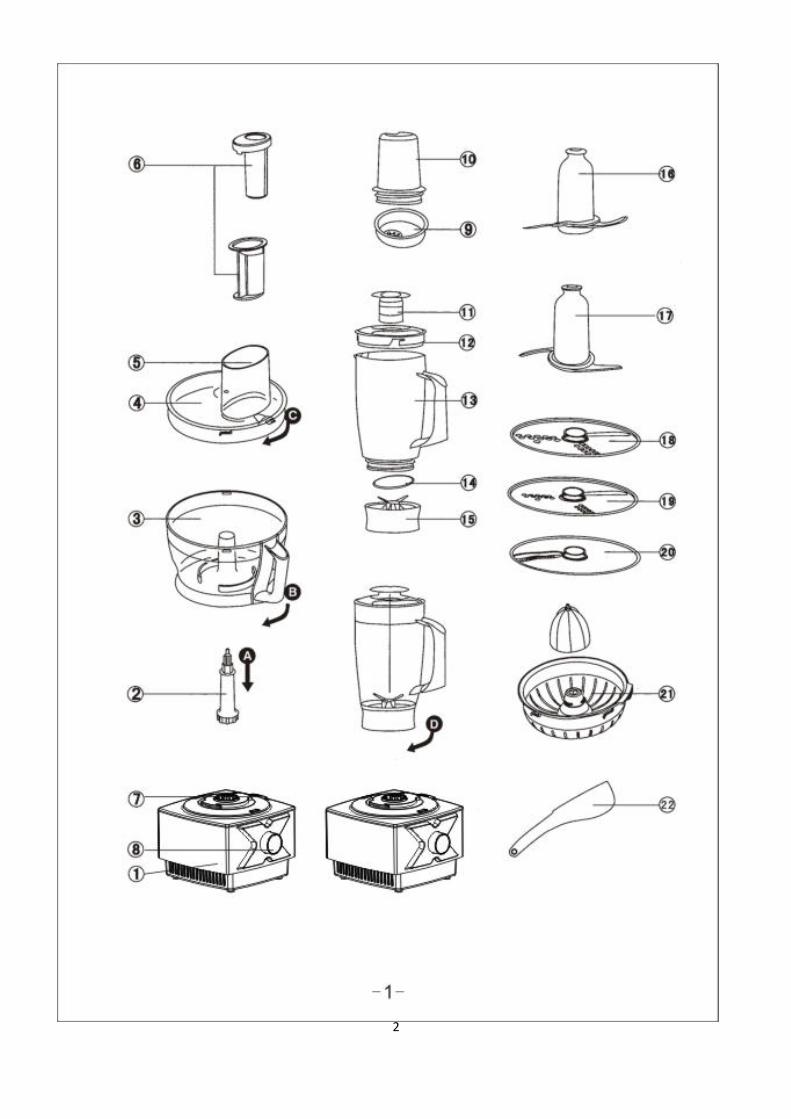
Legenda
Procesor Storcator/blender Accesorii
1. Unitatea centrala 9.Capac sita 16. Lama cutit
2. Ax central 10.Pahar 17. Accesoriu aluat
3. Bol 11. Capac de amestecare 18. Disc feliere groasa
4. Capac 12. Capac 19. Disc feliere subtire
5. Tub introducere alimente 13. Carafa 20. Disc feliere fina (Julienne)
6. Dispozitive de impingere 14. Garnitura 21. Storcator citrice
7. Blocare de siguranta 15. Unitatea de cutite 22. Spatula
8. Control viteza
Alegerea vitezei pentru toate functiile
Accesoriu Functie Viteza Capacitate maxima KB timp
Lama cutit Tocare carne
Maruntire legume
Pentru umpluturi: taie
impreuna carne si legume
(carnea se introduce prima)
2
1-2
2
500g carne
500g carne
30sec
Accesoriu
aluat
Preparare aluat 2 500g faina, 280ml
apa
60sec
Discuri de
feliere/
maruntire
Feliere/ sfaramare/ maruntire
legume si alimente precum
morcovi, branza
1-2 1200ml 60sec
Componente
de amestec
Preparare gem, milk shake,
supa
1-2 1200ml 60sec
Componente
storcator
citrice
Stoarcerea citricelor 1 1200ml 60sec
Accesorii
rasnita
Pentru condimente, boabe
cafea – rasnire
2 200g 30sec
5
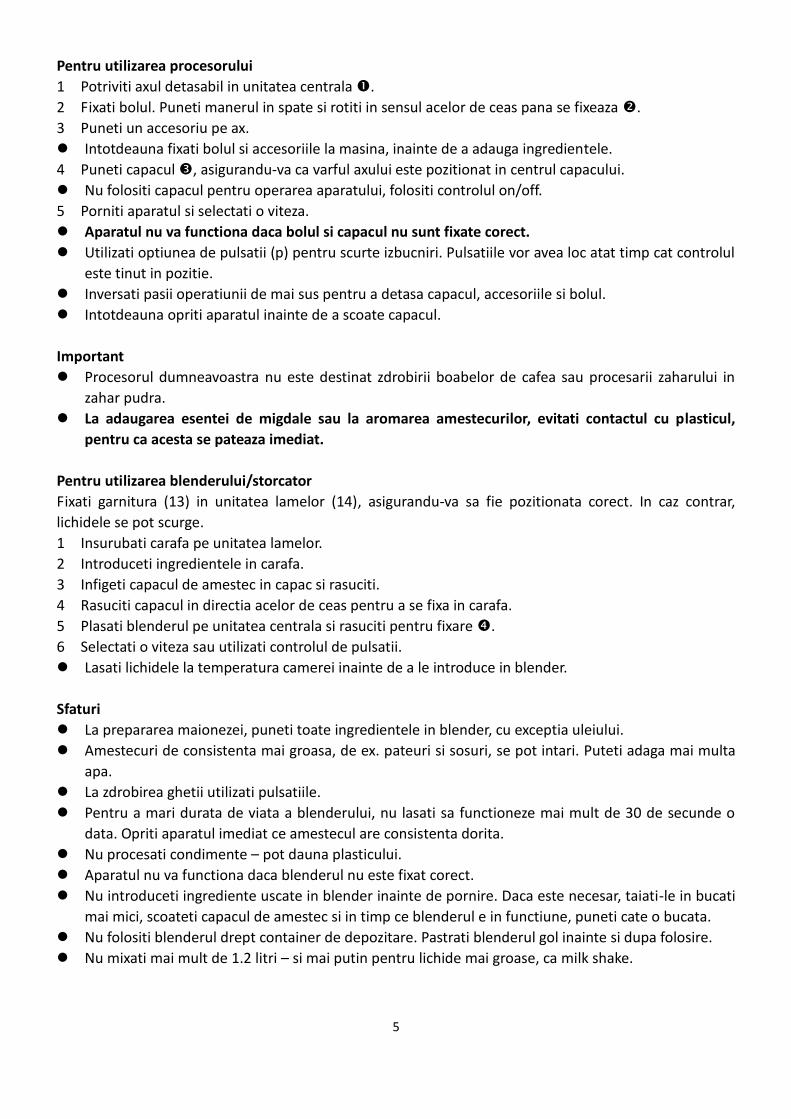
Pentru utilizarea procesorului
1 Potriviti axul detasabil in unitatea centrala .
2 Fixati bolul. Puneti manerul in spate si rotiti in sensul acelor de ceas pana se fixeaza .
3 Puneti un accesoriu pe ax.
Intotdeauna fixati bolul si accesoriile la masina, inainte de a adauga ingredientele.
4 Puneti capacul , asigurandu-va ca varful axului este pozitionat in centrul capacului.
Nu folositi capacul pentru operarea aparatului, folositi controlul on/off.
5 Porniti aparatul si selectati o viteza.
Aparatul nu va functiona daca bolul si capacul nu sunt fixate corect.
Utilizati optiunea de pulsatii (p) pentru scurte izbucniri. Pulsatiile vor avea loc atat timp cat controlul
este tinut in pozitie.
Inversati pasii operatiunii de mai sus pentru a detasa capacul, accesoriile si bolul.
Intotdeauna opriti aparatul inainte de a scoate capacul.
Important
Procesorul dumneavoastra nu este destinat zdrobirii boabelor de cafea sau procesarii zaharului in
zahar pudra.
La adaugarea esentei de migdale sau la aromarea amestecurilor, evitati contactul cu plasticul,
pentru ca acesta se pateaza imediat.
Pentru utilizarea blenderului/storcator
Fixati garnitura (13) in unitatea lamelor (14), asigurandu-va sa fie pozitionata corect. In caz contrar,
lichidele se pot scurge.
1 Insurubati carafa pe unitatea lamelor.
2 Introduceti ingredientele in carafa.
3 Infigeti capacul de amestec in capac si rasuciti.
4 Rasuciti capacul in directia acelor de ceas pentru a se fixa in carafa.
5 Plasati blenderul pe unitatea centrala si rasuciti pentru fixare .
6 Selectati o viteza sau utilizati controlul de pulsatii.
Lasati lichidele la temperatura camerei inainte de a le introduce in blender.
Sfaturi
La prepararea maionezei, puneti toate ingredientele in blender, cu exceptia uleiului.
Amestecuri de consistenta mai groasa, de ex. pateuri si sosuri, se pot intari. Puteti adaga mai multa
apa.
La zdrobirea ghetii utilizati pulsatiile.
Pentru a mari durata de viata a blenderului, nu lasati sa functioneze mai mult de 30 de secunde o
data. Opriti aparatul imediat ce amestecul are consistenta dorita.
Nu procesati condimente – pot dauna plasticului.
Aparatul nu va functiona daca blenderul nu este fixat corect.
Nu introduceti ingrediente uscate in blender inainte de pornire. Daca este necesar, taiati-le in bucati
mai mici, scoateti capacul de amestec si in timp ce blenderul e in functiune, puneti cate o bucata.
Nu folositi blenderul drept container de depozitare. Pastrati blenderul gol inainte si dupa folosire.
Nu mixati mai mult de 1.2 litri – si mai putin pentru lichide mai groase, ca milk shake.

6
Utilizare accesorii
Cutit (16) / Accesoriu aluat (17)
Lama de cutit este unul dintre accesoriile cu cele mai multe intrebuintari.
Timpul de procesare va determina textura produsului final.
Pentru textura mai groasa folositi controlul de pulsatii.
Utilizati lama de cutit pentru prepararea prajiturilor si a produselor de
patiserie, maruntirea carnii crude si preparate, a legumelor, nucilor, preparare
pateuri, sosuri, supe-crema, si pentru sfaramarea biscuitilor si a painii.
Poate fi folosita la amestecuri cu drojdie, daca nu exista accesoriu special.
Utilizati accesoriul pentru aluat pentru amestecuri cu drojdie.
Sfaturi
Lama cutit
Taiati alimentele precum carne, paine, legume in cuburi de aprox. 2cm/3/4 inainte de procesare.
Biscuitii trebuie rupti in bucatele mai mici si adaugati pe tubul de introducere alimente in timp ce
blenderul este in functiune.
La prepararea aluaturilor de patiserie, luati grasime/untura direct de la frigider si taiati-o in cuburi
de 2cm/3/4.
Aveti grija sa nu procesati prea mult alimentele.
Accesoriu aluat
1 Puneti ingredientele uscate in bol si adaugati lichidul prin tubul de introducere alimente in timp ce
masina functioneaza. Procesati pana ce se formeaza o minge moale elastica, in aprox. 30-90secunde.
2 Framantati din nou doar cu mana. A doua framantare nu este recomandata in bol pentru ca
procesorul poate deveni instabil.
Discuri de feliere/ zdrobire 18-19-20
Discuri dublu functionale, Gros-18, subtire-19
1 Folositi partea pentru zdrobire a discului pentru branza, morcovi, cartofi si alimente similare.
2 Folositi partea pentru feliere pentru branza, cartofi, morcovi, varza, castraveti, dovlecel si ceapa.
Disc de taiere fina (20) – Stil Julienne
Folositi pentru a taia: cartofi pentru cartofi prajiti in stil Julienne; ingrediente solide pentru salate,
garnituri, caserole (morcovi, dovlecel, castravete etc.)

7
Siguranta
Nu scoateti capacul pana cand discul de taiere nu s-a oprit complet din
miscare.
Atentie la discuri- sunt foarte ascutite.
Utilizarea discurilor
1) Fixati axul central si bolul in unitatea centrala.
2) Tinand de centru (d), plasati discul cu partea dorita in sus.
3) Fixati capacul.
4) Alegeti tubul de inserare alimente pe care doriti sa il folositi.
Dispozitivul de impingere contine un tub de alimentare mai mic pentru ingrediente mai subtiri.
Pentru a folosi tubul mai mic – mai intai puneti dispozitivul mai mare de impingere in tubul de
alimentare.
Pentru a folosi tubul de alimentare mai mare – folositi ambele dispozitive impreuna.
5) Puneti alimentele in tubul de alimentare.
6) Porniti aparatul si apasati in mod echilibrat cu dispozitivul – nu introduceti degetele in tubul de
introducere alimente!
Sfaturi
Folositi ingrediente proaspete.
Nu taiati alimentele prea marunt. Umpleti deschizatura tubului larg aproape de tot. Folositi
alternativ tubul mic.
La folosirea discului de tocare, puneti ingredientele orizontal.
La feliere sau zdrobire: alimentele plasate in pozitie verticala (f) sunt maruntite mai bine decat cele
plasate orizontal (g).
Vor ramane intotdeauna resturi in bol, dupa procesare.

8
Storcator citrice (21)
Folositi storcatorul de citrice pentru a stoarce sucul din fructe (portocale, lamai, grapefruit, lime etc)
Con
Sita
Pentru utilizarea storcatorului
1 Fixati axul central si bolul in unitatea centrala.
2 Fixati sita in bol- manerul sitei trebuie sa fie fixat exact deasupra
manerului bolului (h).
3 Puneti conul deasupra axului, rasucind in jos. (i)
4 Taiati fructele in jumatati. Porniti aparatul si apasati fructul pe con.
Storcatorul nu va functiona daca sita nu este fixata bine.
Rasnita
Folositi rasnita pentru a rasni ierburi, nuci si boabe de cafea.
Unitatea lamelor
Garnitura
Pahar
Capac cu sita
Siguranta
Nu fixati niciodata lamele inainte ca paharul sa fie conectat.
Nu desurubati paharul in timp ce rasnita este conectata la masina.
Nu atingeti lamele. Pastrati departe de copii.
Nu scoateti lamele pana nu s-a oprit complet functionarea rasnitei.
Important
Pentru a prelungi viata aparatului, nu rasniti mai mult de 30 de secunde o data.
Nu procesati condimente – pot dauna plasticului.
Folositi numai ingrediente uscate.
Utilizarea rasnitei
1 Puneti ingredientele in pahar. Nu umpleti mai mult de jumatate.
2 Puneti garnitura pe unitatea lamelor.
3 Intoarceti cu susul in jos unitatea lamelor.
Coborati-o in pahar, cu lamele in jos.
4 Insurubati unitatea lamelor in pahar, cat mai strans.
5 Plasati rasnita pe unitatea centrala si puneti siguranta (j).
6 Setati la putere maxima sau utilizati pulsatiile.
7 Dupa rasnire, puteti inlocui unitatea lamelor cu capacul-sita si
puteti presara astfel direct ingredientele maruntite peste mancare.
8 Capacul/sita nu este etans.

9
Sfaturi
Mirodeniile (ierburi) sunt cele mai bune atunci cand sunt uscate.
Ingrijire si curatare
1 Intotdeauna opriti aparatul inainte de a-l curata.
2 Aveti grija la manuirea cutitelor si lamelor.
3 Unele alimente pot decolora plasticul, este perfect normal. Stergeti cu o carpa inmuiata in ulei
vegetal pentru a indeparta petele.
Unitatea centrala
Stergeti cu o carpa umeda, apoi lasati sa se usuce.
Blender/rasnita
1 Goliti paharul /carafa inainte de a desuruba din unitatea lamelor.
2 Spalati manual paharul/carafa.
3 Scoateti si spalati garniturile.
4 Nu atingeti lamele, spalati-le cu apa fierbinte cu detergent, si clatiti sub jet de apa. Nu scufundati in
apa unitatea lamelor.
5 Lasati sa se usuce.
Celelalte componente
Spalati manual, apoi lasati sa se usuce.
Pot fi spalate, din cand in cand, pe raftul de sus al masinii de spalat vase. Este recomandat un
program de spalare scurt, cu o temperatura mica.
Service clienti
Daca se deterioreaza cablul, acesta trebuie inlocuit de producator sau de catre un service autorizat,
pentru a evita accidentele.
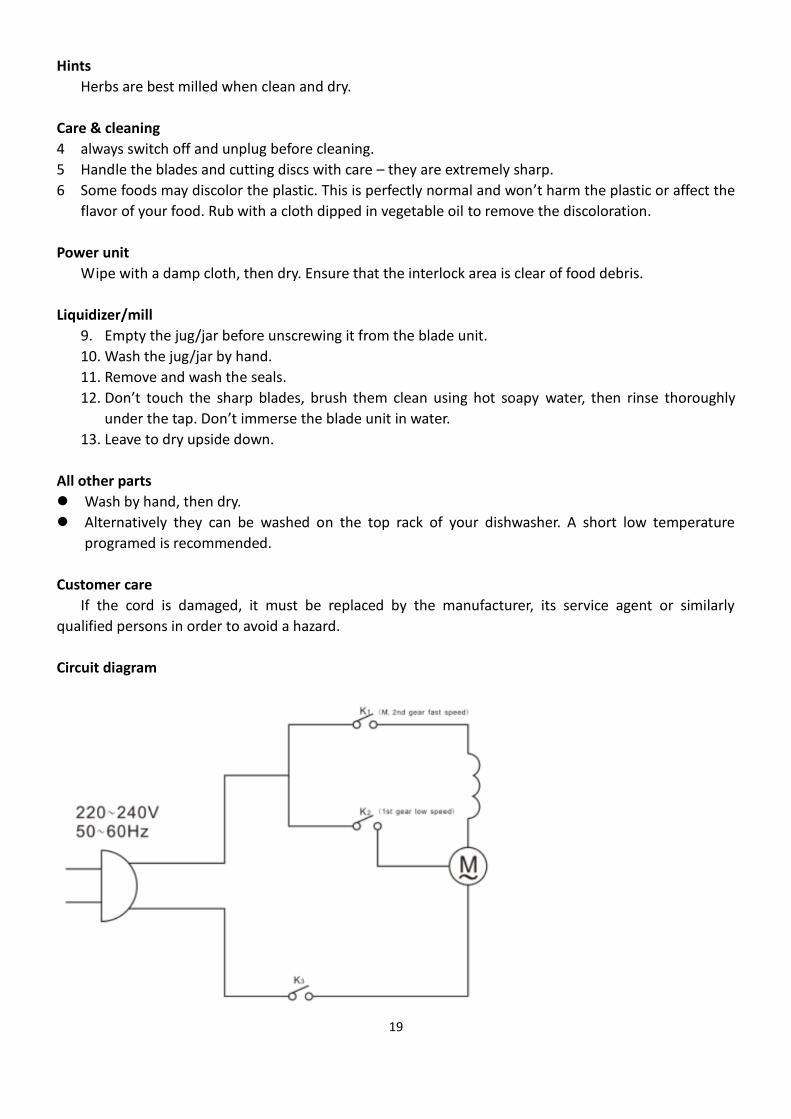
Diagrama circuit

10
ELIMINAREA DESEURILOR IN MOD RESPONSABIL FATA DE MEDIU
Poti ajuta la protejarea mediului!
Va rugam sa respectati regulamentele si legile locale: duceti echipamentele electrice nefunctionale catre un
centru de colectare al echipamentelor electrice uzate.
Importator: Asesoft Distribution
Europolis Logistic Park, Italia Street, 1-7, Chaijna, Ilfov, Romania
Tel: +4021 256 00 86, www.heinner.com, www.asesoftdistribution.ro
11
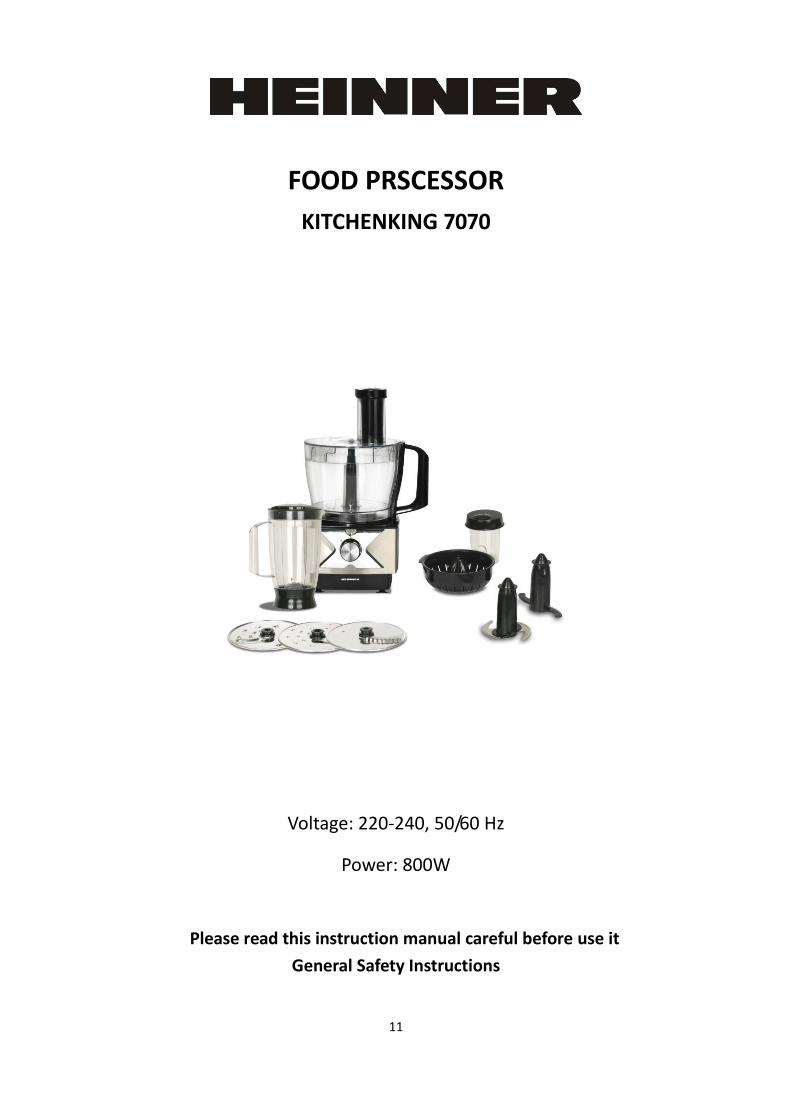
FOOD PRSCESSOR
KITCHENKING 7070
Voltage: 220-240, 50/60 Hz
Power: 800W
Please read this instruction manual careful before use it
General Safety Instructions

12

13
Before using your machine
Read these instructions carefully and retain for future reference.
Remove all packaging and any labels.
Safety
The blades and discs are very sharp, handle with care.
Always hold the knife blade by the finger grip @at the top,
away form the cutting edge, both when handling and cleaning.
Do not lift or carry the processor by the handle – or the handle may break resulting in injury.
Always remove the knife blade before pouring contents from the bowl.
Keep hands and utensils out of the processor bowl and liquidiser jug whilst connected to the power
supply.
Switch off and unplug:
before fitting or removing parts.
after use.
before cleaning.
Never use your fingers to push food down the feed tube. Always use the pusher supplied.
Before removing the lid from the bowl or liquidizer/ mill from the power unit:
Switch off
Wait until the attachment/ blades have completely stopped
Be careful not to unscrew the liquidizer jug or mill from the blade unit.
Allow all liquids to cool to room temperature before placing them in the liquidizer.
Do not use the lid to operate the processor, always use the on/ off speed control.
This machine will be damaged and may cause injury if the interlock mechanism is subjected to
excessive force.
Never use an unauthorized attachment.
Never leave the machine on unattended.
Never use a damaged machine, if break, please get it repaired in the designated maintain place.
Never let the power unit, cord or plug get wet.
Don’t let the wire hang over the edge of a table or worktop or touch hot surfaces.
Do not exceed the maximum capacities stated.
This appliance is not intended for use by persons (including children) with reduced physical, sensory
or mental capabilities, or lack of experience and knowledge, unless they have been given
supervision or instruction concerning use of the appliance by a person responsible for their safety.
Only use the appliance for its intended domestic use.
Before plugging in
Make sure your electiricity supply is the same as the one shown on the underside of
your machene

14
Before using for the first time
1. Remove all packaging. Take care of the knife blades as they are very sharp. These covers should
be discarded as they are to protect the blade during manufacture and transit only.
2. Wash the parts see “cleaning”.
Key
Processor Liquidizer Attachments
1. Power unit 9. Sprinkler lid 16. Knife blade
2. Drive shaft 10. Jar 17. Dough tool
3. Bowl 11. Blending cap 18. Thick slicing/ coarse shredding disc
4. Lid 12. Lid 19. Thin slicing/ fine shredding disc
5. Feed tube 13. Jug 20. Fine (Julienne style) chipper disc
6. Pushers 14. Sealing ring 21. Geared citrus press
7. Safety interlock 15. Blade unit 22. Spatula
8. Speed control
Choosing a speed for all functions
Tool/
Attachment
Function Speed Maximum capacities KB time
Knife Blade Grind meat
Cut vegetables
Make stuffing: cut meat and
vagetables both (need to put
meat first)
2
1-2
2
500g meat
500g meat
30sec
Dough tool Dough making 2 500g flour 280ml
water
60sec
Discs-slicing/
shredding/
chipping
Slicing/ shredding/ chipping
food and vegetables such as as
carrots, cheese
1-2 1200ml 60sec
Mixing
components
Make jam, milk shake, soup 1-2 1200ml 60sec
Citrus Press
components
Citrus fruits juicing 1 1200ml 60sec
Mill
components
For spices, coffee beans etc
milling
2 200g 30sec

15
To use your food processor
1. Fit the detachable shaft onto the power unit.
2. Then fit the bowl. Place the handle towards the back and turn clockwise until it locks.
3. Fit an attachment over the drive shaft.
Always fit the bowl and attachment onto the machine before add ingredients.
4. Fit the lidensuring the top of the drive shaft locates into the center of the lid.
Do not use the lid to operate the processor; always use the on/off control.
5. Switch on and select a speed.
The processor won’t work if the bowl and lid are fitted incorrectly.
Use the pulse (p) for short bursts. The pulse will operate for as long as the control is held in position.
6. Reverse the above procedure to remove the lid, attachments and bowl.
Always switch off before removing the lid.
Important
Your processor is not suitable for crushing or grinding coffee beans, or converting granulated sugar
to caster sugar.
When adding almond essence or flavoring to mixtures avoid contact with the plastic as this may
result in permanent marking.
To use your liquidizer
1. Fit the sealing ring 13 into the blade unit 14 ensuring the seal is located correctly. Leaking will
occur if the seal is damaged or not fitted correctly.
2. Screw the jug onto the blade unit.
3. Put your ingredients into the jug.
4. Pout the blending cap in the lid, then turn.
5. Turn the lid in a clockwise direction to lock onto the jug.
6. Place the liquidizer onto the power unit and turn to lock.
7. Select a speed or use the pulse control.
Allow all liquids to cool to room temperature before placing them in the liquidizer.
Hints
When making mayonnaise, put all the ingredients, except the oil into the liquidizer. The with the
machine running, pour the oil into the lip and let it run through.
Thick mixtures, eg pates and dips, may need scraping down. If it’s difficult to process, add more
liquid.
When crushing ice use the pulse in short bursts.
To ensure the long life of your liquids, never run it for longer than 30 seconds. Switch off as soon as
you’ve got the right consistency.
Don’t process spices – they may damage the plastic.
The machine won’t work if the liquidizer is fitted incorrectly.
Don’t put dry ingredients into the liquidizer before switching on. If necessary, cut them into pieces;
remove the filler cap; then with machine running, drop them through one by one.
Don’t use the liquidizer as a storage container. Keep it empty before and after use.
Never blend more than 1.2 liters – less for frothy liquids like milkshakes.

16
Using the attachment
Knife blade 16 / dough tool 17
The knife blade is the most versatile of all the attachments
The length of the processing time will determine the texture achieved.
For coarser texture use the pulse control.
Use the knife blade for cake and pastry making, chopping raw and
cooked meat, vegetables, nuts, pate, dips, pureeing soups and to also make
crumbs from biscuits and bread. It can also be used for yeasted dough mixes
if the dough tool is not supplied.
Use the dough tool for yeasted mixes.
Hints
Knife blade
Cut food such as meat, bread, vegetables into cubes approximately 2cm/3/4in before processing.
Biscuits should be broken into pieces and added down the feed tube whilst the machine is running.
When making pastry use fat straight from the fridge cut into 2cm/3/4in cubes.
Take care not to over-process.
Dough tool
1. Place the dry ingredients in the bowl and add the liquid down the feed tube whilst the machine is
running. Process until a smooth elastic ball of dough is formed this will take 30-90 secs.
2. Re-knead by hand only. Re–kneading in the bowl is not recommended as it may cause the
processor to become unstable.
Slicing/ shredding discs 18/19/20
1. Reversible slicing/ shredding discs.thick18, thin19
2. Use the shredding side for cheese, carrots, potatoes and foods of a similar texture.
3. Use the slicing side for cheese, carrots, potatoes, cabbage cucumber, courgette,
beetroot and onions.
Fine(julienne style) chipper disc 20
Use to cut: potatoes for julienne style French fries; firm ingredients for salads,
garnishes, casseroles and stir fries (eg carrot, swede, courgette, cucumber).

17
Safety
Never remove the lid until the cutting disc has completely stopped.
Handle the cutting discs with care – they are extremely sharp.
To use the cutting discs
1. Fit the drive shaft and bowl onto the power unit.
2. Holding by the center grip d, place the disc onto the drive shaft with
the appropriate side uppermost (e).
3. Fit the lid.
4. Choose which size feed tube you want to use. The pusher contains
a smaller feed tube for processing individual items or thin ingredients.
To use the small feed tube – first put the large pusher inside the feed tube.
To use the large feed tube – use both pushers together.
5. Put the food in the feed tube.
6. Switch on and push down evenly with the pusher-never put your fingers in the feed Tube.
Hints
Use fresh ingredients.
Don’t cut food too small. Fill the width of the large feed tube fairly full. This prevents the food from
slipping sideways during processing. Alternatively use the small feed tube.
When using the chipper disc, place ingredients horizontally.
When slicing or shredding: food placed upright f comes out shorter than food placed horizontally (g).
There will always be a small amount of waste on the plate or in the bowl after processing.

18
Citrus press 21
Use the citrus press to squeeze the juice from citrus fruits (eg oranges, lemons, limes and
grapefruits).
Cone
Sieve
To use the citrus press
1. Fit the drive shaft and bowl onto the power unit.
2. Fit the sieve into the bowl – ensuring the sieve handle is
licked into position directly over the bowl handle (h).
3. Place the cone over the drive shaft turning until it drops
all the way down (i).
4. Cut the fruit in half. Then switch on and press the fruit onto the cone.
The citrus press will not operate if the sieve is not locked correctly.
Mill
Use the mill for milling herbs, nuts and coffee beans.
blade unit
sealing ring
jar
sprinkler lid
Safety
Never fit the blade unit to your machine without the jar fitted.
Never unscrew the jar while the mill is fitted to your machine.
Don’t touch the sharp blades. Keep the blade unit away from children.
Never remove the mill until the blades have completely stopped.
Important
To ensure long life of your mill, never run for longer than 30 seconds.
Switch off as soon as you’ve got the right consistency.
Don’t process spices – they may damage the plastic.
The machine won’t work if the mill is fitted incorrectly.
Use for dry ingredients only.
To use your mill
1. Put your ingredients into the jar. Fill it no more than half full.
2. Fit the sealing ring into the blade unit.
3. Turn the blade unit upside down. Lower it into the jar, blades down.
4. Screw the blade unit onto the jar until it is finger tight.
5. Place the mill onto the power unit and turn to lock j.
6. Switch on to maximum speed or use the pulse control.
7. After milling, you can replace the blade unit with the sprinkler lid
and shake out your food.
8. The sprinkler lid is not airtight.
19
Hints
Herbs are best milled when clean and dry.
Care & cleaning
4 always switch off and unplug before cleaning.
5 Handle the blades and cutting discs with care – they are extremely sharp.
6 Some foods may discolor the plastic. This is perfectly normal and won’t harm the plastic or affect the
flavor of your food. Rub with a cloth dipped in vegetable oil to remove the discoloration.
Power unit
Wipe with a damp cloth, then dry. Ensure that the interlock area is clear of food debris.
Liquidizer/mill
9. Empty the jug/jar before unscrewing it from the blade unit.
10. Wash the jug/jar by hand.
11. Remove and wash the seals.
12. Don’t touch the sharp blades, brush them clean using hot soapy water, then rinse thoroughly
under the tap. Don’t immerse the blade unit in water.
13. Leave to dry upside down.
All other parts
Wash by hand, then dry.
Alternatively they can be washed on the top rack of your dishwasher. A short low temperature
programed is recommended.
Customer care
If the cord is damaged, it must be replaced by the manufacturer, its service agent or similarly
qualified persons in order to avoid a hazard.
Circuit diagram

20
Environment friendly disposal
You can help protect the environment!
Please remember to respect the local regulations: hand in the non-working electrical equipment’s to an
appropriate waste disposal center.
Importer: Asesoft Ditribution
Europolis Logistic Park, Italia Street, 1-7, Chaijna, Ilfov, Romania
Tel: +4021 256 00 86, www.heinner.com, www.asesoftdistribution.ro

21
КУХНЕНСКИ РОБОТ
KITCHENKING 7070
Захранване: 220-240, 50/60 Hz
Мощност: 800W
Прочетете внимателно настоящите инструкции и ги пазете за последващи консултации
22
23
Преди употреба на уреда
Прочетете внимателно инструкциите и ги запазете за последващи консултции.
Махнете всички опаковки и етикети.
Мерки за безопасност
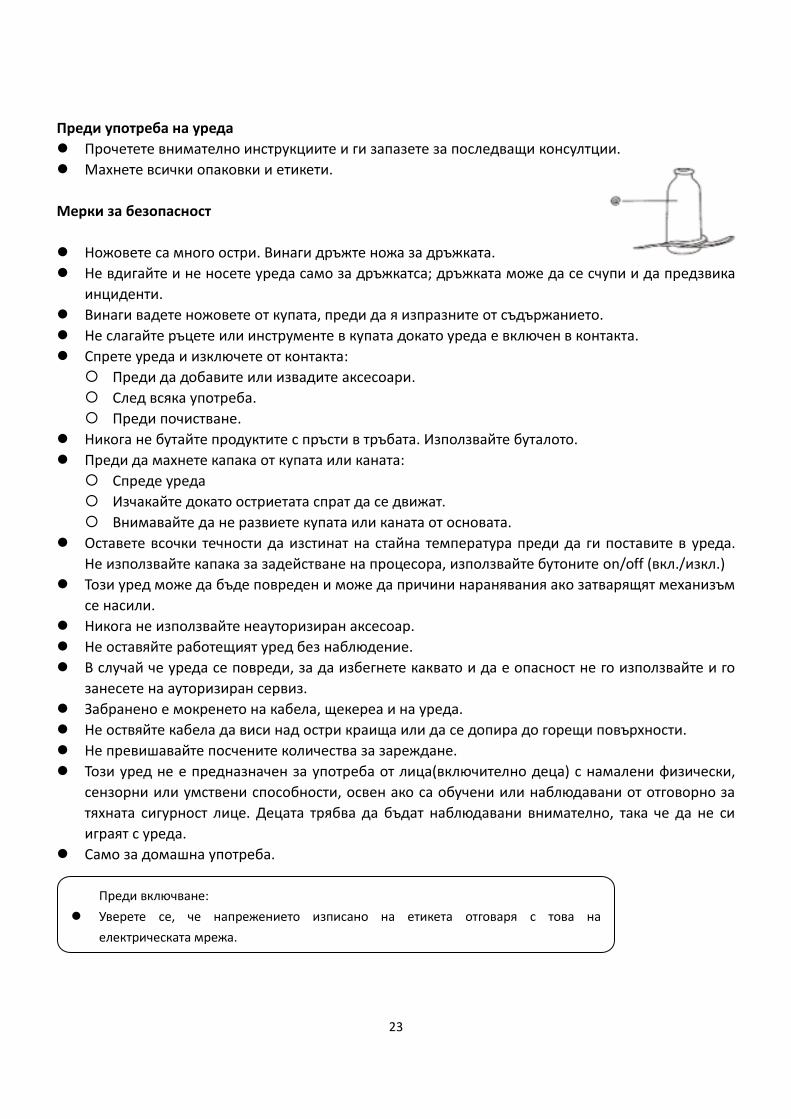
Ножовете са много остри. Винаги дръжте ножа за дръжката.
Не вдигайте и не носете уреда само за дръжкатса; дръжката може да се счупи и да предзвика
инциденти.
Винаги вадете ножовете от купата, преди да я изпразните от съдържанието.
Не слагайте ръцете или инструменте в купата докато уреда е включен в контакта.
Спрете уреда и изключете от контакта:
Преди да добавите или извадите аксесоари.
След всяка употреба.
Преди почистване.
Никога не бутайте продуктите с пръсти в тръбата. Използвайте буталото.
Преди да махнете капака от купата или каната:
Спреде уреда
Изчакайте докато остриетата спрат да се движат.
Внимавайте да не развиете купата или каната от основата.
Оставете всочки течности да изстинат на стайна температура преди да ги поставите в уреда.
Не използвайте капака за задействане на процесора, използвайте бутоните on/off (вкл./изкл.)
Този уред може да бъде повреден и може да причини наранявания ако затварящят механизъм
се насили.
Никога не използвайте неауторизиран аксесоар.
Не оставяйте работещият уред без наблюдение.
В случай че уреда се повреди, за да избегнете каквато и да е опасност не го използвайте и го
занесете на ауторизиран сервиз.
Забранено е мокренето на кабела, щекереа и на уреда.
Не оствяйте кабела да виси над остри краища или да се допира до горещи повърхности.
Не превишавайте посчените количества за зареждане.
Този уред не е предназначен за употреба от лица(включително деца) с намалени физически,
сензорни или умствени способности, освен ако са обучени или наблюдавани от отговорно за
тяхната сигурност лице. Децата трябва да бъдат наблюдавани внимателно, така че да не си
играят с уреда.
Само за домашна употреба.
Преди включване:
Уверете се, че напрежението изписано на етикета отговаря с това на
електрическата мрежа.
24
Преди първата употреба
1. Махнете всички опаковки. Внимание с ножовете, защото са много остри.
2. Почистете съставните части – виж радел „Почистване“
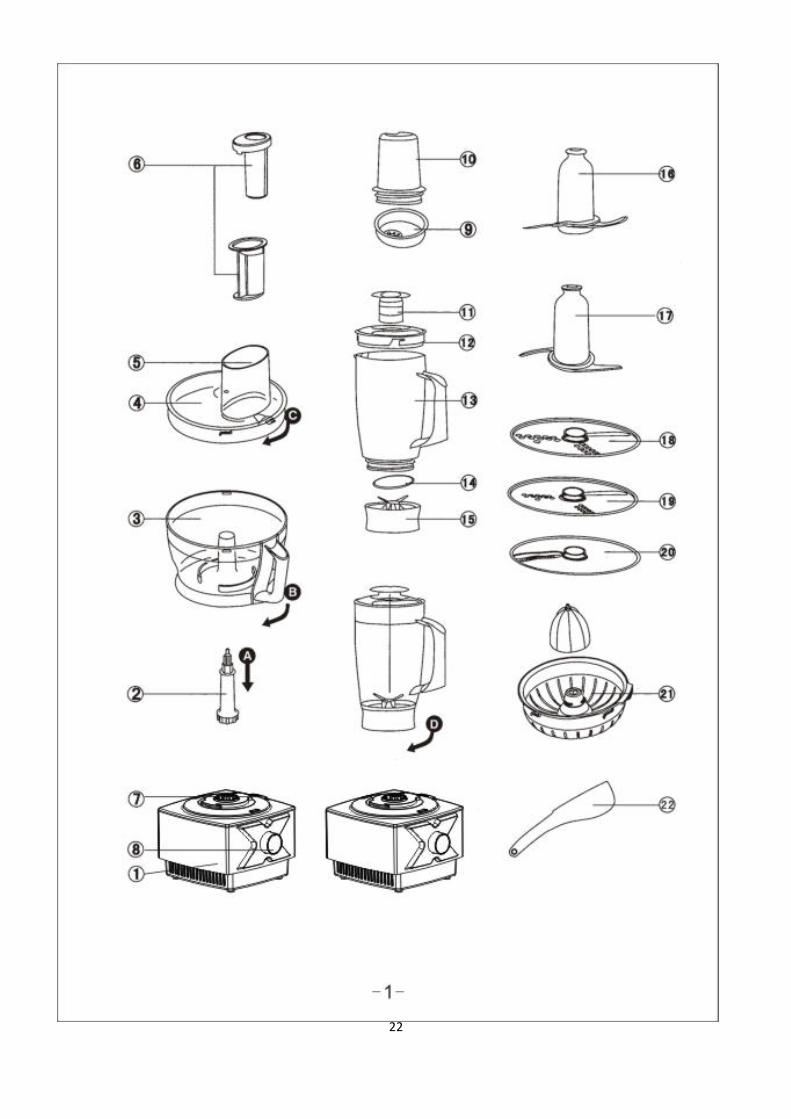
Легенда
Процесор
1. Захранващ блок
2. Централна ос
3. Купа
4. Капак
5. Търба за продуктите
6. Бутала
7. Защитен блокаж
8. Контрол на скоростта
Сокоизстисквачка/блендер
9. Капак ренде
10. Кана
11. Капак разбъркване
12. Капак
13. Купа
14. Гарнитура
15. Режещ блок
Аксесоари
16. Нож
17. Приставка
18. Диск за дебели фелии
19. Диск за тънки фелии
20. Диск за много тънки фелии
21. Сокоизстисквачка
22. Шпатула
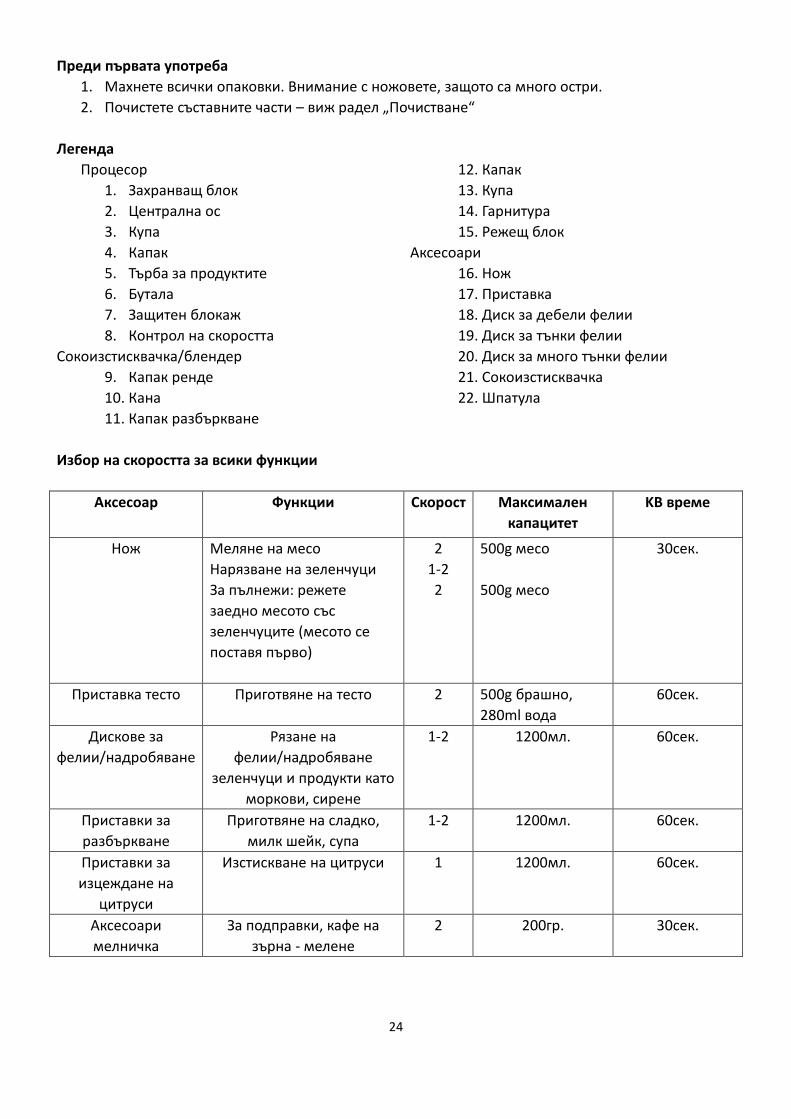
Избор на скоростта за всики функции
Аксесоар Функции Скорост Максимален
капацитет
KB време
Нож Меляне на месо
Нарязване на зеленчуци
За пълнежи: режете
заедно месото със
зеленчуците (месото се
поставя първо)
2
1-2
2
500g месо
500g месо
30сек.
Приставка тесто Приготвяне на тесто 2 500g брашно,
280ml вода
60сек.
Дискове за
фелии/надробяване
Рязане на
фелии/надробяване
зеленчуци и продукти като
моркови, сирене
1-2 1200мл. 60сек.
Приставки за
разбъркване
Приготвяне на сладко,
милк шейк, супа
1-2 1200мл. 60сек.
Приставки за
изцеждане на
цитруси
Изстискване на цитруси 1 1200мл. 60сек.
Аксесоари
мелничка
За подправки, кафе на
зърна - мелене
2 200гр. 30сек.
25
За употреба на процесора
1. Поставете оста в централното звено .
2. Закрепете купата. Сложете дръжката отзад и завъртете в посока на часовниковата
стрелка.
3. Сложете един аксесоар на оста.
Винаги закрепяйте купата и аксесоарите за основната част преди да добавите продуктите.
Сложете капака , уверете се че върха на оста е поставен в центъра на капака. Не използвайте
капака за задвижване на уреда. Използвайте бутона on/off (вкл./изкл).
6 Включете уреда и изберете скорост.
Уреда няма да работи ако купата или капака не са закрепени правилно.
Използвайте опцията „пулс“ за кратки интервали. Пулсацията ще продължи токолва колкото
бутона се задържи включен.
За да извадите капака, купата и аксесоарите трябва да изпълните по-горните операции в
обратен ред.
Винаги изключвайте уреда преди да махнете капака.
Важно
Този процес не е предназначен за надробяване на кафени зърна или за преработването на
захар в пудра захар.
При добавяне на есенции за овкусяване на смесите, избягвайте контакта с пластмасата, тъй
като ще стане на петна.
За използване на блендера/сокоизстисквачката
Закрепете уплътнителя (13) в частта на ножовете (14), уверявайки се, че са поставени правилно. В
противен случай, течностите ще изтекат.
Завийте каната за частта на ножовете.
1. Поставете продуктите в каната.
2. Затегнете капака за разбъркване в капака и завъртете.
3. Завъртете капака в посока на часовниковата стрелка, за да ги закрепите за купата.
4. Сложете блендера на централната част и завъртете за да го фиксирате.
5. Изберете скорост или използвайте пулс бутна.
Оставете течностите на стайна температура преди да ги поставите в блендера.
Съвети
За приготвяне на майонеза, сложете всички съставки в блендера с изкл;ючение на олиото.
Смеси с по-гъста консистеция, като например пастети, сосове, могат са се втвърдят. Можете да
добавите повече вода.
При раздробяване на леда използвайте пул бутона.
За да удължите живота на блендера, не го оставяйте да работи без прекъсване повече от 30
секунди. Спрете уреда веднага следп олучаване на желаната консистенттност.
Не обработвайте подправки – могат да повредят пластмасата.
Уреда няма да работи ако блендера не е закрепен правилно.
Не слагайте сухи продукти преди да пуснете блендера. Ако е необходимо, нарежете ги на
дребни парченца, махнете капака докато работи блендера и ги поставете по едно, докато
функцонира блендера.
Не използвайте блендера за съхранение на вещи. Дръжте блендера празен преди и след
употреба.
26
Не миксирайте повече от 1,2 литра – и по-малко за по-гъсти течности като милк шейкове.
Употреба на приставките
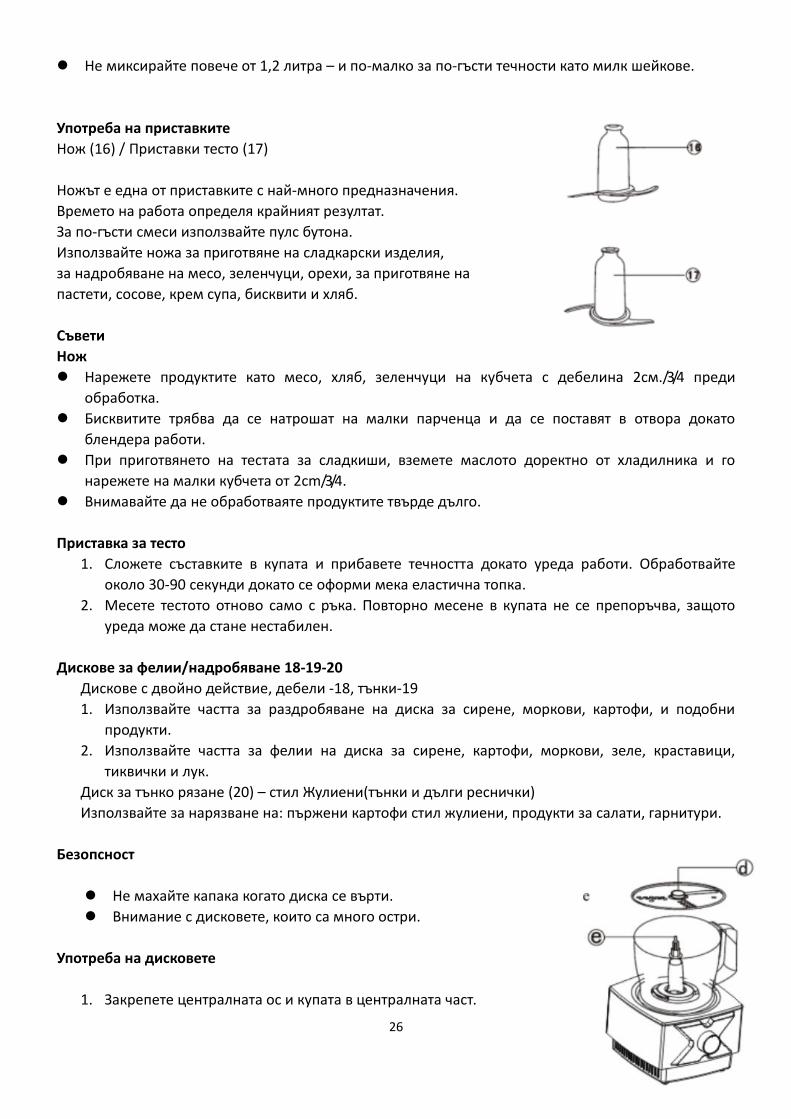
Нож (16) / Приставки тесто (17)
Ножът е една от приставките с най-много предназначения.
Времето на работа определя крайният резултат.
За по-гъсти смеси използвайте пулс бутона.
Използвайте ножа за приготвяне на сладкарски изделия,
за надробяване на месо, зеленчуци, орехи, за приготвяне на
пастети, сосове, крем супа, бисквити и хляб.
Съвети
Нож
Нарежете продуктите като месо, хляб, зеленчуци на кубчета с дебелина 2см./3/4 преди
обработка.
Бисквитите трябва да се натрошат на малки парченца и да се поставят в отвора докато
блендера работи.
При приготвянето на тестата за сладкиши, вземете маслото доректно от хладилника и го
нарежете на малки кубчета от 2cm/3/4.
Внимавайте да не обработваяте продуктите твърде дълго.
Приставка за тесто
1. Сложете съставките в купата и прибавете течността докато уреда работи. Обработвайте
около 30-90 секунди докато се оформи мека еластична топка.
2. Месете тестото отново само с ръка. Повторно месене в купата не се препоръчва, защото
уреда може да стане нестабилен.
Дискове за фелии/надробяване 18-19-20
Дискове с двойно действие, дебели -18, тънки-19
1. Използвайте частта за раздробяване на диска за сирене, моркови, картофи, и подобни
продукти.
2. Използвайте частта за фелии на диска за сирене, картофи, моркови, зеле, краставици,
тиквички и лук.
Диск за тънко рязане (20) – стил Жулиени(тънки и дълги реснички)
Използвайте за нарязване на: пържени картофи стил жулиени, продукти за салати, гарнитури.
Безопсност
Не махайте капака когато диска се върти.
Внимание с дисковете, които са много остри.
Употреба на дисковете
1. Закрепете централната ос и купата в централната част.

27
2. Поставете диска с желаната страна нагоре държейки ги в центъра.
3. Закрепете капака.
4. Изберете тръбата за въвеждане на продуктите.
5. Буталото има отвор за въвеждане на по-тънките продукти.
6. За да използвате по-малката тръба, първо трябва да сложите по-голямото бутало в отвора
за продуктите.
7. За да използвате по-голямата подаваща тръба, използвайте двете устройства заедно.
8. Сложете продуктите в тръбата.
9. Включете уреда и натискайте равномерно с буталото, не пъхайте пръстите в тръбата за
продукти!
Съвети
Използвайте свежи продукти.
Не режете твърде на дребно продуктите. Напълнете широката тръба за продукти до горе.
Използвайте алтернативно малката тръба.
При употреба на диска за кълцане, сложете продуктите в хоризонтално положение.
При рязане на фелии или надробяване: продктите които са оставени във вертикално
положение (f) се надробяват по-добре от тези които са поставени в хоризонтално положение (g).
След работа, винаги има остатъци в купата.
Сокоизстисквачка за цитруси (21)
Използвайте сокоизстисквачката за цитруси за изцеждане на сок от цитрусови плодове
(портокали, лимони, грейпфрут, лайм, т.н.)
Конус
Цедка
Употреба на сокоизстисквачката
1. Закрепете централната ос и купата за централната част.
28
2. Закрепете цедката за купата – дръжката на цедката трябва да бъде
закрепена точно над дръжката на купата (h).
3. Сложете конуса над оста, завъртете надолу (i).
4. Нарежете плодовете на половинки. Включете уреда и натиснете плода върху конуса.
5. Сокоизстисквачката няма да работи ако цедката не е закрепена добре.
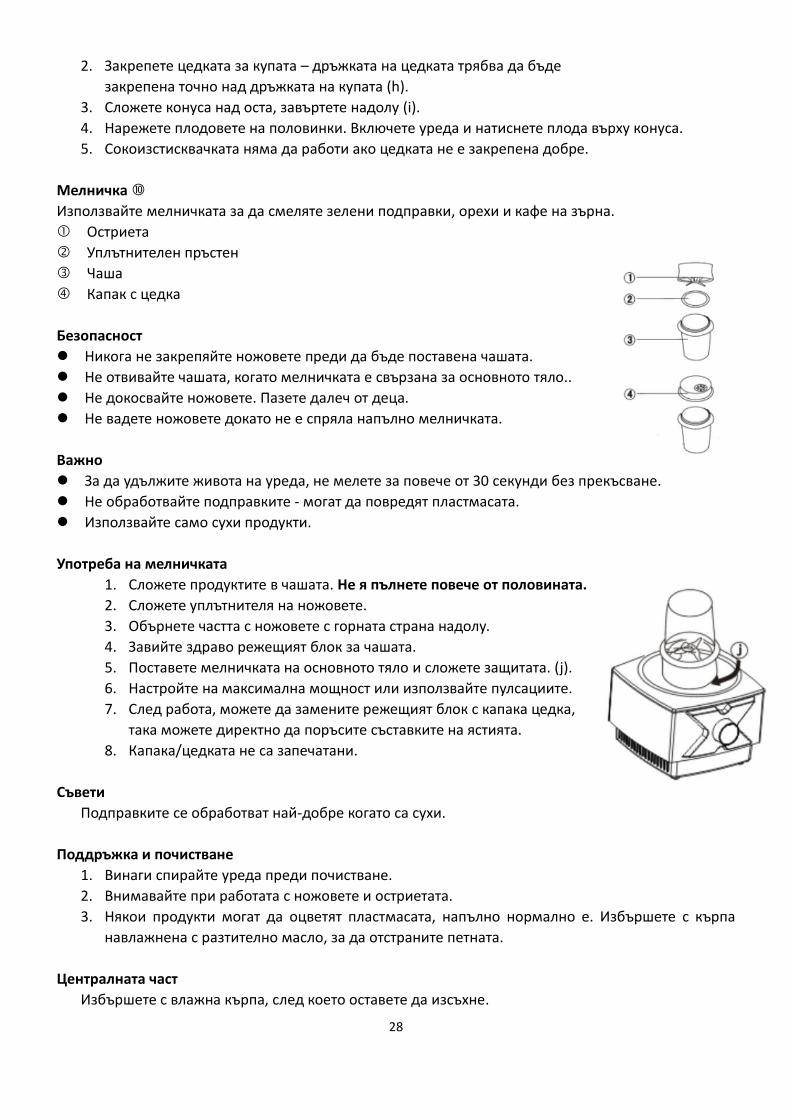
Мелничка
Използвайте мелничката за да смеляте зелени подправки, орехи и кафе на зърна.
Остриета
Уплътнителен пръстен
Чаша
Капак с цедка
Безопасност
Никога не закрепяйте ножовете преди да бъде поставена чашата.
Не отвивайте чашата, когато мелничката е свързана за основното тяло..
Не докосвайте ножовете. Пазете далеч от деца.
Не вадете ножовете докато не е спряла напълно мелничката.
Важно
За да удължите живота на уреда, не мелете за повече от 30 секунди без прекъсване.
Не обработвайте подправките - могат да повредят пластмасата.
Използвайте само сухи продукти.
Употреба на мелничката
1. Сложете продуктите в чашата. Не я пълнете повече от половината.
2. Сложете уплътнителя на ножовете.
3. Обърнете частта с ножовете с горната страна надолу.
4. Завийте здраво режещият блок за чашата.
5. Поставете мелничката на основното тяло и сложете защитата. (j).
6. Настройте на максимална мощност или използвайте пулсациите.
7. След работа, можете да замените режещият блок с капака цедка,
така можете директно да поръсите съставките на ястията.
8. Капака/цедката не са запечатани.
Съвети
Подправките се обработват най-добре когато са сухи.
Поддръжка и почистване
1. Винаги спирайте уреда преди почистване.
2. Внимавайте при работата с ножовете и остриетата.
3. Някои продукти могат да оцветят пластмасата, напълно нормално е. Избършете с кърпа
навлажнена с разтително масло, за да отстраните петната.
Централната част
Избършете с влажна кърпа, след което оставете да изсъхне.
29
Блендер/мелничка
1. Изпразнете чашата/купата преди да я отвиете от оста с остриетата.
2. Измийте ръчно чашата/купата.
3. Извадете и измиите уплътнителите.
4. Не докосвайте остриетата, мийте ги с гореща вода и препарат и изплакнете под течаща
вода. Не потапяйте под вода частта с остриетата.
5. Оставете да изсъхне.
Другите части
Измиите на ръка, след което оставете да изсъхне.
Могат да бъдат мити, от време на време, на горният ред на миялната машина. Препоръчва се
кратка програма за миене на ниска температура.
Сервиз
Ако се повреди кабела, той трябва да се подмени от производителя или от ауторизиран сервиз,
за да се избегнат инциденти.
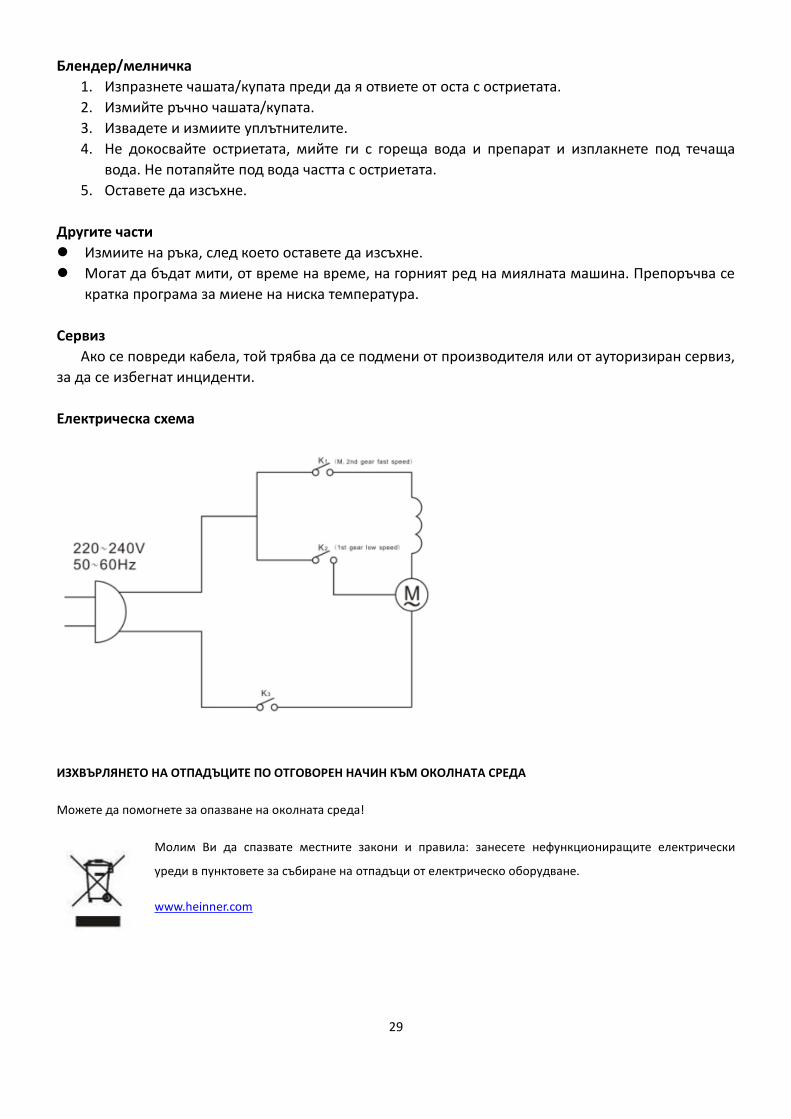
Електрическа схема
ИЗХВЪРЛЯНЕТО НА ОТПАДЪЦИТЕ ПО ОТГОВОРЕН НАЧИН КЪМ ОКОЛНАТА СРЕДА
Можете да помогнете за опазване на околната среда!
Молим Ви да спазвате местните закони и правила: занесете нефункциониращите електрически
уреди в пунктовете за събиране на отпадъци от електрическо оборудване.
www.heinner.com

30